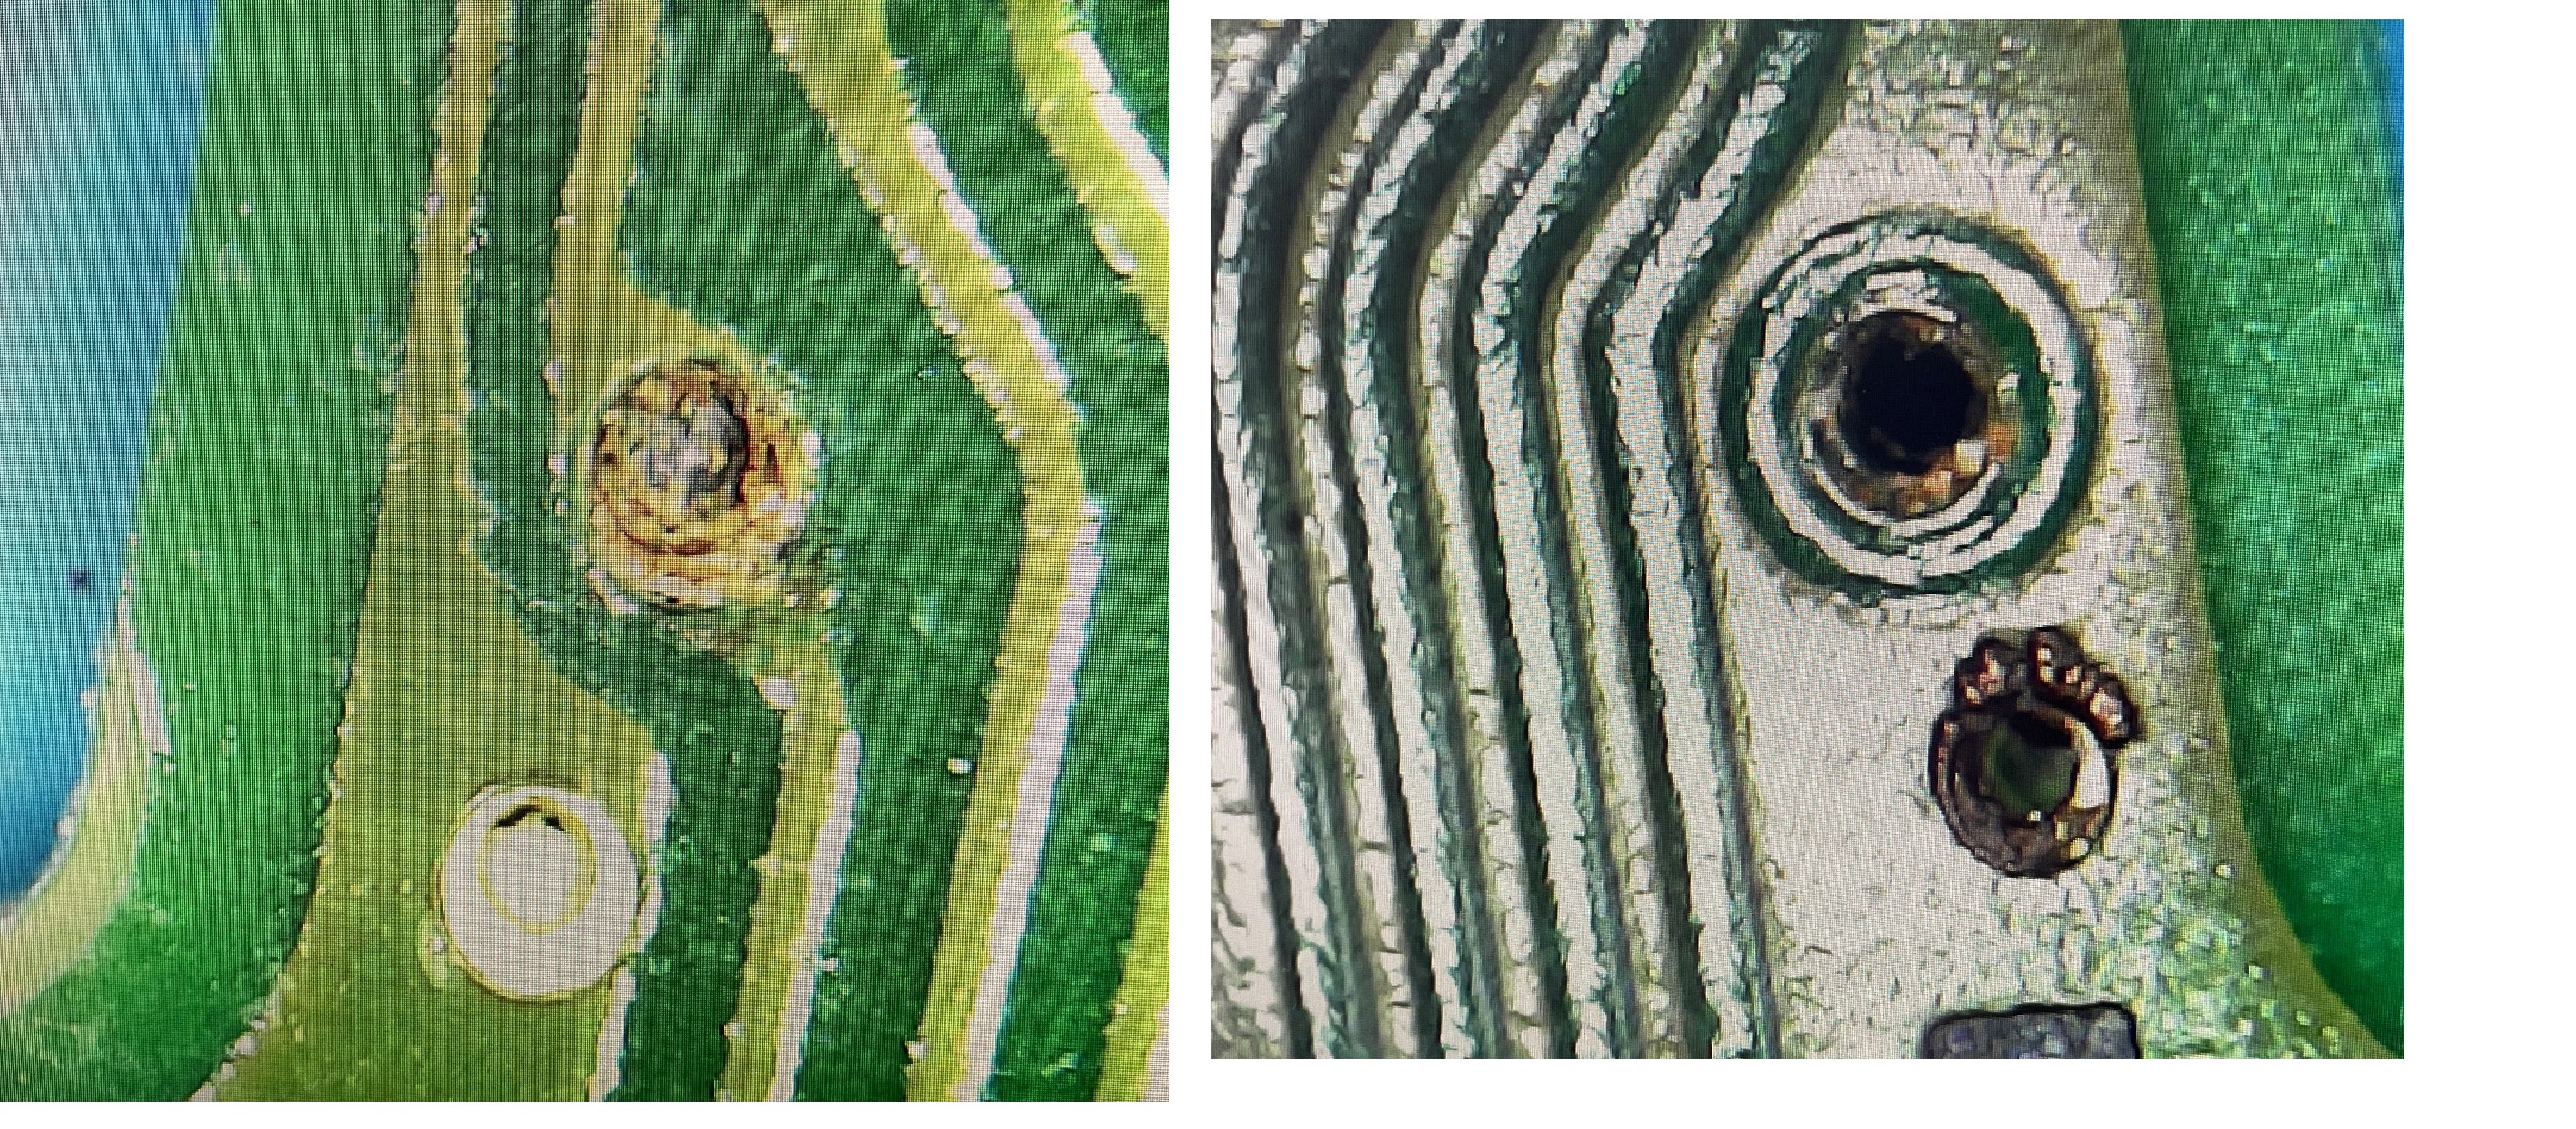
In my case, it looks very like the pictures posted where clearly some water has got in. There is one via that that clearly corroded completely, though there is one next to it that joins the same points. There is one that looks… not great, but it joins under the chip so can’t directly test it. Will have to go round and do some diode tests as you suggest.
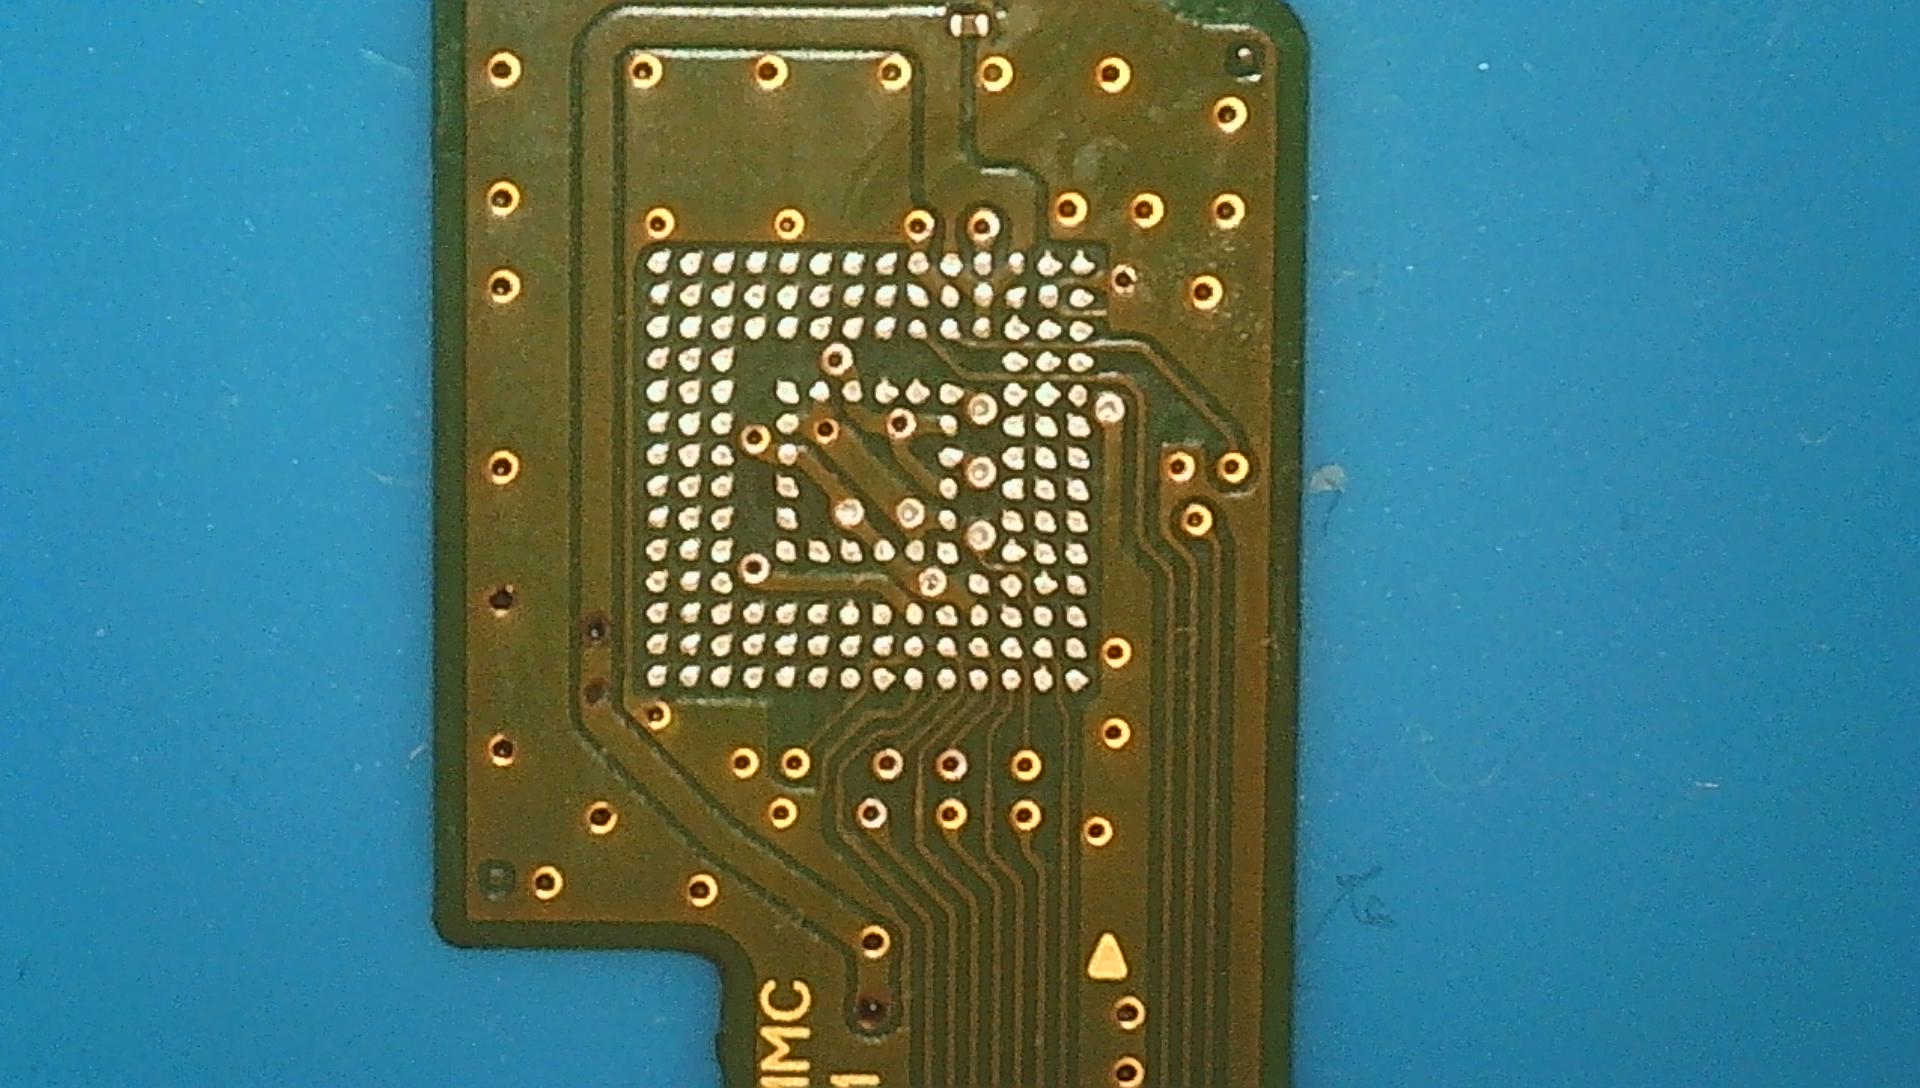
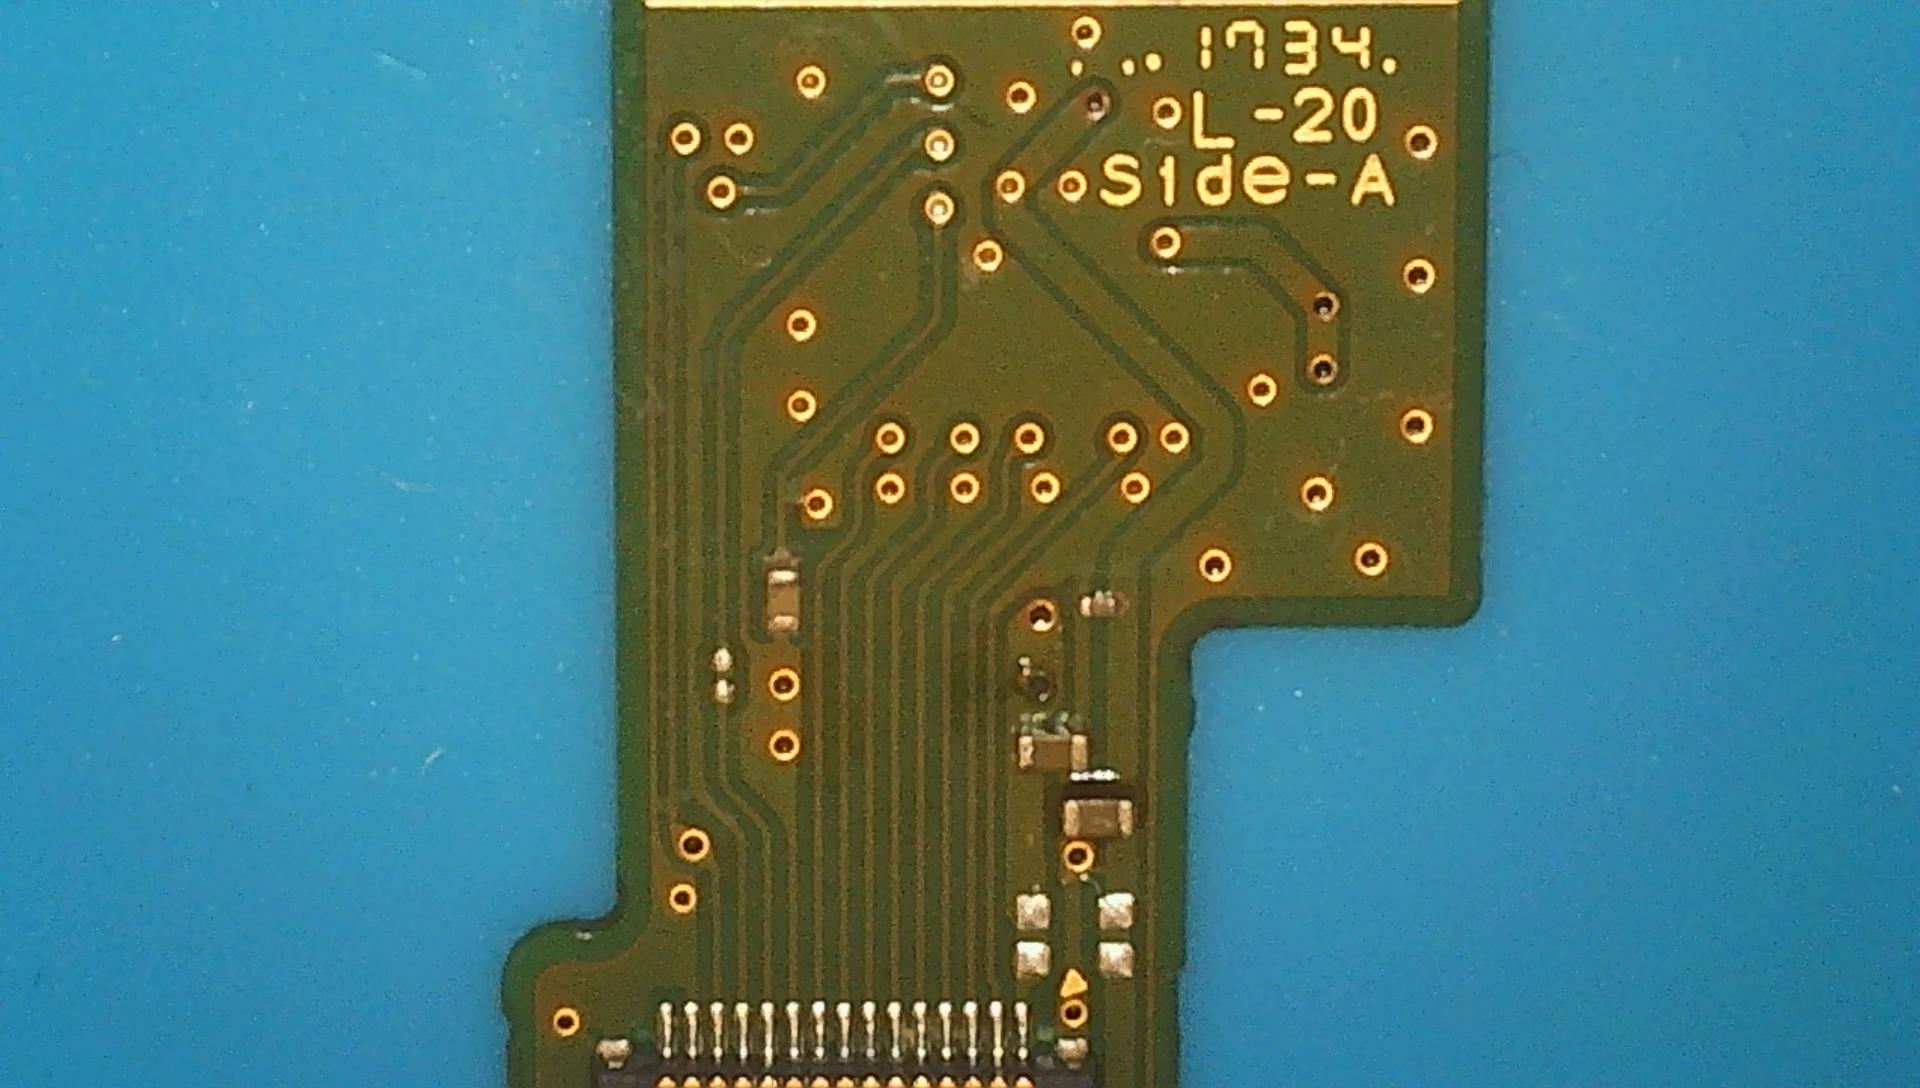
I did in fact find some points that were OL when they shouldn’t be. But without a picture from under the chip I wasn’t sure how I would progress other than removing it. So thats what I did. Turns out I probably could have run a jumper in my case, as the via that has failed, while under the chip, did have some common points I could have used on the other side. Annoying, but at least I have pictures now. Hope these help tomoten:
I will now go about reballing the chip as best as I can, and seeing if I can get it reading.
I think at this point, I may put it back on the same board with vias fixed up, and then copy over to a spare, rather than using this one long term.
1 Like
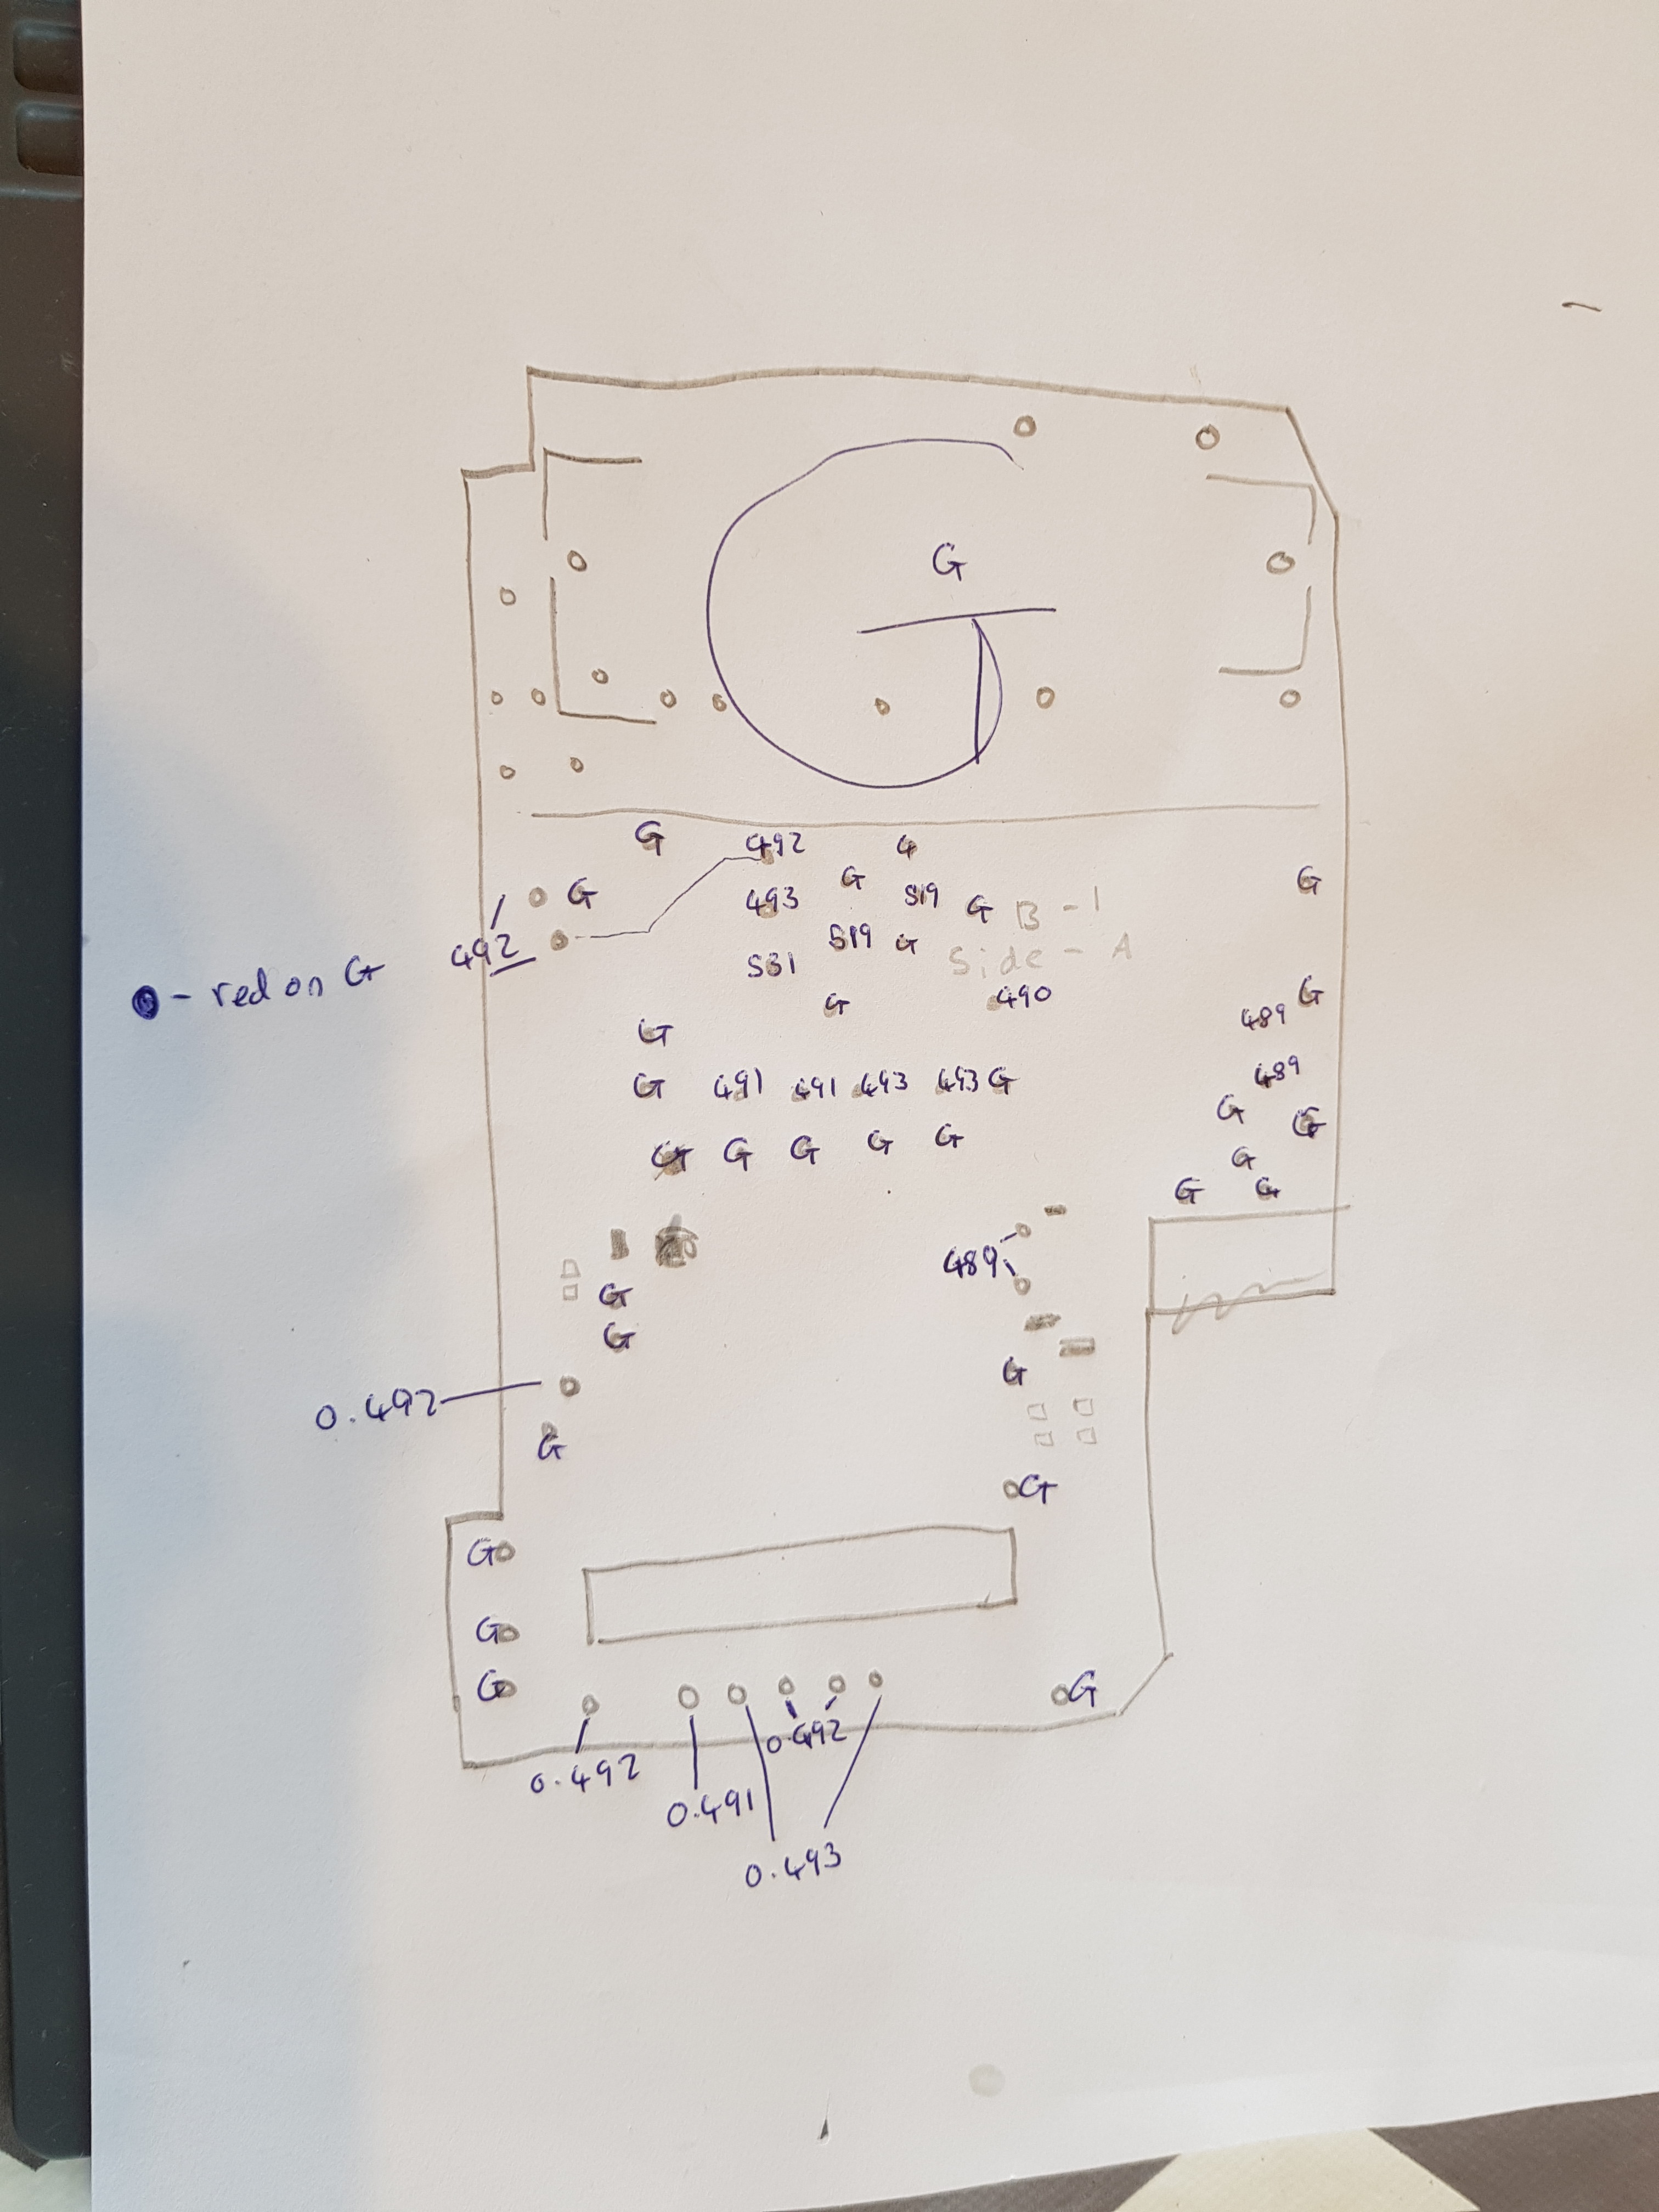
Oh! And if you don’t have a second board to test for readings, here’s a terrible drawing I did while testing mine.
1 Like


Did you get this reading with a emmc reader or you plug in the switch into the PC ?
Yes, that puts is from a PC. Previously the SD adapter would be detected but show no partitions. On the switch itself I now get the Nintendo logo and the the battery logo, so I think it is working, just need to charge it now. Though my plan will be to back up and copy over to a different drive.
Severence, Insomniac
Thank you.
If eMMC has defect, how does change value of voltage?
I measured eMMC board refer to Insomniac’s nice drawing. However, the values of reading were different.
Example,
Insomniac’s drawing
0.497
my eMMC
0.732
Insomniac’s drawing
0.531
my eMMC
0.241
I’m confused…
Were you putting the Red probe on ground (G in the picture?)
Insomniac
I put the red probe to ground(the big “G” area which is draw in your drawing) and the black probe to the measurement point.
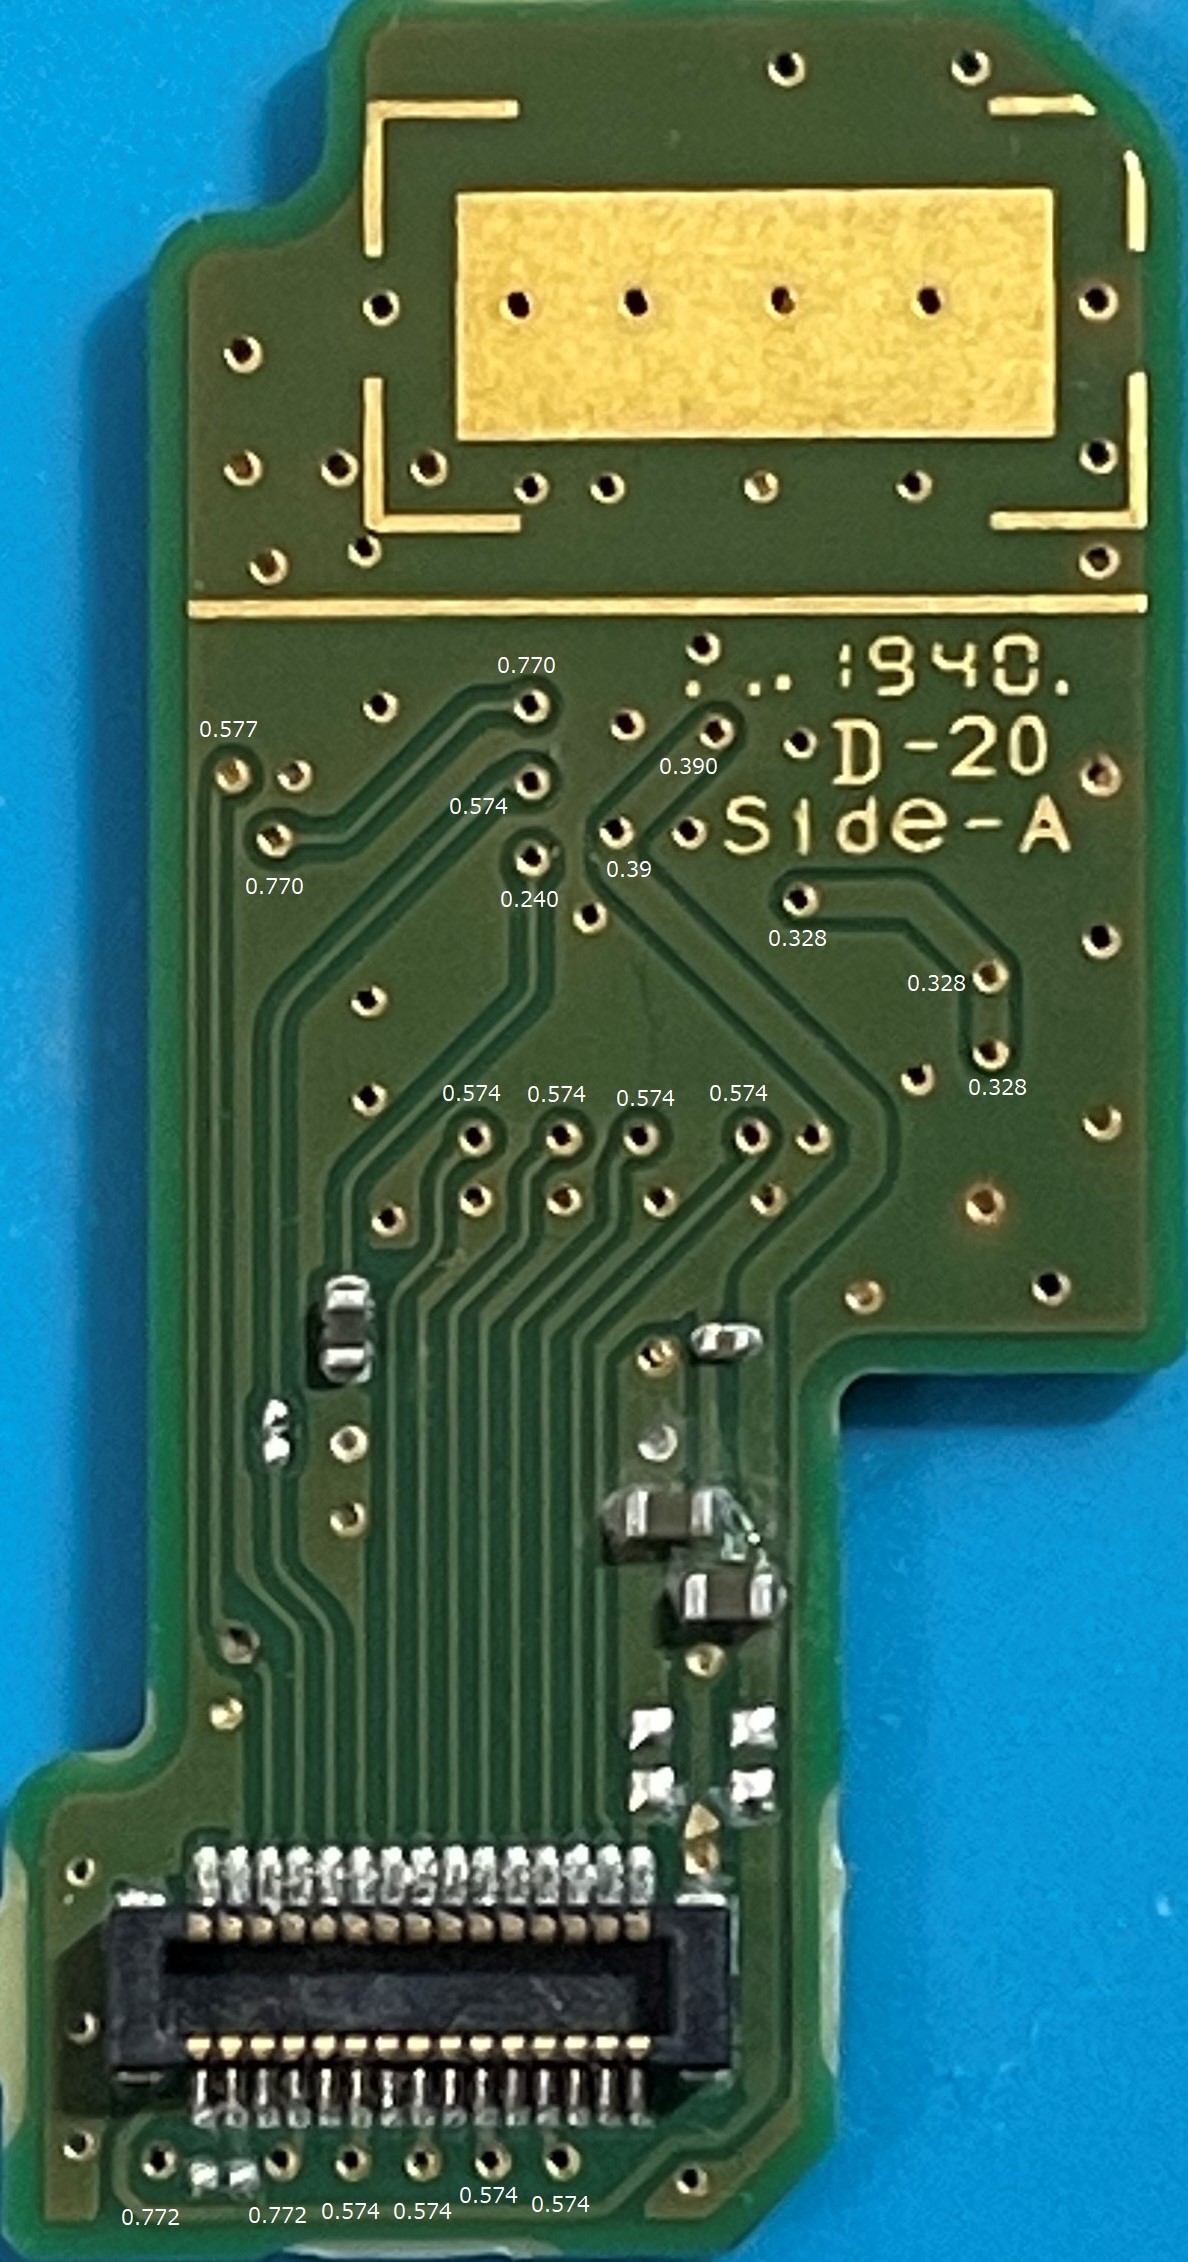
Ok, maybe it’s best to update one of the pictures with all your readings so we can compare fully?
Also, take those same readings on a known good EMMC module and see how this compares to your results on your bad EMMC board, as it’s entirely possible your meter has a higher/lower forward voltage on it’s diode mode which is skewing your results as compared to Insomniac’s.
This is one of the reasons I tend to avoid in circuit diode mode readings and tend to opt for resistance.
Also check who the EMMC IC manufacturer is, as this could also have an impact.
At the same time though, this could well be indicating a fault, or maybe there is liquid/corrosion under the IC which is skewing your readings.
You need to compare your readings to a known good EMMC module to validate your meter readings, else nobody will know if your readings are good/bad
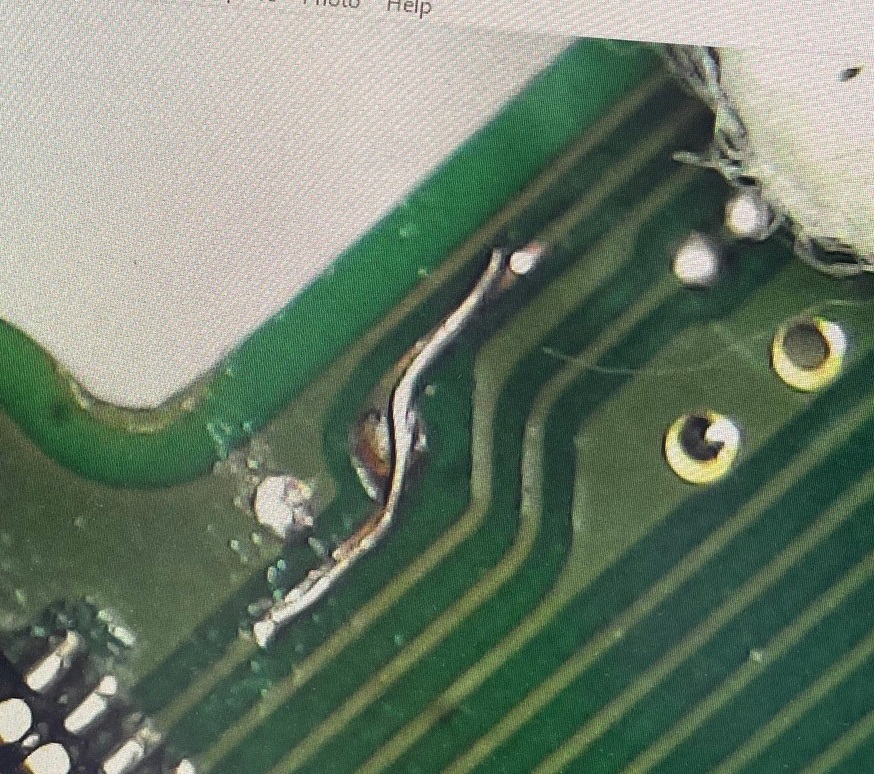
Maybe it’'s the light playing tricks but the Connector, top row, third pin from the left, VIA and tace coming off it looks broken, you’ll likely have to jump it and if there is another needed trace on the other side, thread a wire through. Several more like this which I think I can see from your previous pictures, take the measurments from the connector directly instead.
Severence
Thank you for advised me.
I used micro scope to check Vias which is your advise.
I confirmed broken Vias and no continuity from the connector, top row, third pin to damaged Vias and next Vias.
Is this damage heat damage or corrosion?
I had spare eMMC board. To switch IC to spare board is easier and faster trouble shooting?
However, I have no experienced reball IC. Now I’m studying reball at youtube.
I orderd stencil as precaution.
No worries man ![]()
I would imagine corrosion was the cause, and would guess some amount of lquid got under the EMMC IC itself.
I wouldn’t recommend this as your first reball experience tbh and would instead opt to repair any damaged trace first… but, prior to plugging in and applying power first confirming your prior readings on a known good EMMC module if you have one? so we can verify if your previous diode mode reading were good.
I would still go ahead and flux boil the IC to help aid liquid/corrosion removal below the IC (if there is any) and then give the module an IPA bath, then take those same measurments again and see if anythings changed.
If all tests well and you’ve fixxed all broken traces etc then I would plug it into your unpatched board and in Hekate back it all up straight away (if it works)
afaict (and I could be wrong) the via coming from the third pin from the left, the Via doesn’t seem to go anywhere, so just scratch back the solder mask and jump the break in the trace.
I notice in you picture you dont have anything on the vias coming from the top right pin, when they should connect to the ones higher up on the right.
I did it!!!
I jumped the damaged a via and then I could read eMMC data using HETAKE.
but,
Console boot with blue screen…OMG!
I have never be able to repaired the blue screen console…
I already backup eMMC data and rewrite eMMC data from backup with no error. I feel like that the eMMC was not caused the blue screen.
Did you double check the area I pointed out?
I think based on his read/write in Hekate, the EMMC seems probably ok at this point.
That being said,
Store this backup up in a safe place on your computer incasthe IC spontaneously decides to fail.
Nice work man ![]()
As the console was liquid damaged, this could be a few things.
Either it’s corruption of the EMMC partitions, which tbh there’s not not much you can do about without the keys (which you need a modchip to recover on patched/Mariko) you could regen boot 0/1 partitions (as they’re not encrypted) but from memory these wouldn’t cause BSOD, from memory it’s typically corruption of the BCPKG partitions which cause the blue blue screen, if that is the issue.
next option is Ram, inspect the area, if there was signs of liquid below give it a flux boil, if still nothing reflow.
Fuel gauge, check for liquid/corrosion and chips and cracks to this IC, all of which can cause BSOD,
Check the main PMIC for liquid/corrosion, same as above.