I bought a used switch on a whim. Visually perfect but of course without function. I disassembled it a bit and checked whether the stage 1 boot runs through (checked for the usual short circuits beforehand, nothing). It does indeed run, eMMC also had 1.8V present.
It is a v1 unpatched. RCM then worked when I disconnected the battery briefly and then reconnected it. I made a backup and saved the keys. Then I rebuilt the firmware and restored it. Unfortunately, the switch still didn’t boot and so I first carried out a firmware update. This went through but unfortunately the switch did not boot afterwards (the assumption was a firmware downgrade and the fuses, I would prefer the switch to just run normally anyway).
Then I completely rebuilt the NAND again, with the donor NAND image and my keys and then reloaded it as before, but that didn’t work either. The switch also behaves differently from time to time, sometimes I can boot AMS, sometimes not, sometimes the OFW also works. It almost seems to me (without direct evidence) that the NAND is somehow broken / corrupt. Although it does benchmark and everything else well. But the longer the use, the less it works at the end of the day. After rebuilding it does work 1-2 times and then it starts to fall apart again.
Is there anything hardware-related that could explain this behaviour? Or is this already a hint in the direction of the eMMC module and I should order a “new” one on ebay and then set it up with my backup + keys. I would like to avoid this if there is something else beforehand.
I always get a bit concerned when i see references such as this as it implies your using retrosix wiki guide… not to be mean to the author (the heart is in the right place) but to put it bluntly the guide is dumb af and promotes dangerous diagnostic techniques (which could cause permanent damage), pointless ones, incorrect terminology (for example " If your VSYS did not pull a short" ) poor choice of terms for rails, for example “VSYS” is a terrible term to use for the rail which the BQ IC generates (even though this is how the BQ IC defines it) about another x20 IC’s also use this term for completely unrelated I/O and they are, or can be completely different in voltage (which could lead to disastrous consequences if the user doesn’t know this) - I hope the author stumbles across this post at some point and fixes his guide, it’s shocking quite honestly and has probably destroyed more Switch consoles than it’s saved anyway,
I’m a bit confused on this, does the Switch boot or no? I’m going to assume I’m misinterpreting the above and assume no and it’s a black screen throughout.
What does this tell you? I ask because there is two rails for the EMMC.
I’m not sure what you mean by this, do you mean you weren’t seeing the console in RCM state (in TegraRCMGUI) until you disconnected the battery and reconnected it? if yes then you have an issue here. I guess you using a Jig to get it into this state or?
Again, need clarification, if it doesn’t boot and has a black screen how are you doing a firmware update? do you mean your generateing newer OS/FW files elsewhere (or you are capable of booting into some homebrew/CFW which can do it?) and then writing them to the EMMC?
Ok, confusion again, this implies it did boot prior and now doesn’t boot, again you need to clarify (try making it clear as to your definition of “boot” also, ie: boots to Hekate, boots to OS, no boot at all, shows boot logo but doesn’t enter OS, only boots CFW and not stock OS etc etc )
Ok so now this is different to what you just mentioned prior. So it does infact boot both Atmosphere (that’s what you mean right) and stock OS but it’s intermittent, now I understand
It’s not impossible I suppose. Transfer the data to another module and see if the problem persists
What you mentioned with the EMMC module is possible. The fuel gauge, Ram, SoC would also candidates which could also cause the symptoms your seeing (intermittent boot)
I started to deal with the topic this weekend and therefore I simply lack a lot of knowledge
Just right. That’s one of the things I looked at. My background is more software, but I also build circuit boards and assemble them myself. The approach was quite logical and comprehensible to me. Terminology aside.
Okay, sorry for the confusion. It’s not my mother tongue.
It only starts when it is in RCM mode and I inject the payload.
This is another indication that the 1.8v voltage regulator is working correctly. Of course, my information is limited. And I also don’t know all the test points or even have a schematic. But based on the information available, I decided to go further in the direction of RCM.
The console was on “somehow” in an undefined status. After I disconnected the battery and then reconnected it, the console was definitely off. Then I used the jig and VOL+ to switch to RCM mode.
But that was also a learning process. Maybe that is also a problem. I don’t have any reference experience here, so I don’t know if this is normal with this problem or if it already indicates something.
Okay, when I say boot I mean boot up without any modifications like RCM. Just the normal operating system.
In the RCM I was able to dump the firmware and rebuild it together with the prod.keys. Then I restored it via system restore and wiped sysmmc. Afterwards I could boot from the boot loader into the stock firmware (I call this OFW). And that also worked. I then set up the switch and carried out the firmware update. But when I rebooted for the first time, the screen went black again.
Exactly. Until the first reboot, everything actually works as expected. Without RCM, the console never boots. From RCM, Atmosphere boots and sometimes also the OFW. However, the more often I reboot or the more often the console goes into the aforementioned undefined state, the less it works and after 2-3 reboots I can start neither Atmosphere nor OFW.
If I rebuild the NAND, everything works again until the first reboot. And so on.
I’ll probably start now, removing the module is definitely easier than replacing any components
So there is no evidence of a permanently deteriorating system? I plugged in a game earlier the first time and it worked straight away. Even in OFW. In my opinion (limited knowledge ), the console works flawlessly. At least the first time till i reboot.
Right it’s comprehensible, but trust me man, it’s mostly wrong almost to the point of shear stupidity (again not trying to be mean to the author but… he calls it a wiki but gives no ability to actually correct his bad info and then doesn’t even leave comment boxes so you could even attempt to highlight a problem - I mean in some posts he’s using my very own terminology from this very forum, so I know he visits here, so he’s welcome to send me a PM and I’ll tell him where his guide is wrong, which unfortunately is most of it) - For example, “let’s identify if something is shorted by “injecting” voltage at xyx” so so so dumb, maybe he boils his water in the oven, and makes toast by resting a 240V mains power line on his bread Anyway I digress but the frustration is real, I’ve had batches of boards in recent memory where I was wondering why the USB port was covered in disgusting solder blobs and the USB plasic was all charred even when there was no indicators of the USB ever being swapped, and numerous people here showing photos of the very same (which makes me wonder if the death in their cases was more down to the following of this “guide”)
Ah I see, is that because autoRCM is enabled in Hekate? Or because of a possible update fuse mismatch scenario?
Hmm kindof, this goes back to that guide being pretty bad
We’ll come back to this one later once you’ve confirmed the previous
Ah I see
I see, yeah it does have the vibes of a dodgy EMMC IC - I wonder if you can mount it over USB from Hekate and ue some PC software on it to check for R/W errors and the like just to doubly verify this. (though just to note these tests are typically destructive but it sounds like you have the files to write back to it afterwards)
Ah okay, that’s frustrating, of course. Measuring voltages is one point, picking up the explanations is another. But I can assess my skills quite well and just soldering away is definitely not one of them.
Without RCM the console starts but the status is somehow not on and not off. Pressing the power button for a long time helps to turn the Switch off. But really long, like 15+ seconds.
I then switched on AutoRCM because it made life easier for me to isolate the problem. Regarding the fuses, I did update to the latest available version (16.1.0). Simply because I thought that someone might have downgraded the switch before. I could then rule that out.
It’s also funny that the switch has a different serial number in the software than on the housing sticker… Someone has definitely been at it.
I have already mounted the module on the PC to rebuild the NAND (with donor NAND). I would like to try this. Do you know any software that can check this?
I have the prod.keys and PRODINFO.bin in the backup on my PC. I also have a complete backup of the NAND (~30gb). Plus boot0 and boot1. Should I back up anything else before checking the module?
Another question:
I noticed a different number of keys in the prod.keys. In version 13.2 (that was the FW version when I got the switch) I had 158 keys. And now in version 16.1.0 I was able to extract 205 keys. Is this normal or does the possibly already point to the NAND?
Hmm Not sure on this one yet… maybe power button on the pwr/vol flex is intermittent, I suppose the same problem could occur if there was USB issues (bent pins or junk in the USB port triggering a boot prompt) - maybe come back to this one later as I think it’s a secondary issue unrelated to the first (I think) - though it might be worth disconnecting the pwr/vol flex cable just to take it out the equation.
And does Hekate reflect that same OS version in the fuse count? (you’ll have to cross corelate the number with the table on the github page I think to verify this)
Yeah, sounds like someone has swapped the board over, pretty common on Switch as the LCD’s are a bit of a pain to swap and it’s easier to just change the whole assembly.(most common reason for this)
Back in the day I used to use RMprepUSB to test flash media (I think just using the mode meant for identifying fake capacity) but I think dedicated software which does a write, read over and over would be a better fit bit like you’d use on your old mechanical hard drives.
This page suggests one
I don’t see why that wouldn’t work fine, though as mentioned it is likely destructive, whether that means it wipes the partition table too I’m not sure (might be worth checking on that just incase that presents issues putting the data back on after the fact)
I think your good as, long as your able to regen HOS files/partitions (for the current OS version for the correlated update fuse burn count) - though if your currently able to boot now (even if intermittently) might be worth dumping boot0, boot1 and then rawnand (so you get all partitions) - you know, in case rawnand holds the partition table (I’m not sure on this but you would assume it does) just in case
Maybe I was a little inaccurate again. When I start without JIG the screen stays black. Only when I press the off button for a longer time does the console really turn off. And then I can inject a payload again via JIG and VOL+. I thought that was supposed to be the case with the power button. Long press so that the switch goes off.
Yes, in Hekate is also already the correct version 16+. 18 fuses are burned. So the update has worked in any case.
Thank you! I will try. But only after the “new” modules are there. I have just ordered two eMMC modules from Ali.
I will backup everything again anyway. To be on the safe side.
Now that I think about it, earlier when I plugged the game in and turned it on briefly, there were a few red dots (pixels, maybe 6-10) on the screen that didn’t belong there. I blamed it on the cooling because I didn’t have the cooling plate on at the time. When I reattached it and started the game, there were no graphic errors. Does this mean anything else?
This would make sense if autoRCM is enabled. If autoRCM is disabled and the above is the same, then it could be tied back to the potential EMMC issues, but best to rule that out prior to delving into this.
I suspect Ram is the more likely candidate in this case then or corresponding lines at SoC (or board issues relating to both these) - If your in a black screen scenario you can try putting gentle pressure on the ram while prompting the console to boot and see if something changes as a result. (to get the SoC/Ram shield off without damage, twist the “tabs” with a blade outwards all the way round, be careful not to scratch the board)
(assuming of course these aren’t stuck / slow pixels on the LCD)
While not advised, I’m pretty sure you wouldn’t see this on a known good and/or it’d throw an error or turn the unit off if the temperature hit a certain height.
I’m going to take the Switch apart further to check the RAM. It was definitely there, but it would be very strange if the RAM always failed in a deterministic way, wouldn’t it?
By the way, the pixel errors were not static. They were in the lower right edge of the screen and moved. As I said, there weren’t many of them and they weren’t there at the second start. But there was also the cooling plate on it and perhaps more pressure in certain places. So it could well be that there is something wrong with the soldering points. However, that would be beyond my competence at the moment.
I can try the RAM soon, eMMC will take a while. I’ll be in touch And thank you so far, that has already helped me.
Sorry, I think I understand now. It sounds to me that it’s prompted to boot, it’s halting somewhere (still “on”) no display etc, requires long hold to turn off. This would all be pretty typical given the other symptoms you’ve described.
It is odd that initially following you writing “fresh” OS files/partitions to the EMMC you regained the ability to boot into the OS (in some form or fashion) for at least one turn prior to reboot - or maybe I should say more consistently following. I suppose the reason could still be the EMMC in additon but, we’d also have to consider what dodgy ram or a dodgy ram connection could contribute to this also. for example writing data from EMMC to ram, corruption occuring (as a result of the suspected fault) data read from ram and written back to the EMMC etc, ram cleared at power off, EMMC data corrupt and then no boot / black screen as a result. (all just a theory mind you, pure speculation on my part, but logical)
In regards to the fault symptoms observed with the moving pixels on the display, this is pretty typical on Switch and is usually as a result of bad connection between the ram and the board (or the corresponding ram lines on the SoC / board joints) It being a handheld device and being exposed to far more flex makes this more common than with static consoles. In addition, boards which have had their USB port swapped (badly) and / or M92 IC swapped (badly) are also more prone to these sorts of Ram issues too.
The Ram itself is actually probably fine physically speaking and it’s quite rare the IC’s themselves to ever die.
I had exactly the same thoughts about data from RAM to flash and that something would be lost or simply transferred incorrectly.
The plan is now set for me. I’ll wait for the eMMC module, replace it and rebuild it. If that doesn’t produce the desired result, I’ll then turn my attention to the RAM. Or rather have it done. Reflow equipment is available but I don’t feel quite sure about it. Let’s see.
You were right about the RAM. I pressed lightly on the RAM when booting and at least Atmosphere booted normally and without problems. Maybe it also has something to do with the thermal expansion, the switch was cold. But it didn’t work at first and only after I pressed on the RAM.
Does everything point to the RAM? I have a hot air station, preheater and flux here. However, I haven’t reflowed a BGA chip yet. And it would be difficult to clean it afterwards.
If it’s you own personal Switch (and you intend for it to stay that way) then a reflow can’t hurt and is pretty straight forward. Flux round the edge of the ICs, point your nozzle away from the USB and SoC, be equal in your targeting of the two ram IC’s at first and distribute the heat evenly, when you see the small caps down the sides solder turn molten, hone in on one IC and hold for a few seconds, then move to the other ram IC and do the same. After, let cool, clean up as best you can, if you wan’t to clean further you can flood with IPA and heat the IC/s at about 140C while cleaning round them with cotton swab while doing so (it’s not the end of the world if you don’t get all flux provided it’s a no-clean flux)
Before installing the board back in the chassis, ensure the frame is not bent, it it is, straighten it back out as best you can.
Yeah it’s my own Switch. I have to take the mainboard out of the housing? I would then preheat from “below” at around 150 degrees Celsius, then flux and then reflow from above as you described. 300 degrees Celsius, rather little air flow?
Yeah, I would, to avoid any potential damage to the housing etc and because during reflow you want to allow the board to “relax” which it won’t be able to do in an assembly (or board jig) particularly if you find your assembly has a bend / curve (as mentioned) which you’ll want to check for after, prior to putting the board back in.
The choice to use a preheater is up to you, it’s not really neccessary for a ram reflow. I only say this because I’m trying to avoid potential secondary issues which could be caused by a second variable here, a lot of preheaters on the market have hot spots which go far beyond your set temp, for example setting a preheater to 100C and having some areas peaking at 300C (for example, and yeah I’ve seen this, and worse) - Now if you were doing an SoC reball, this would be different, a preheater would/could really help you in that case.
If you do go down the preheater route, in regards to temps, yeah I’d probably go somewhere between 100/150C and allow the board to fully saturate prior to using hot air. As for hot air temps, hard to say as they are so variable in reality and it’s best to set and get a feel as you go / based on experience, with a preheater, I’d probably start hot-air at 360C to begin with… though take that value with a pinch of salt. Same goes for air, every station is slightly different.
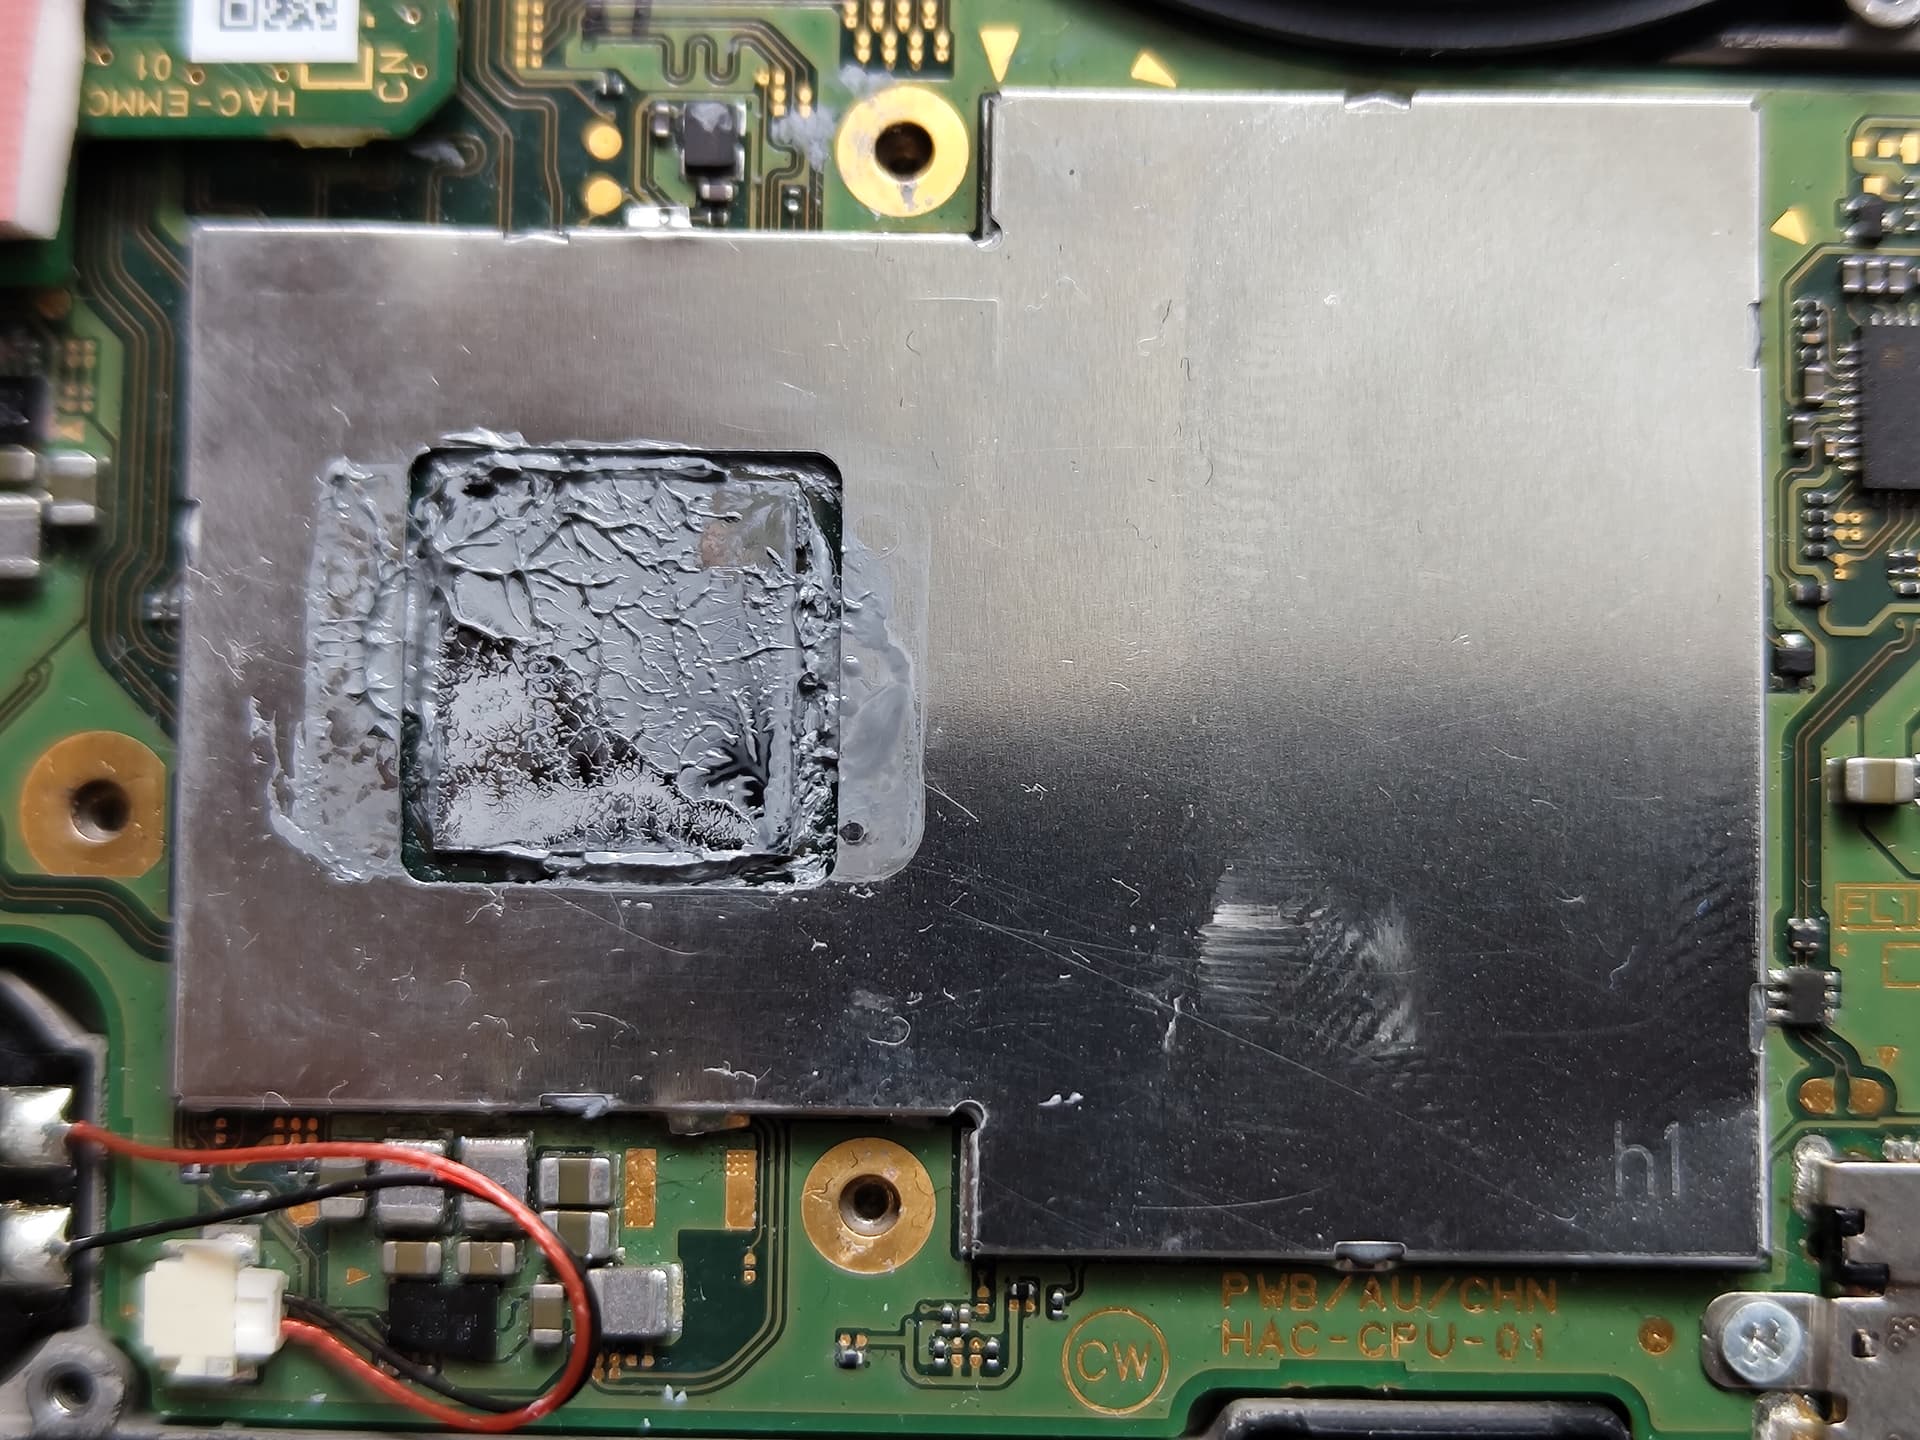
So here the thermal paste or similar has already been done (not by me…). Can I leave the hole as it is or does this copper plate have to be placed between the APU and the heat pipe?
How did the copper come off in the first place? It’s usually pretty difficult to pull this off (for a reason) almost like it’s micro spot welded to the tin/nickel SoC/Ram shield.
You can leave it off I suppose but it will reduce “shielding” and increase risk / damage in a liquid scenario, so your call.
Of course, replace the thermal paste in either scenario
Presumably this is after doing the reflow and putting the Ram/SoC shield back on?
Also by the way, forgot to mention earlier, if you twisted the tabs as mentioned to get the shiled off, then just squeeze them flat again with some pliers (ideally smooth / flat pliers) so it clicks nicely back in place.
Also, just a side observation… somone has change/reworked the M92 IC and USB port, which ties back to what i mentioned earlier
I had to rebuild the NAND again because it was corrupted by the RAM, but after that everything worked fine. Original firmware, custom firmware. Simply wonderful.
Thank you very much for taking me by the hand. I probably wouldn’t have dared to do it on my own, but in the end it was relatively easy.
All that remains is for me to say thank you again and to wish you all the best from germany