Yeah that’ll work provided the testpad has continuity to the BQ SCL line and also the others at M92, Realtek etc, though in terms of wire length it’s going to be a lot shorter going around the board and less impeded… either/or
If you don’t have continuity from the testpad to m92 etc (which is what @FiddyOnFiddy was getting at) then the fix could potentially be much simpler
I say this basically because due to your diagrams I have found I have missing line from SCL/SDA to BQ to m92 to the realtek chip but the line is intact from the fuel gauge to the test points so I’m currently just routing a jumper from the test points to the bq chip as it’s a lot easier than trying to run a jumper under a BGA chip.
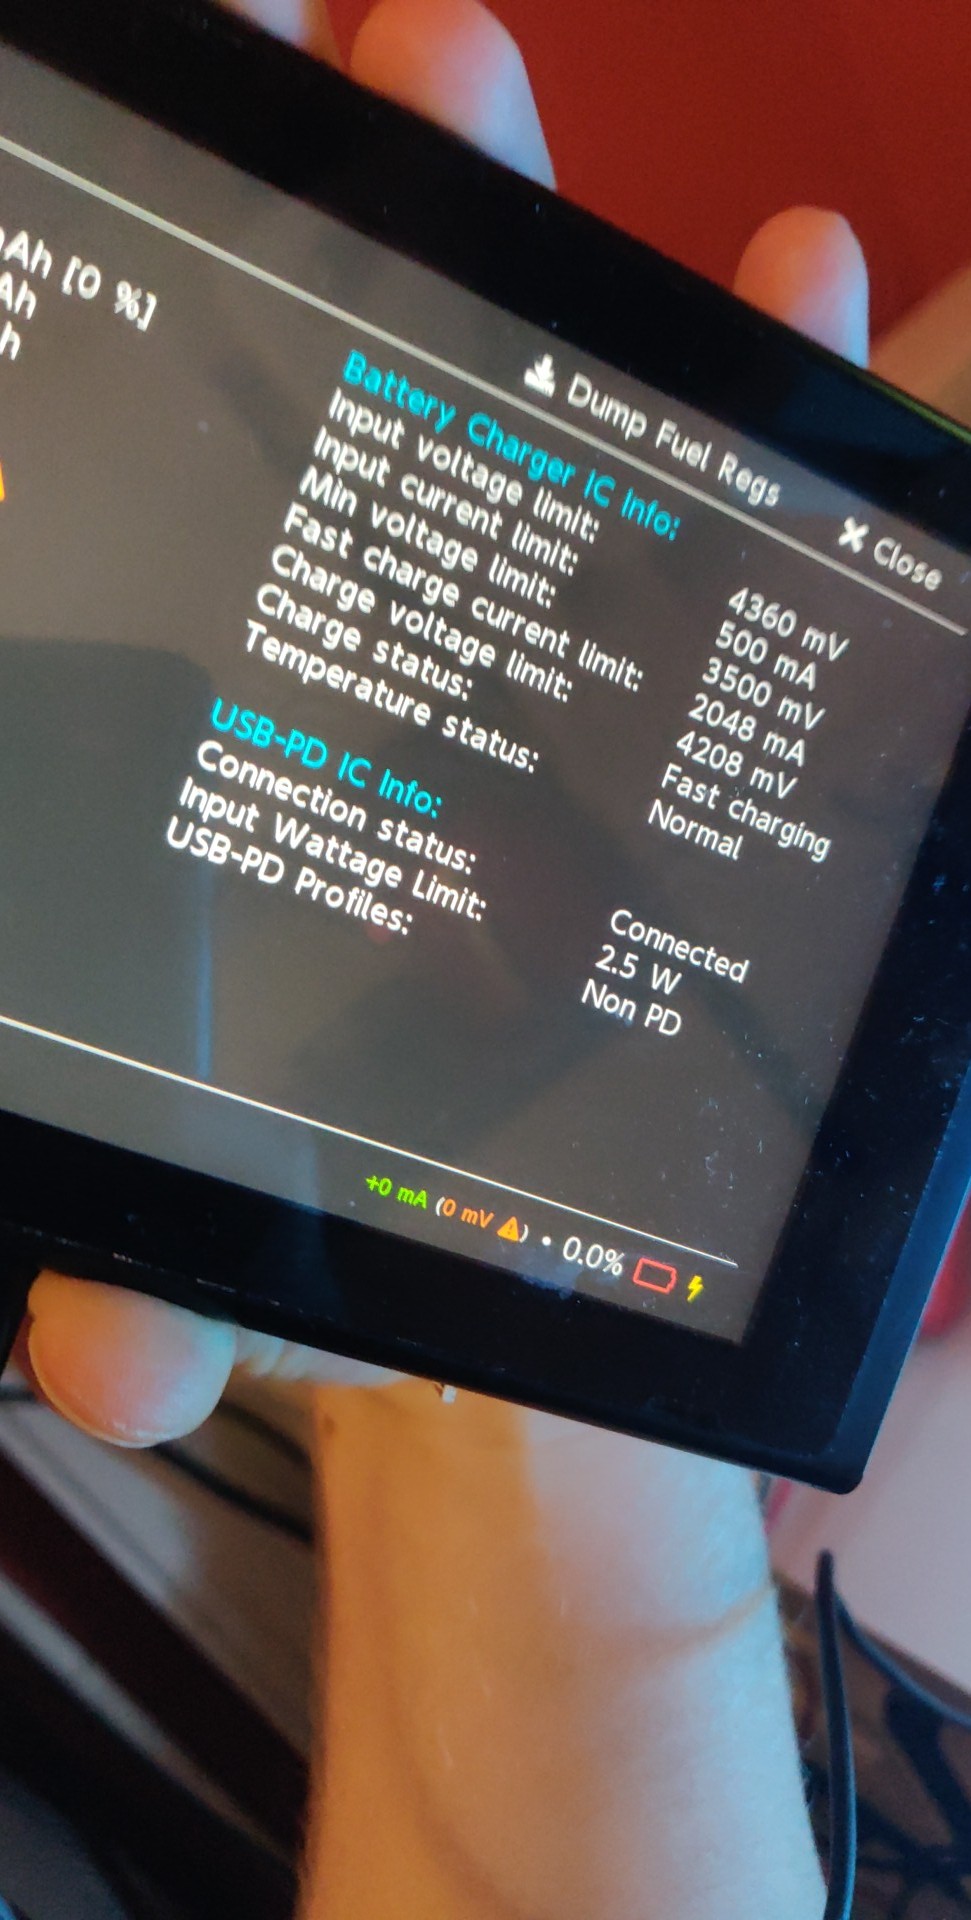
No change in terms of the fuel gauge IC being detected as missing but there as been an improvement in that the Battery IC in hekate now recognises that the thing is “fast charging” and the values from there are a lot more normal so I’ll continue to check if any other lines are missing. It seems my lines seem to be missing between the BQ and m92 so far.
Jrous seems like a much simpler issue as it seems the vias are in tact all around the board and he’s just missing the connection within the fuel gauge circuit itself back to the fuel gauge IC. Guess we’ll find out when he gets a new fuel gauge fitted.
Thanks for your info and these diagrams. Knowing some vague idea about where the fuel gauge lines pass through helps narrow it down. Prior I couldn’t be bothered testing everywhere but I’m imagining it goes from battery to fuel gauage/bq through to m92 and then routed out the realtek back to fuel gauge to complete the line.
Trouble is when you start getting into the greater than two lines being open and especially in cases where the VIA damage was caused as a result of layer damage at the P13/USB area of the board… I tend to just rule them a no-fix and will transfer the SoC/EMMC to another good board (If I have one) as it’s just not worth the risk of sale… something is inevitably going to fail open later on as a result of the extent of layer damage on the board. Checking the board scans there is at least 14 lines which make there way from the tail end of the board past the USB/P13 area relating to BQ, J/C, Fuel gauge etc (any of which if missing could render the whole device useless) and then probably the same number of lines relating just to P13 and M92 (which more commonly fail open as a result of excess heat in this area) So, think what I’d say is, if it’s just for fun and to become your own personal Switch then maybe continue on with the repair/s if it’s for sale I’d deem a no-fix, if it’s a customer repair, I would make it clear that there is a chance of failure and no warranty can be offered
What do you mean by transfer the SoC/EMMC toi another good board? It was my understanding that’s not possible unless the console is unpatched and you can transfer over the keys and nand?
And nah it’s not a customer repair, no chance i’d spend this long on a customer repair haha. It’s for a friend and along the way became a personally vendetta to have closure on a solution but I spend more time checking everything last night and all other lines appear perfectly intact as far as I can tell but still not fully working so time to call it a day.
One question is the red AIN pin from fuel gauge to battery sense pin, how come there’s not a line of continuity from that to the m92 chip and I see you used two different shades of red for it. Just curious what’s going on at the hardware level there if you happen to know.
Yeah, so the NAND is part of the EMMC, the EMMC is a disconnectable module (the easy part) then the SoC (pulled and reballed) which is paired with it, transffered onto a good board is fine, patchd or unpatched doesn’t matter so long as the SoC is together with it’s EMMC
So the darker shade of red is your 1V8PDR and has no direct relationship with the fuel gauge (I just put it there for handy relations to the BQ IC etc) . The lighter shade of red AIN is a presumed single wire serial interface line, I haven’t delved too deepy into into but would guess the line makes it’s way off to the SoC and provides it with battery Serial number (and maybe other things such as temperature)
Technically speaking the sense line of the battery connector is the perceived ground pin (notice my colour codes are not strictly black) and it’s connected via a current sense resistor (to monitor current). Now often the middle pin on a battery connector (or the one pin which isn’t +/-) is often termed as sense, therm, or alert among other names on other devices… hope that helps
The M92 IC job is USB device power/management essentially and takes no responsibility for battery management, that role falls to the BQ IC with the fuel guage reporting on battery capacity and voltage etc
Haha completely understand,
If the console is unpatched, if you can post an image of the fuel gauage stats page something might jump out
Honestly I just didn’t look up what the SoC was and that it refers to tegra chip haha. So I’m assuming the ram isn’t paired then and can be left? I wish I’d actually attempted this, I’ve had some unfixable unpatched switches and a dead cpu board and woulda been a fun experiment to move over and potentially salvage an unpatched console.
Oh, I assumed as part of the fuel gauge passes through there that it was also handling power management between it, the bq and fuel gauge. Some of this does help shed light on my understanding of the inner workings.
I’ve fixed many switches and learned through just trial and error and experience but when it comes to these edge cases I’m more so just looking for a needle in a haystack instead of understanding the circuitry and making informed decisions.
Do you have any resources I can have a look at that you’ve learned some of this from or is it more so just your transferrable knowledge and experience that’s taught you this?
Yeah here’s it now in its current state after repairing the missing line
Nope but I am pretty confident the SoC is tied to the ram manufacturer, so it’s kind of paired (fused) in a sense, so if the SoC was originally using Samsung ram (for example) you’d have to ensure the donor board is also using Samsung Ram too
Yeah, my own unpatched would be the only time I’d put the effort in for an SoC transfer… I mean unless the customer was desperate for data or sentimental reasons or something and was willing to pay the extra for the time… otherwise it’d be a board swap to a patched board
Even though they all have there own independent jobs, I guess you could say they’re all working in tandum with one another (I2C comm lines for the most part) with the SoC being the decider, for example if the fuel gauge is faulty for some reason (but the console is still booting) then full charge current might be dissallowed (depending on it’s fault)
Yeah kindof and trial and error and seeing what works best… unfortunately a lot of the info out there is false and the diagnosis methods (doesn’t matter what for) as for whatever reason a lot of people and youtubers are using some really dated diagnosis methods (reverse biased diode mode readings relative to ground spring to mind)… As I result I can’t really point you anywhere sorry
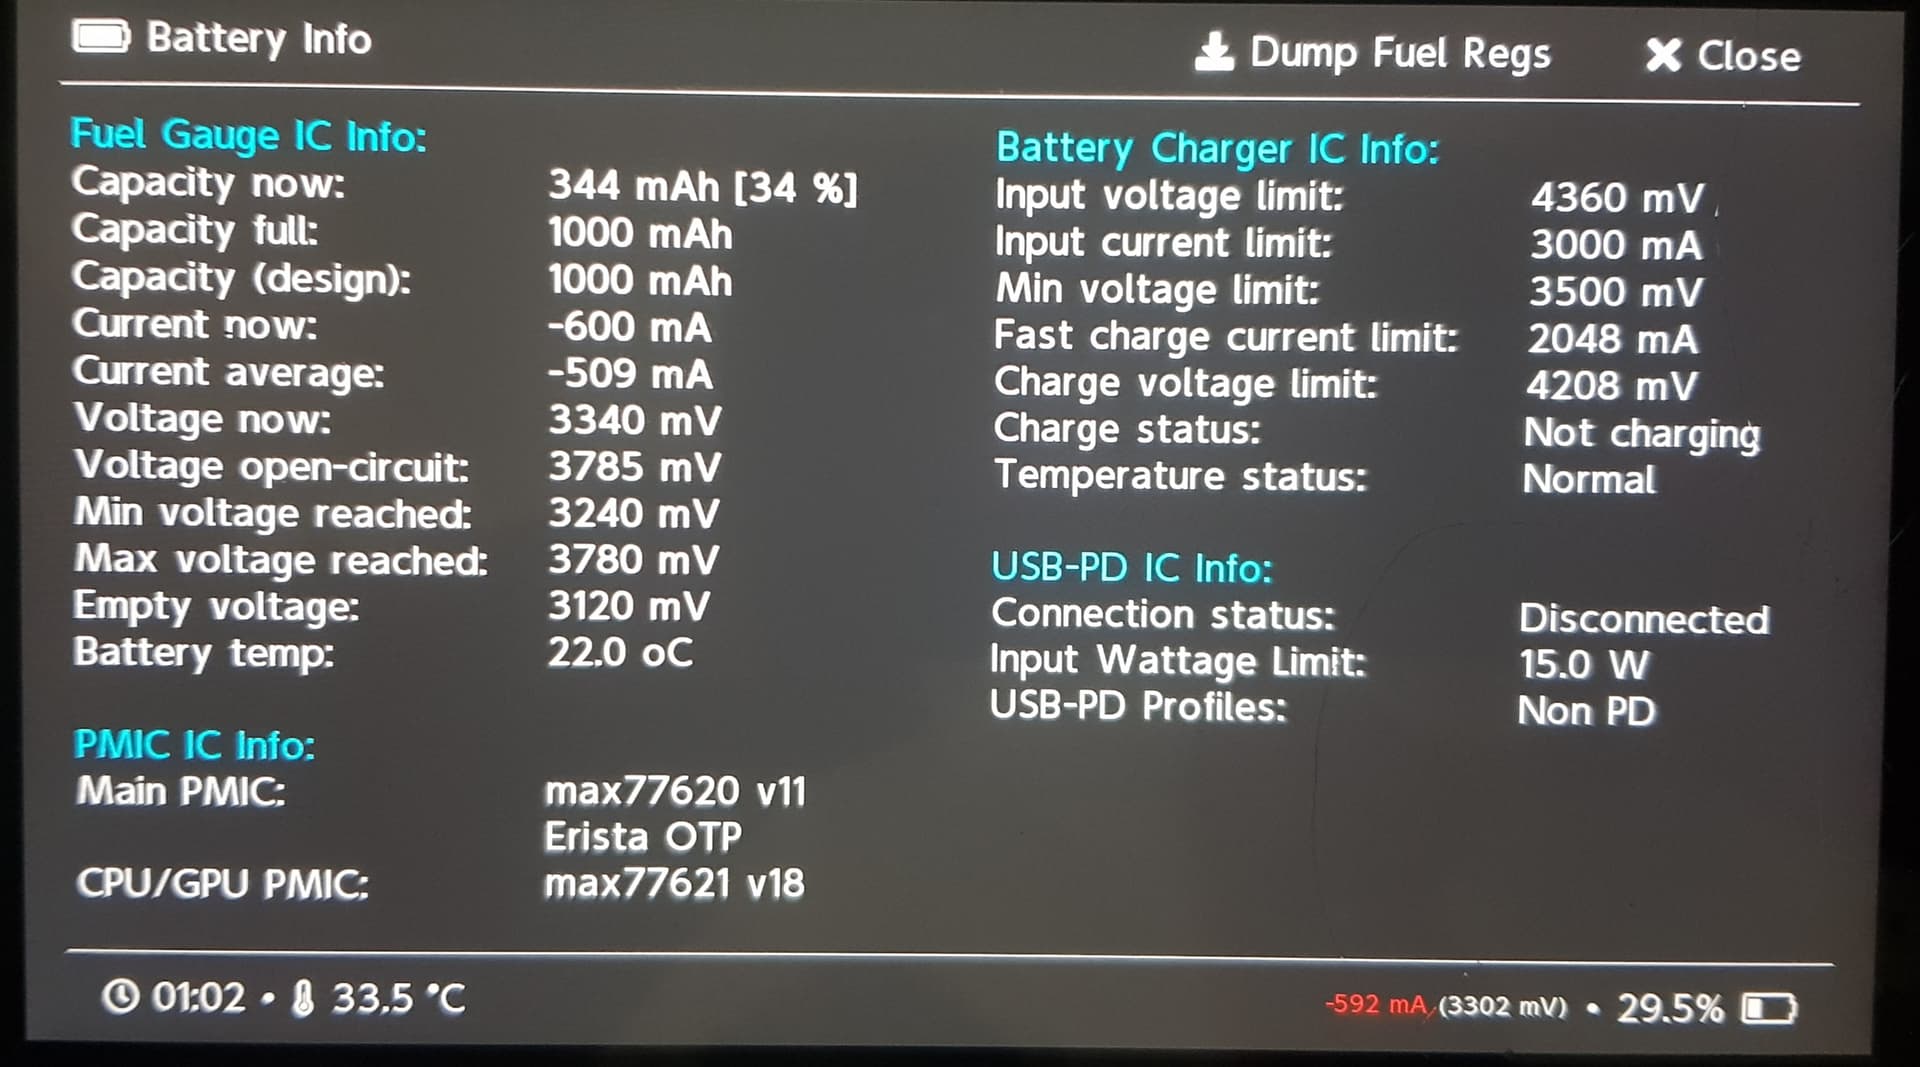
I see, I take the Fuel gauge stats haven’t changed?
otherwise I noticed that the battery drains very quickly.
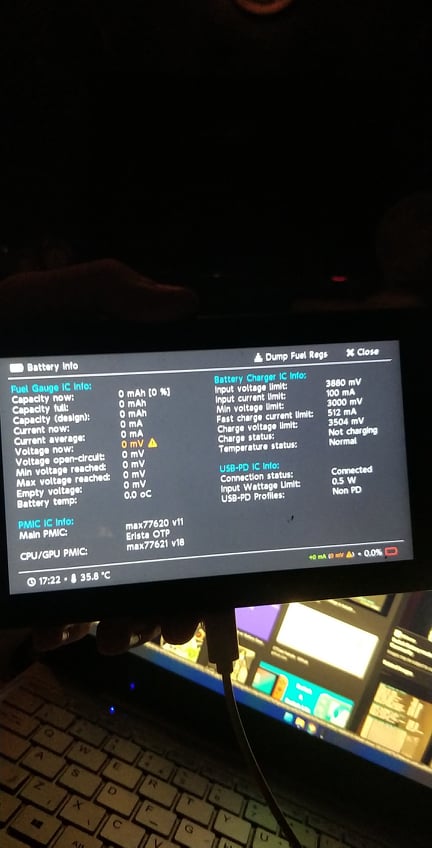
FYI I have not completely reassembled the console. I cheated by reusing the max17050 without balls. I had to change the capacitor on the right of the max17050 with another 0.1uF 6.3V I don’t know if it’s the right value! I relied on the component specification.
please confirm the value of the capacitor. and if you have any idea of the fast battery drain.
As I’ve mentioned this is a bad idea for so many reasons… I would disconnect battery/power from the console and refrain from doing so until you’ve propely resolved the fuel gauge/install
It’s entriely possible the reason for the fast battery drain is as a result of this (or a partial short on another rail) or you potentially have another open or partial open in the area of suspected layer seperation as possible the cause.
I understand but being patient, cool, calm and collected is the order of the day In my experience inpatience leads to dead consoles / devices and it’s quite possibly what landed this board in it’s current state to begin with
Out of interest, are the current symptoms that it’s dropping about 1% in capacity every few seconds in the OS?
If yes, then I had a board sent to me recently with these exact symptoms, the board had over rework of the USB, P13, BQ and Fuel Gauge areas to the point where the FR board material had discoloured in these areas (though this is not always a given) all lines to and from the fuel gauge seemed intact afaict and the stats were correctly reported in Hekate but upon booting into HOS the percentage would drop every few seconds (not a battery issue), When I applied slight downward presure just above the USB port on the board the symptoms would tend to resolve and vattery percentage would be properly reported following a reboot… as the board was suffering other faults (which relate to the above issues) such as occasional random reboots and getting stuck at the first boot logo (which heavily implioes BQ related issues) I made the conclusion it had further VIA/Line issues to/from the BQ IC and together with other misc issues I deemed this one a no-fix and just swapped the board.
Now if this is your own personal console and assuming this isn’t a short or partial short on another rail and/or related to bad fuel guage or install then you might want to delve deeper into the possible cause of the fault and find the potentially open line, if however the intention is to sell this console I would suggest you don’t as it will end in tears as something else will inevitably fail later down the line
In that particular case it wasn’t the USB itself that was the issue (though there was USB related issues) rather, excess heat in the area had caused via/line damage (relating to BQ I guess) in this area which the finger pressure temporarily resolved
If you see signs of heat at the USB/P13 area then it’s possible you have similar problems
A clue, what you have to ask yourself is, is it actually a true battery drain situation or a miss-indication of a battery drain situation? In my case I can tell you there was no external shorts causing the battery to deplete and the battery voltage was not giving any indication to the drain as reported
Unfortunately as I’ve mentioned In my case there was to many issues to continue with a repair, but another clue (assuming no shorts causing the issue) there is at least 14 lines making there way from the tail end of the board elsewhere, you’ve already verified a handful of those… critical lines this end of the board are BQ related so that’d be where I’d start…you are most welcome to modify my image above to document your findings and create your own magic
After you’ve resolved the possible fuel gauge problems and if the strange symptoms continue, you can sometimes take diode/resistance measurments relative to ground (a quick and dirty check) on the surrounding components (in both probe polarities) to get an idea if anything is a miss (that may be an open/close) and I would do this on the BQ IC and I’d also recommend using you reistance mode here which may shed some light on the problem
The battery drains quickly after checking the voltage, it drops from 3.8v to 3.2v.
Another clarification, the battery charges normally when the motherboard is connected with the battery without the display module is connected. otherwise even if the switch is on and the display module is plugged in, the battery struggles to charge.
I have a doubt about the display connector because I have replaced it several times
Another problem noted even if the switch is on, it only responds after 4 seconds to my commands. Bugs every 4-5 seconds. Certainly everything is linked and especially the display connector.
To resume, the motherboard has suffered a lot, I will fix it all step by step while avoiding overheating
I see but in what time period? if it’s a small amount of time (and I’m assuming your battery is a known good or that you’ve tested it’s capacity externally) then it’s probably a short somewher and I would disconnect battery/power and with black probe on ground measure the resistance of your VBatt rail (+/- pins on the board battery connector) your SYS rail (2R2 coil near BQ) and your other primary rails (coils surrounding main max PMIC) and post your measurements (in ohms)
As I’ve mentioned (three? times ) disconnect battery and refrain from powering the console on until you’ve resolved the fuel gauge IC/install issue and resolved the other underlying faults relating to excess battery drain… less you kill this console completely
2R2 resistance increases until1.2MOhms after that start it decreases
I don’t see where the main PMIC is, do you mean MAX77620A. I only checked the shorts
I understood, I checked upstream in diode mode around the Max17050 and the short before connecting the battery. the problem is that there are other problems that I do not master at the moment


 , remains to be tested