Mariko's SoC might be dead after a short on its caps

Hello,

After reading quite a few posts there, I’m excited to join this community. I have an issue with my v2 switch. It might be dead for good but it’s mixed feelings because it’s the occasion to learn more about electronics from all of you and that sounds great. Here my story.

What happens?

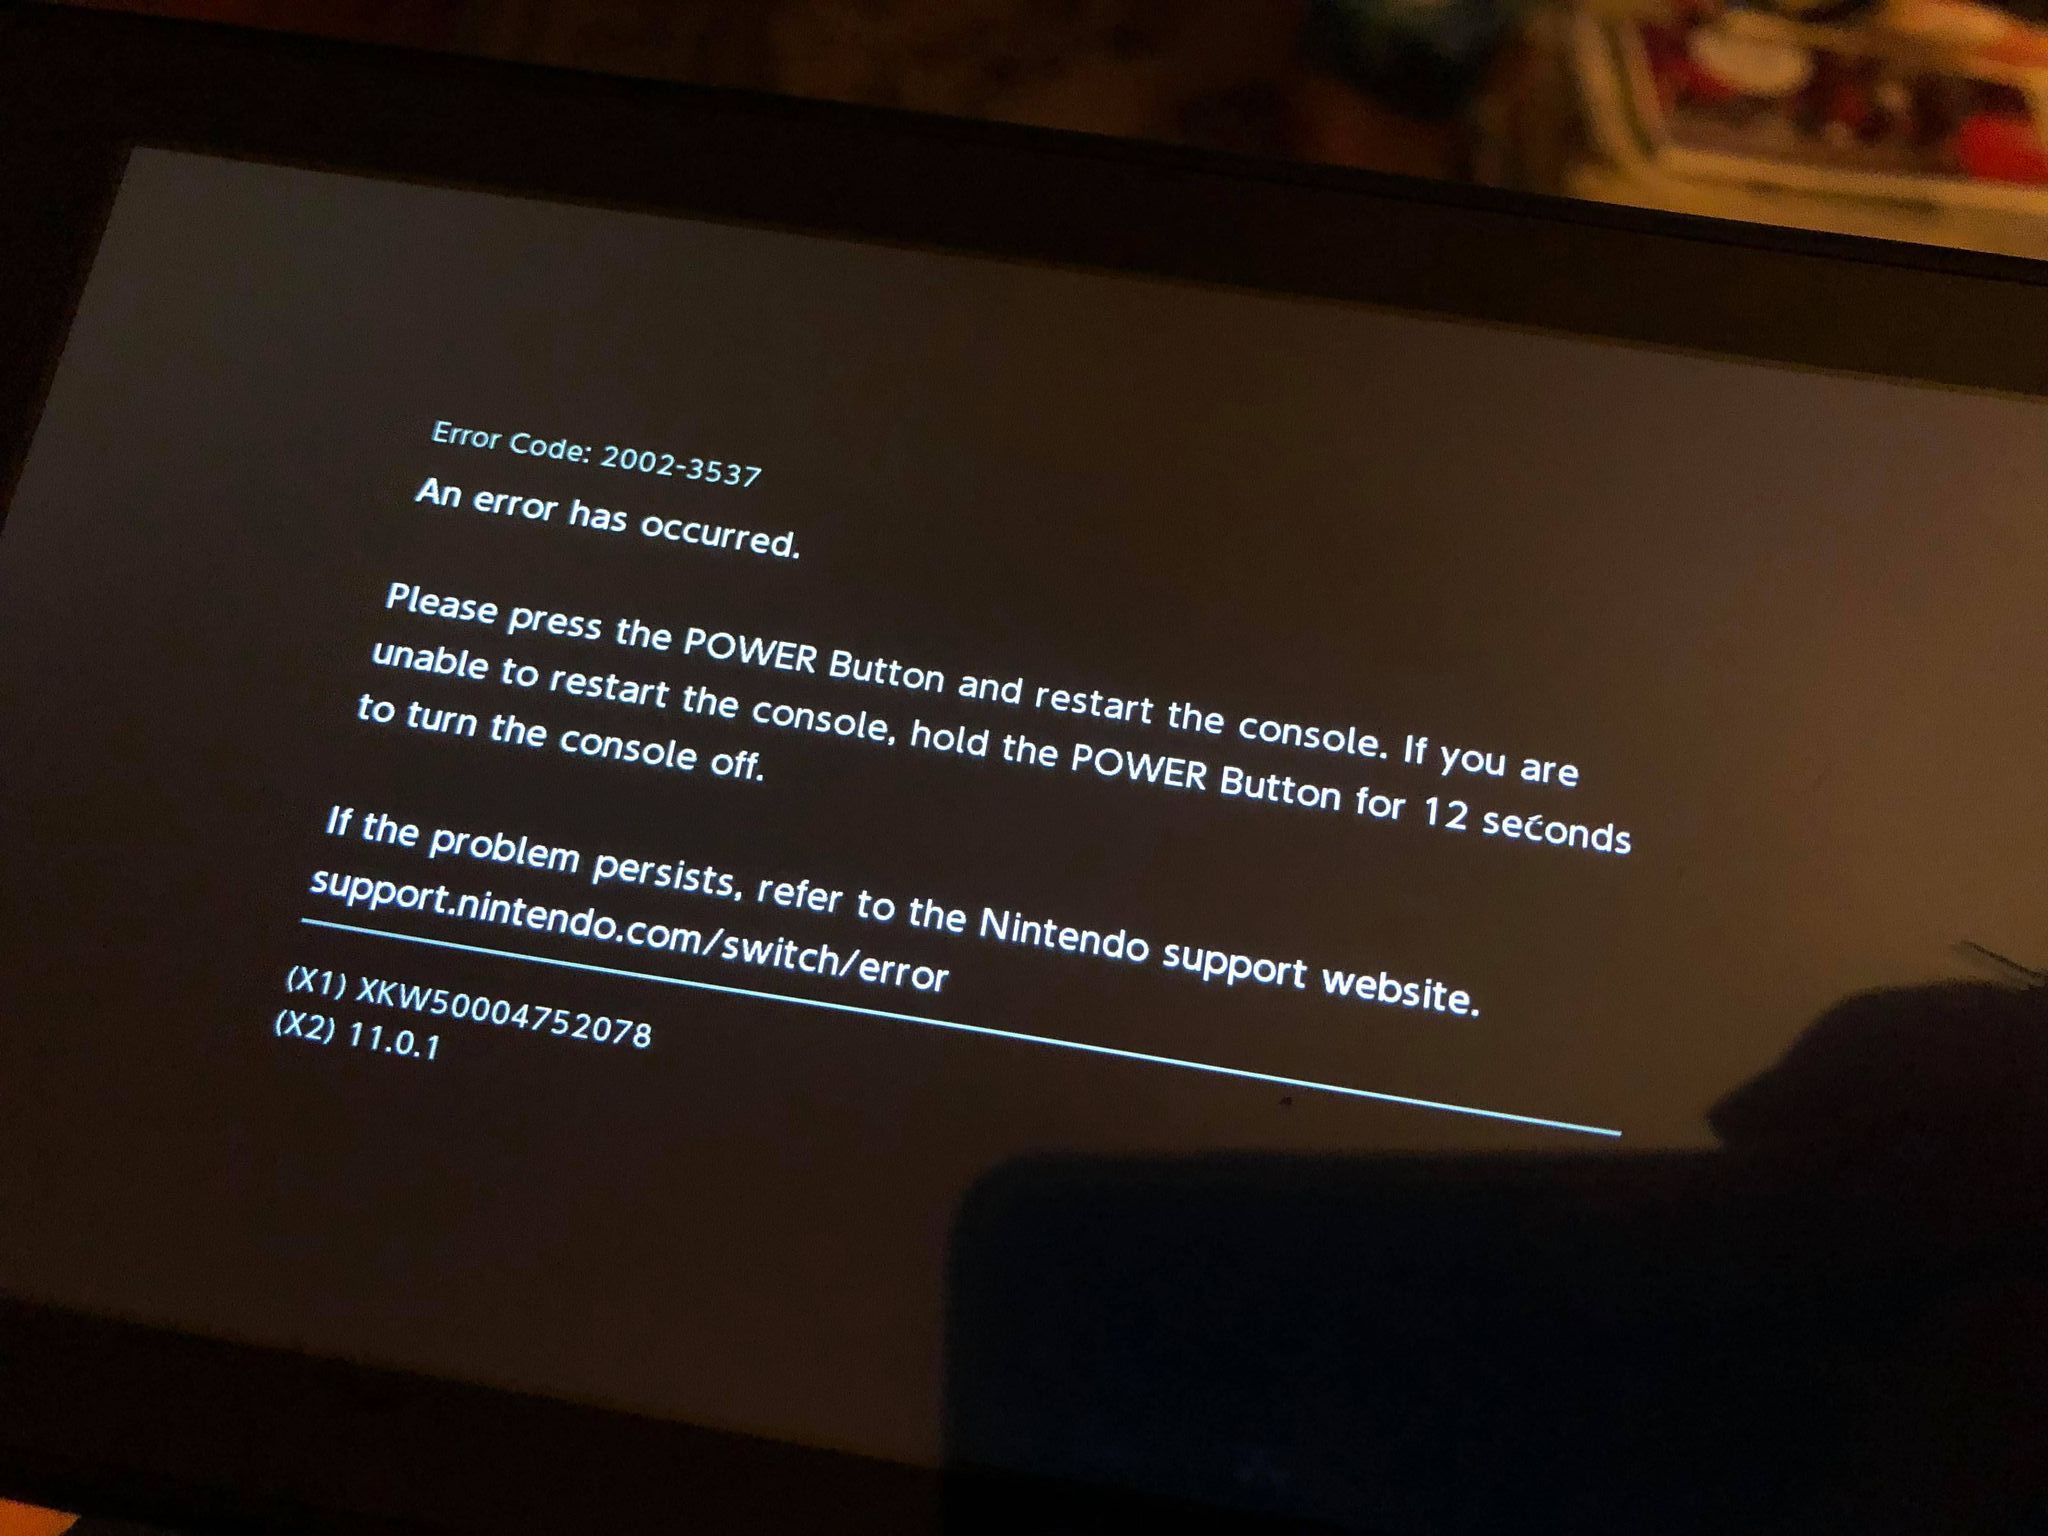
My Mariko switch no longer turns on.

When I plug the battery in and press the bottom power, the backlight of the screen goes on for less than a second, like a flash, and then goes off.

After that, the SoC quickly gets hot, in a few seconds. Then I usually unplug the battery because it goes nowhere like that.

How did I do that?

I was trying to install an SX core in my Switch and I minimized how hard it was.

I made pretty bad solder joints, and the SX Core’s LED was steady read at each power-on attempt. I tried to rework the joints several times and I eventually got small shorts on caps and surrounding them.

There, the SX Core LED was still red and the switch was stuck on a black screen on boot but the backlight was on and the temp was fine.

I always checked if the battery was plugged-in by looking at SX core LED. If there was light, I knew I had to avoid contacts. I somehow developed this stupid automatism after 2-3 hours of desperate work (that point is important for the rest of the story).

So I thought it was a mess and I had to remove the chip and redo the whole work later with better training and better tools. I wanted my switch to be able to boot again.

I disconnected the SX core and started removing my mess using a homemade braided copper wire that I heated with the soldering iron.

That’s when I heard them, small explosions under the hot wire when it was above the caps. The sounds of death. And I saw it, the battery was connected but since SX Core LED was no longer connected, I missed that fact. I immediately regretted my actions.

Here are some pictures of my switch now:
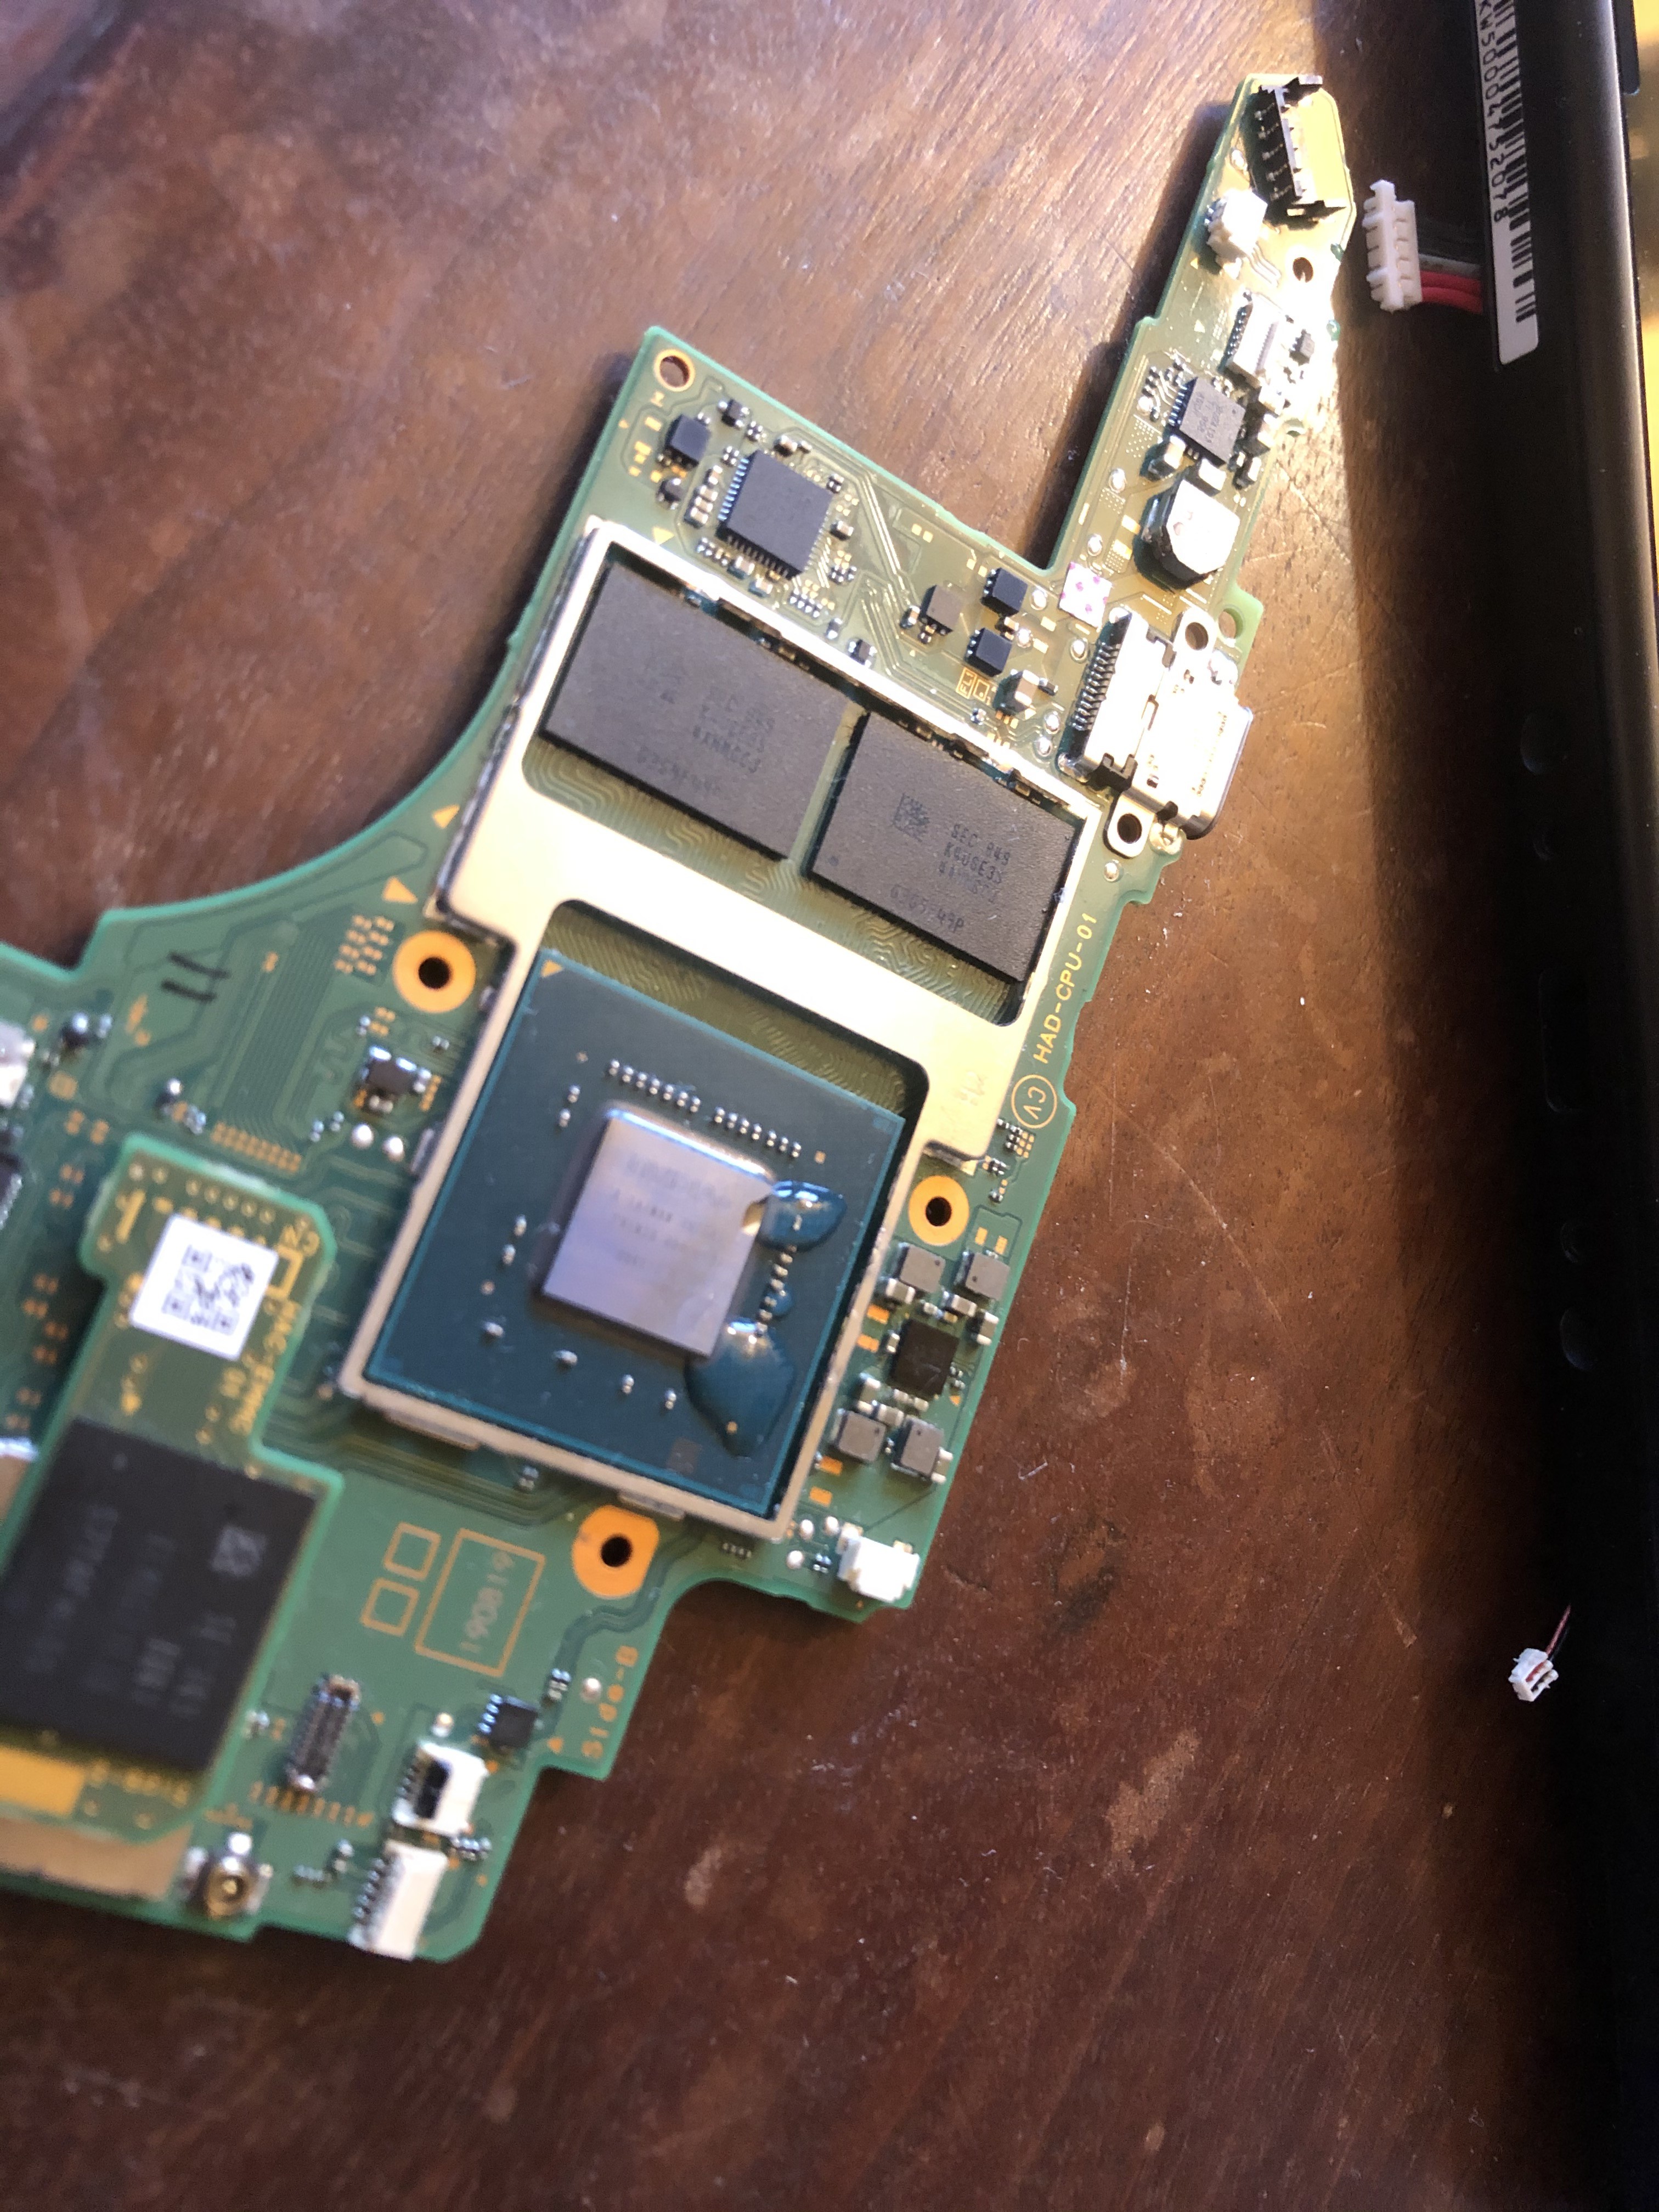
  • of the Motherboard:
    imgur .com/hunuhTH
    imgur .com/vn3CzGa

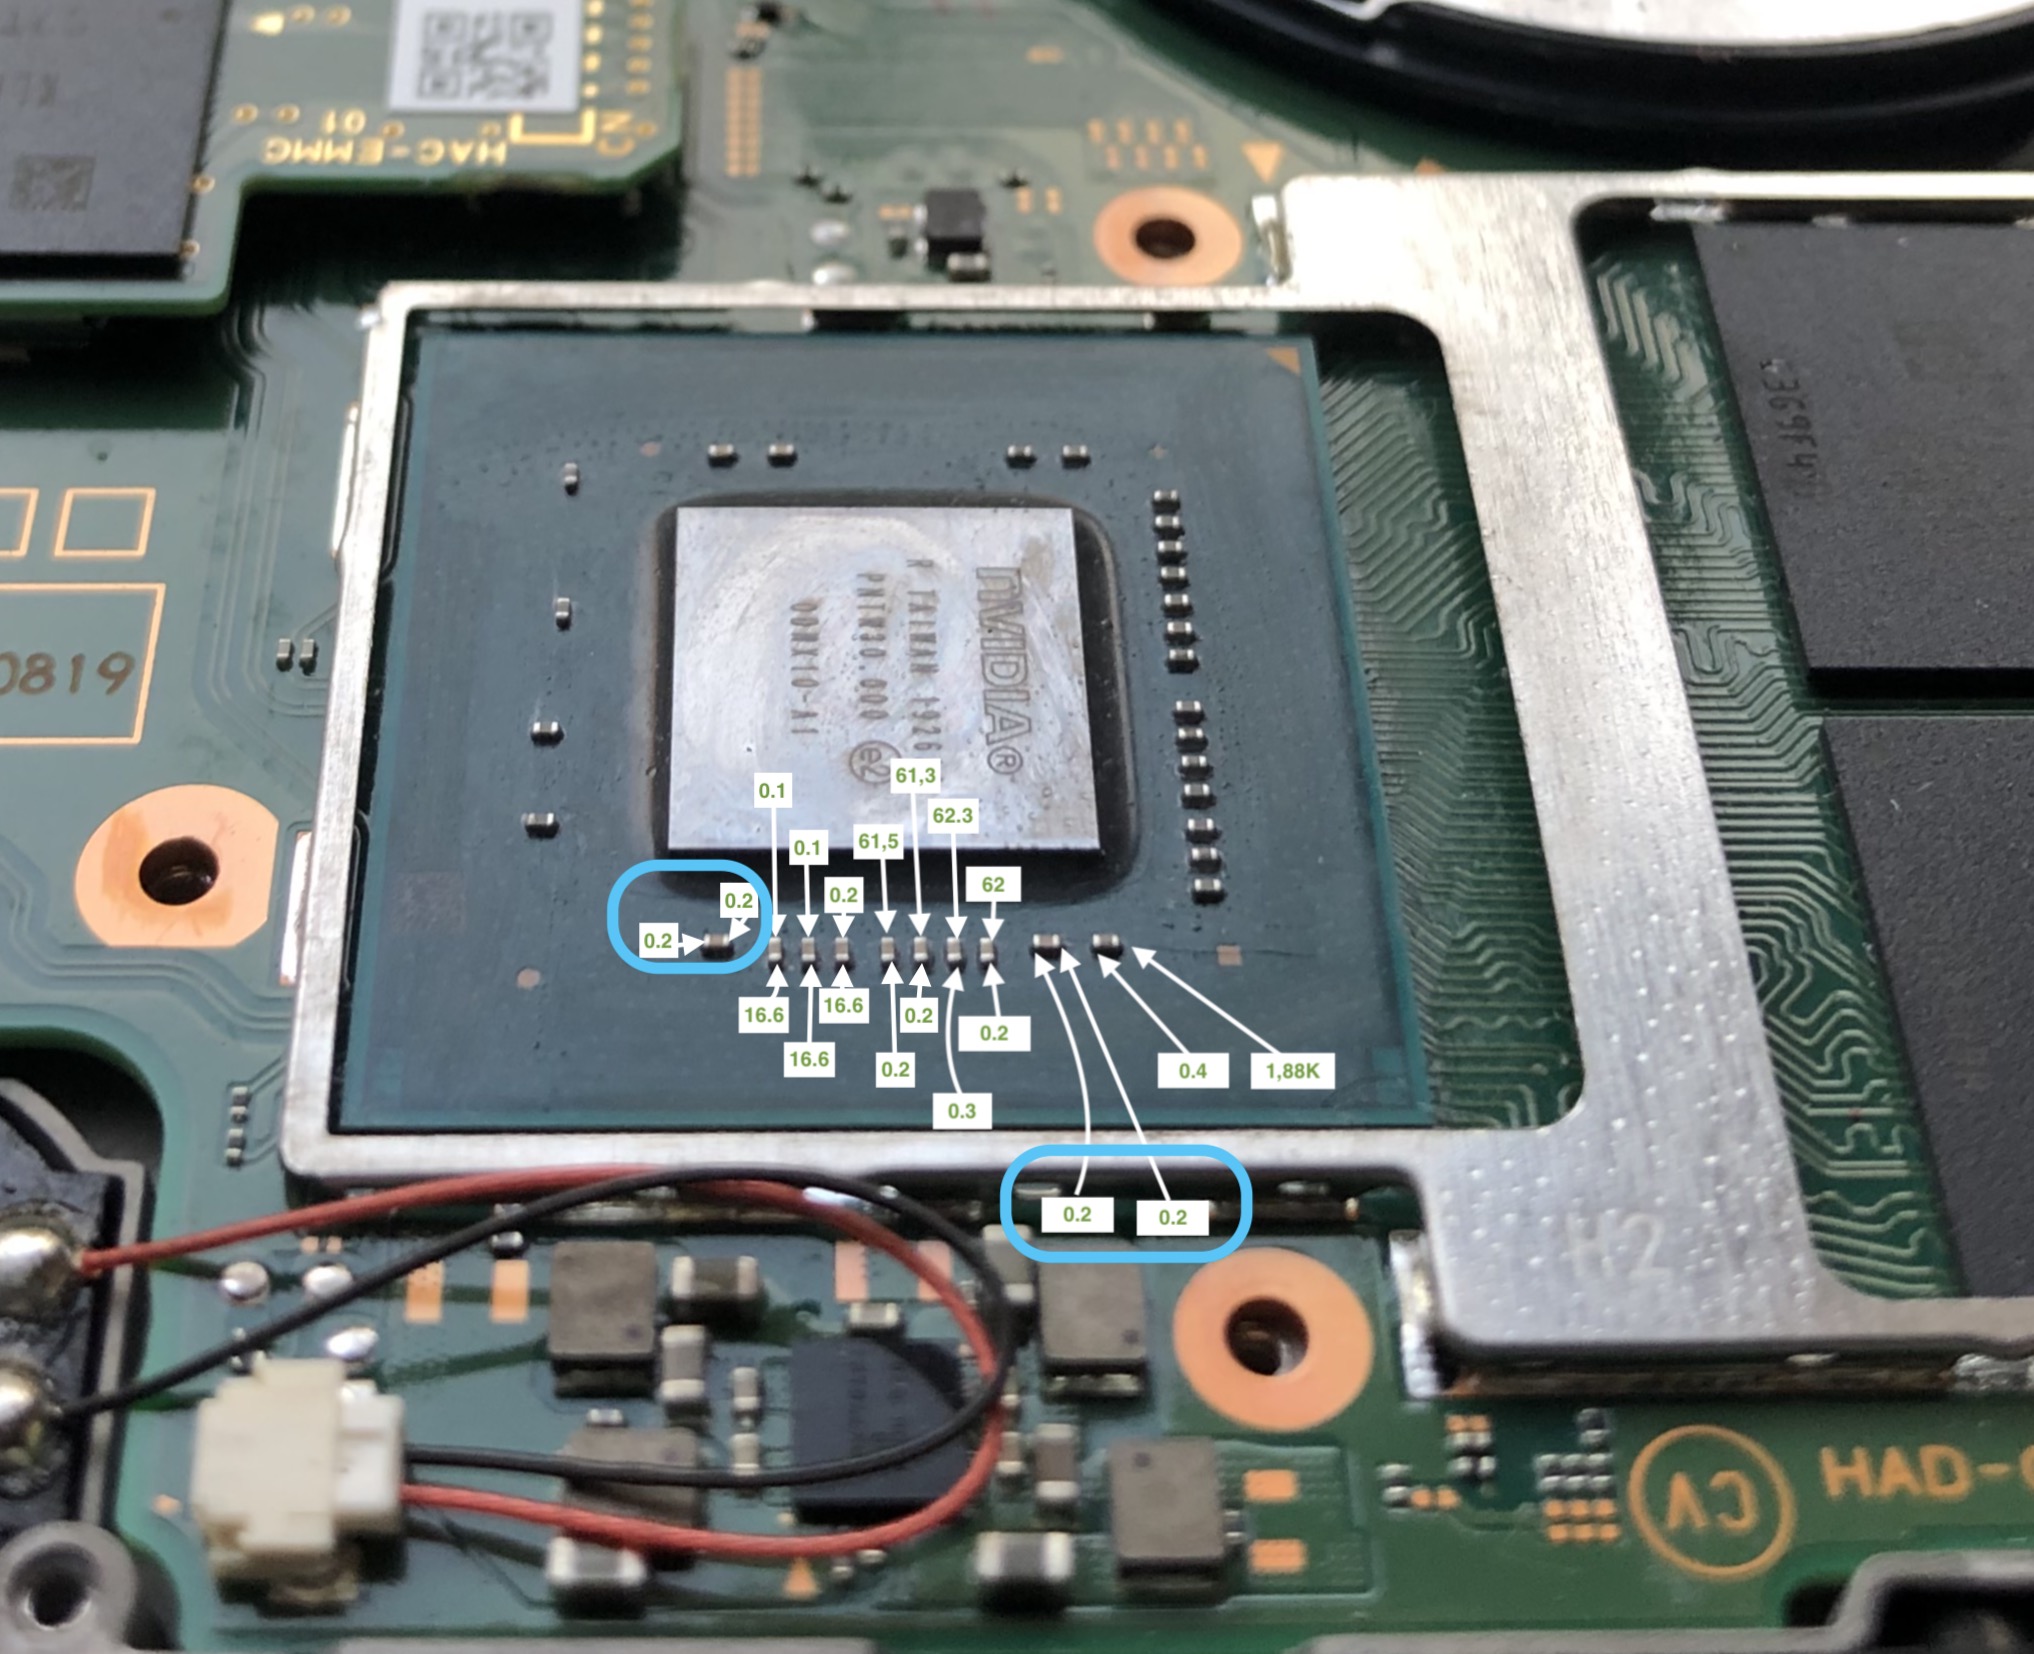
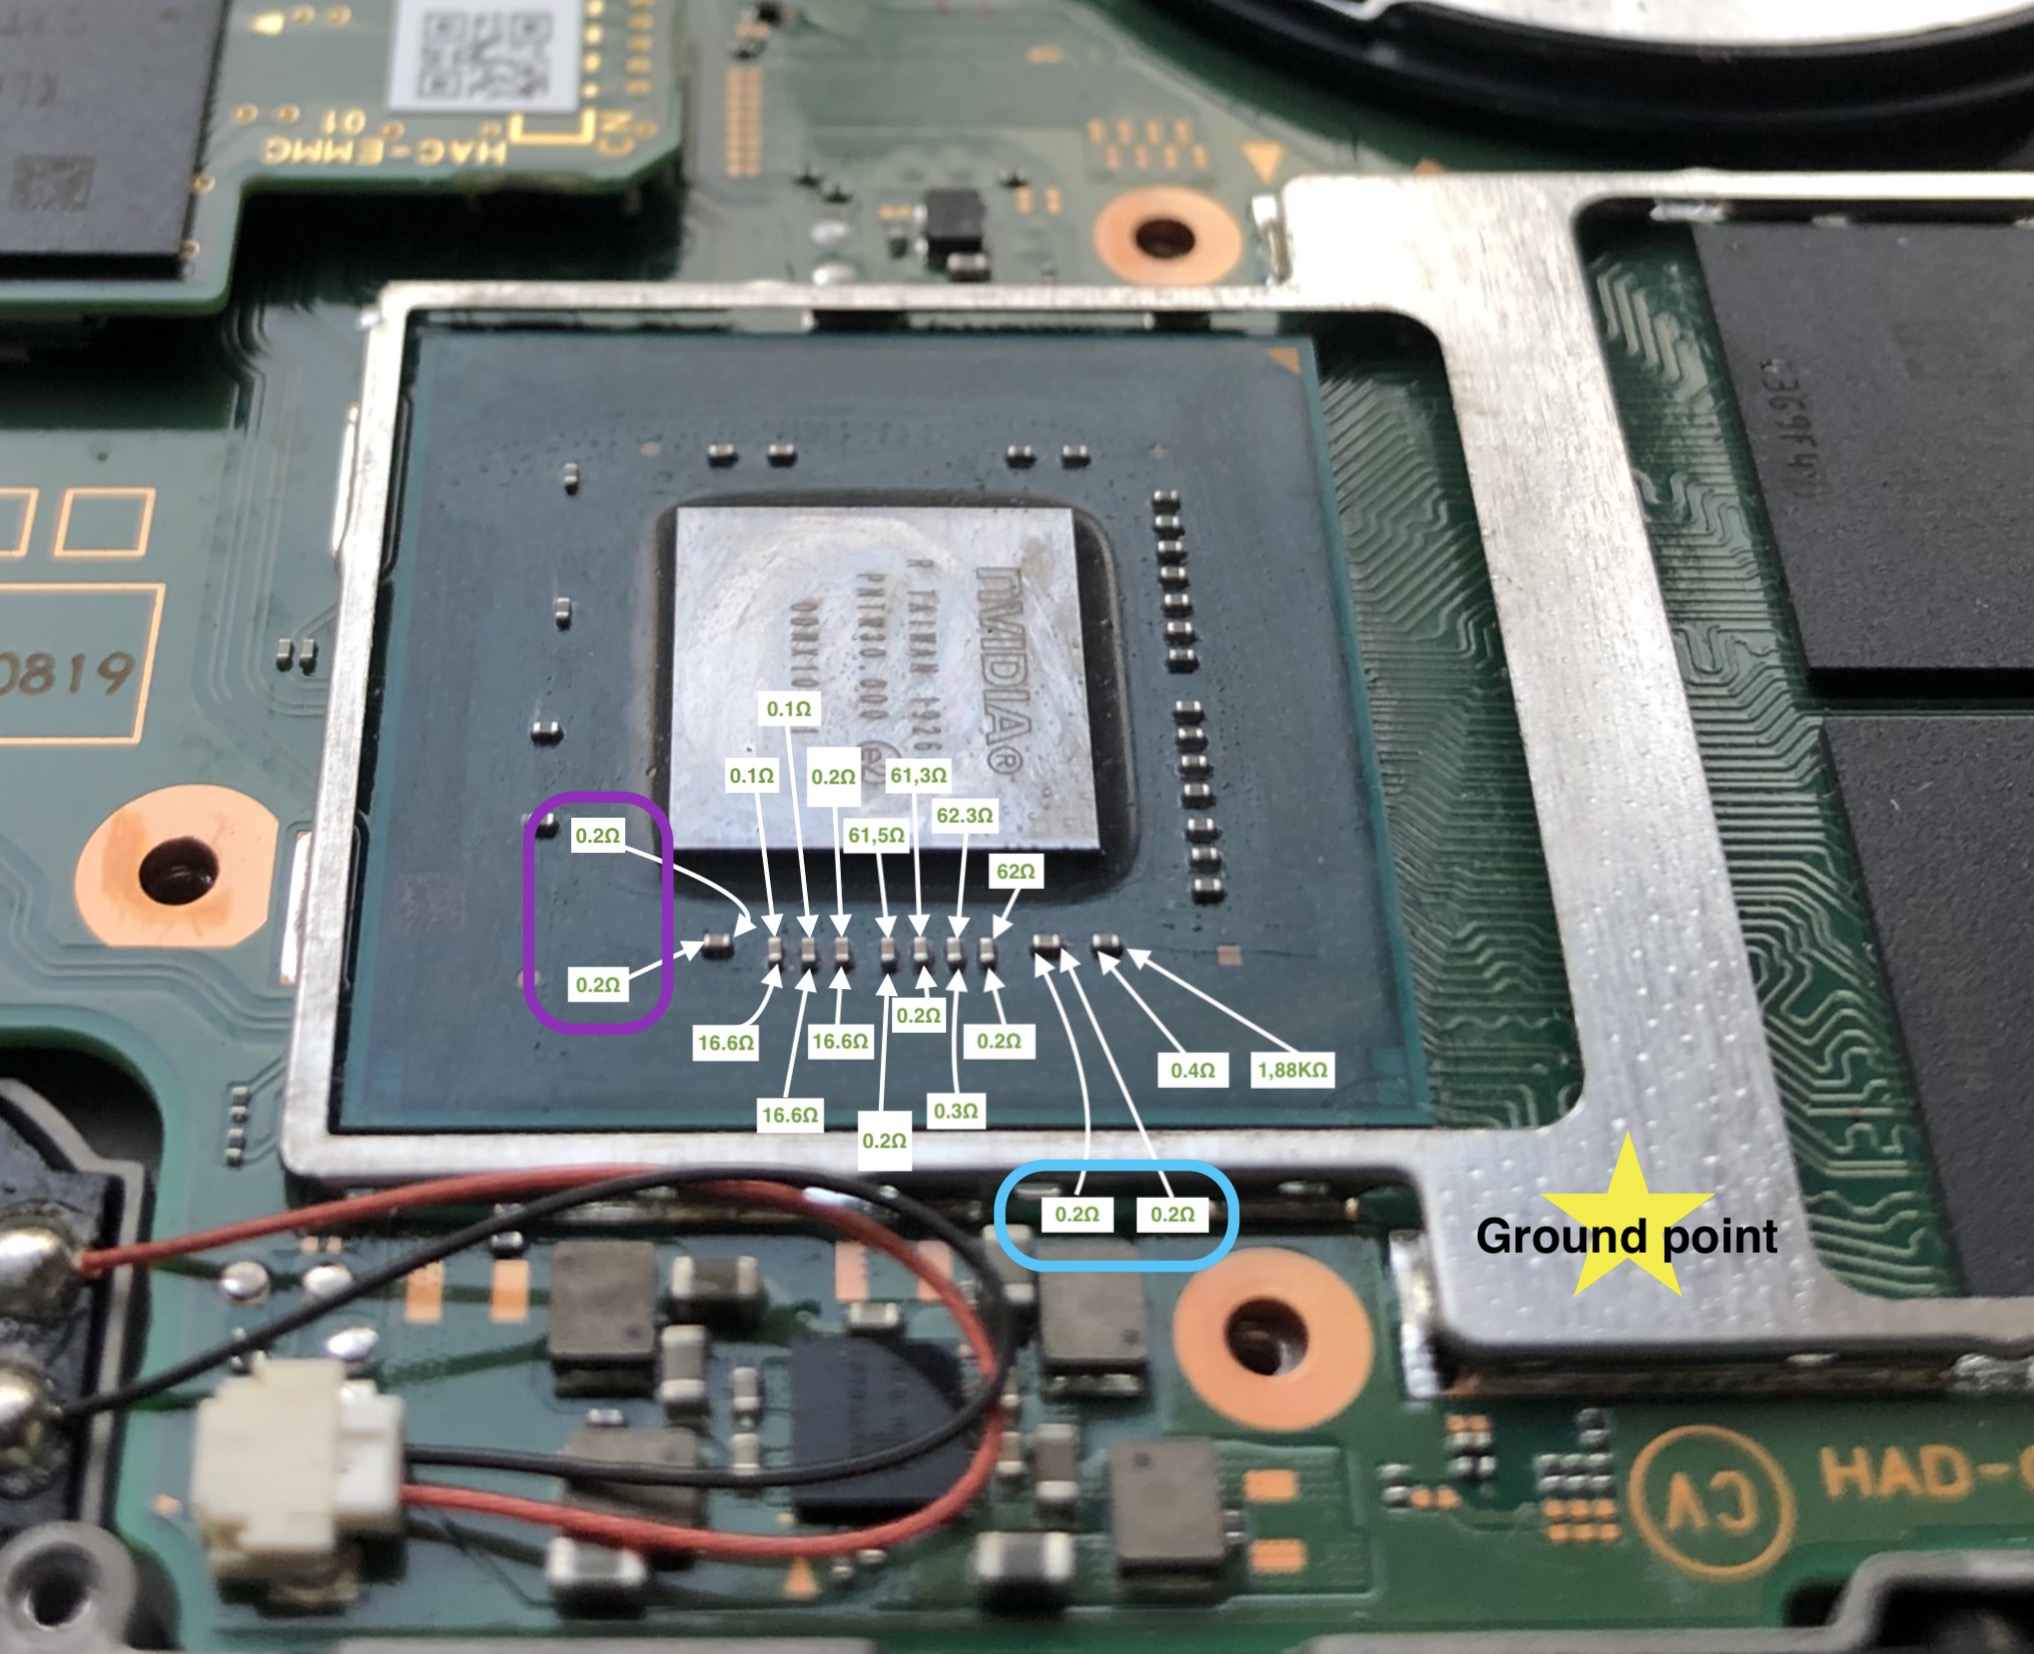
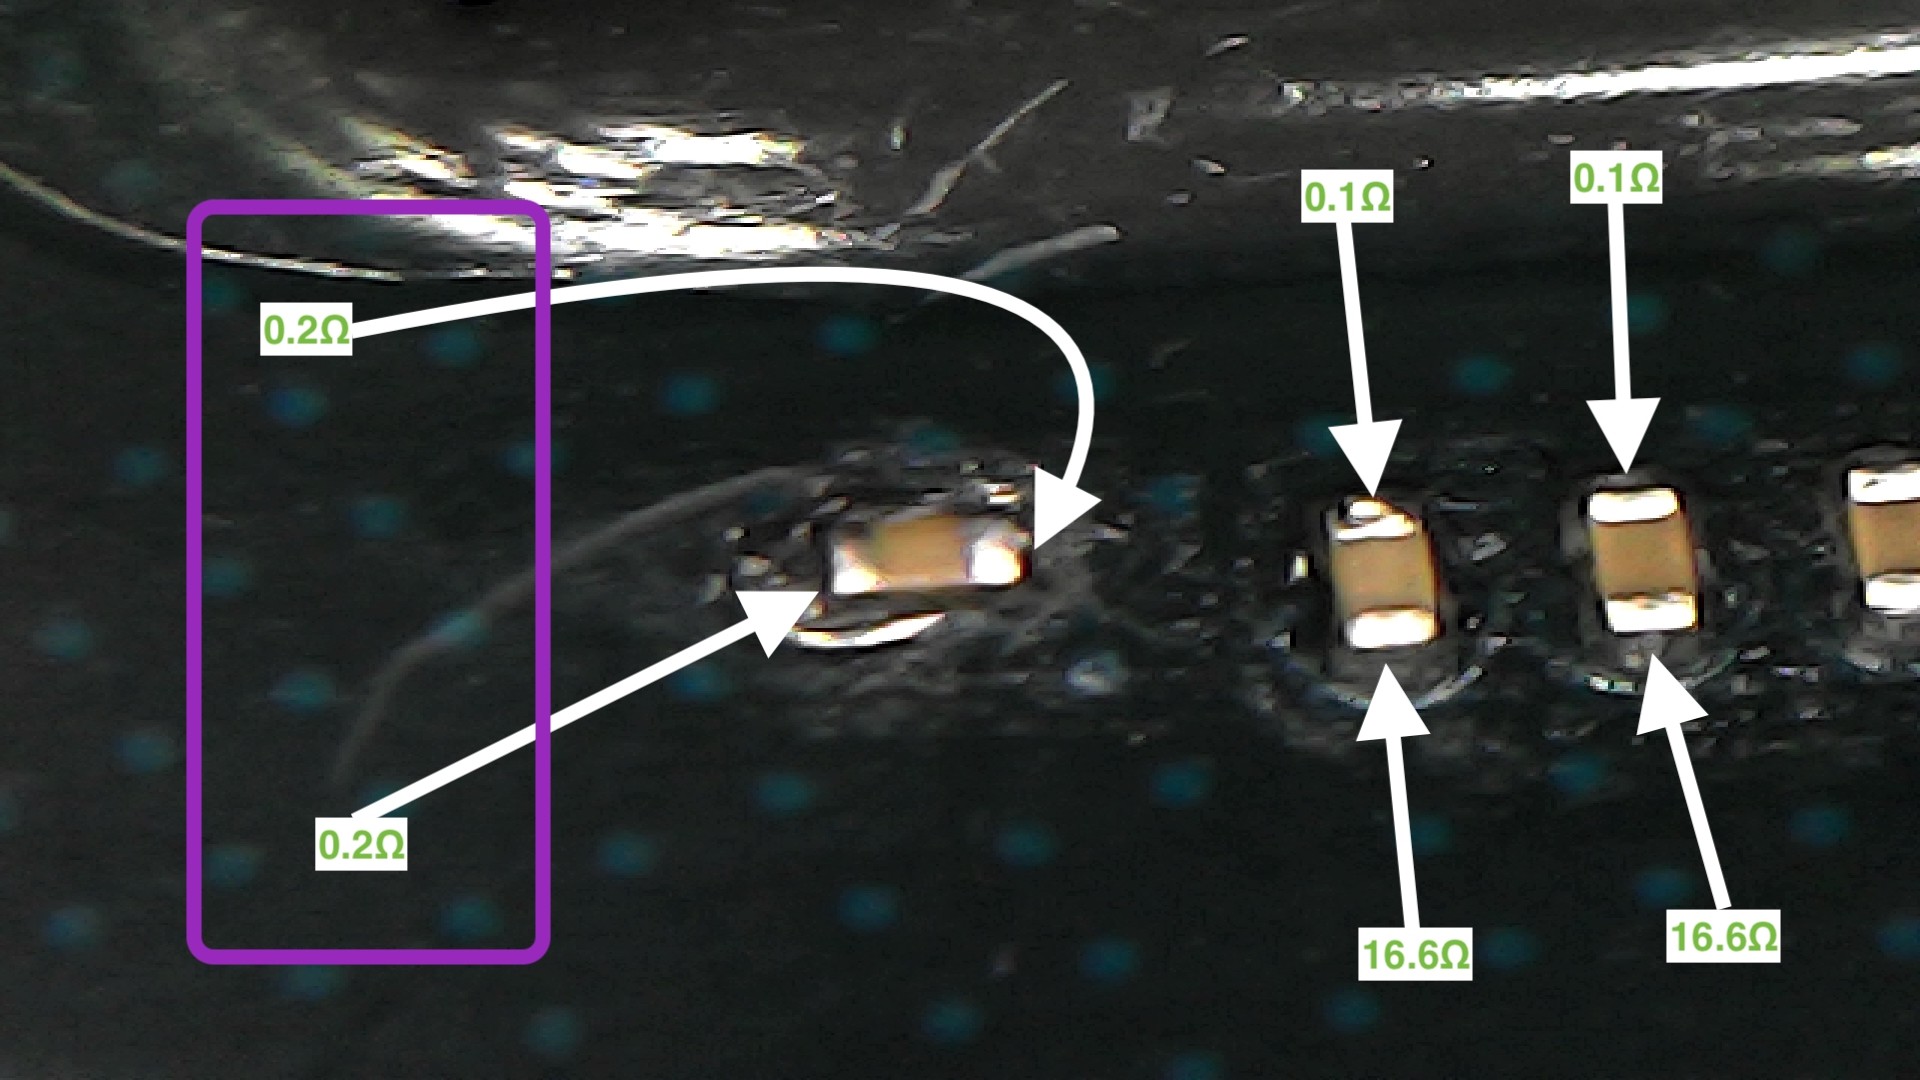
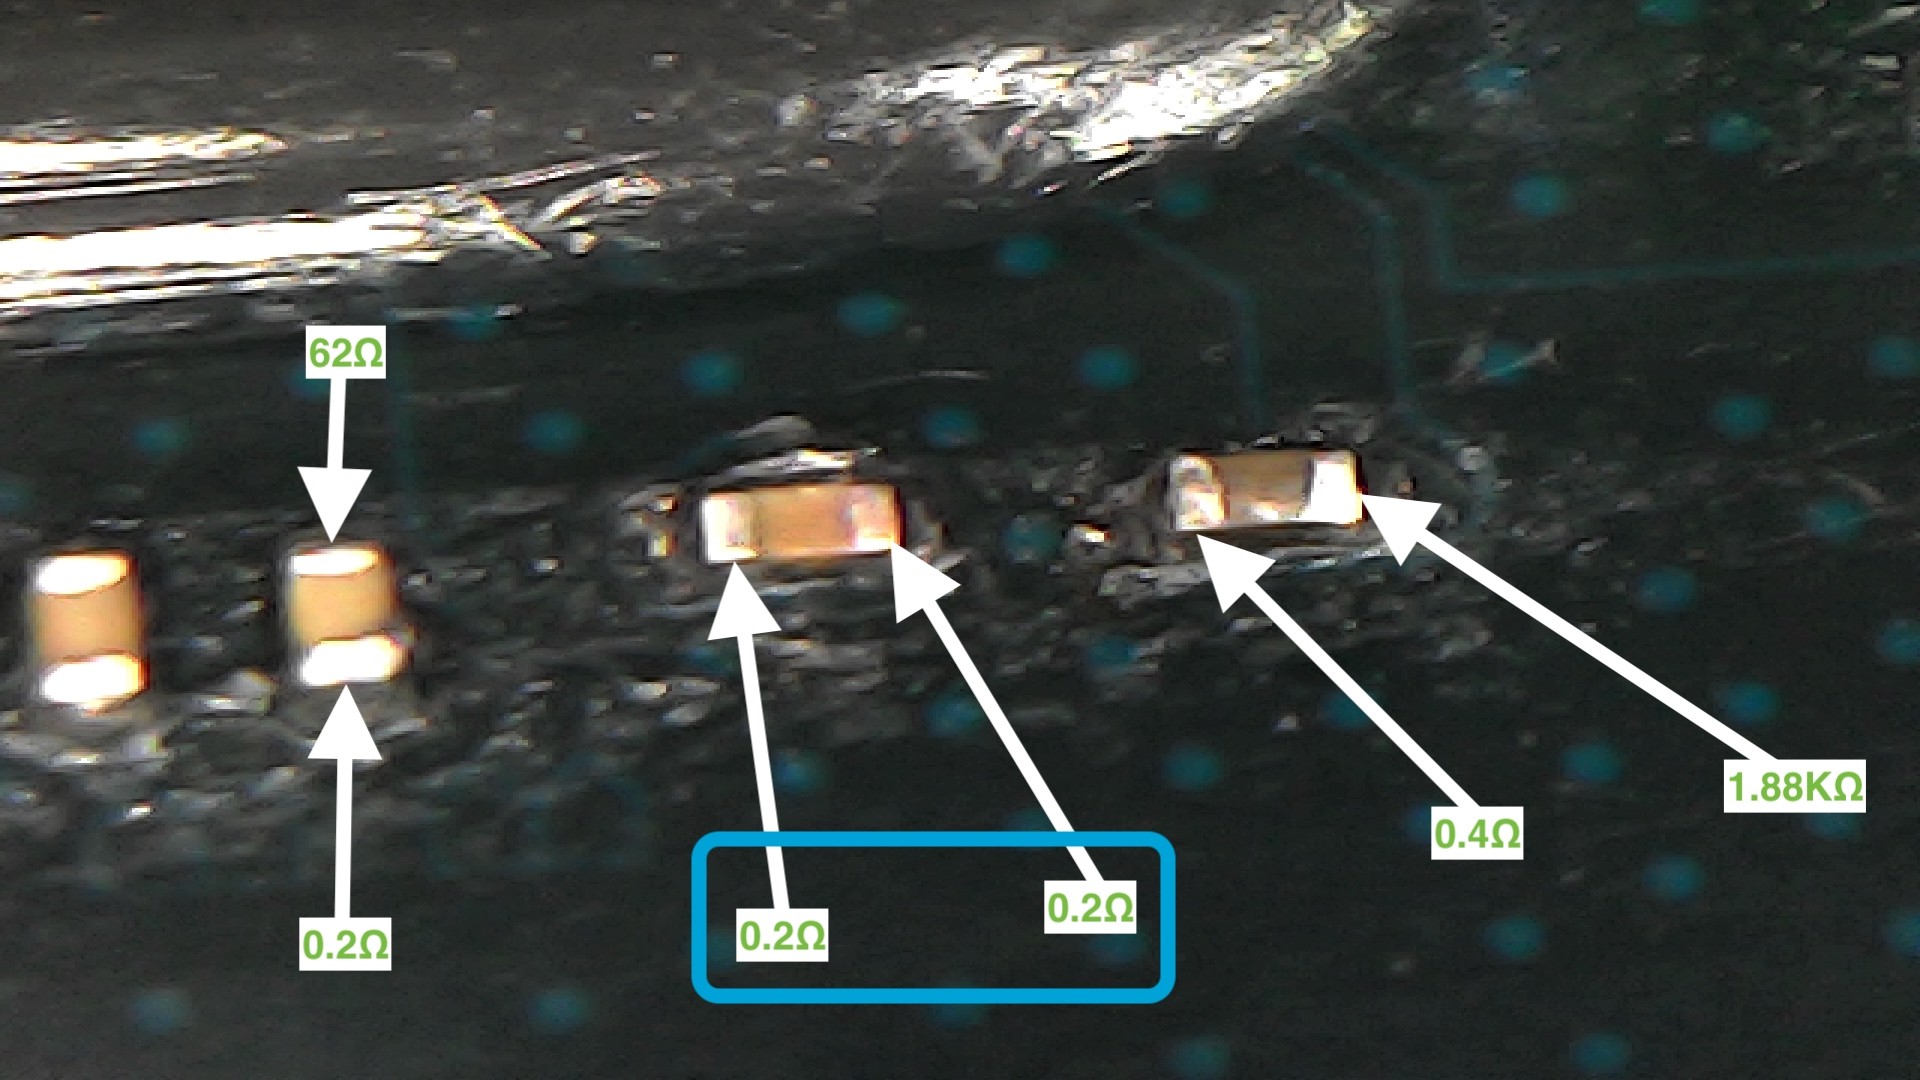
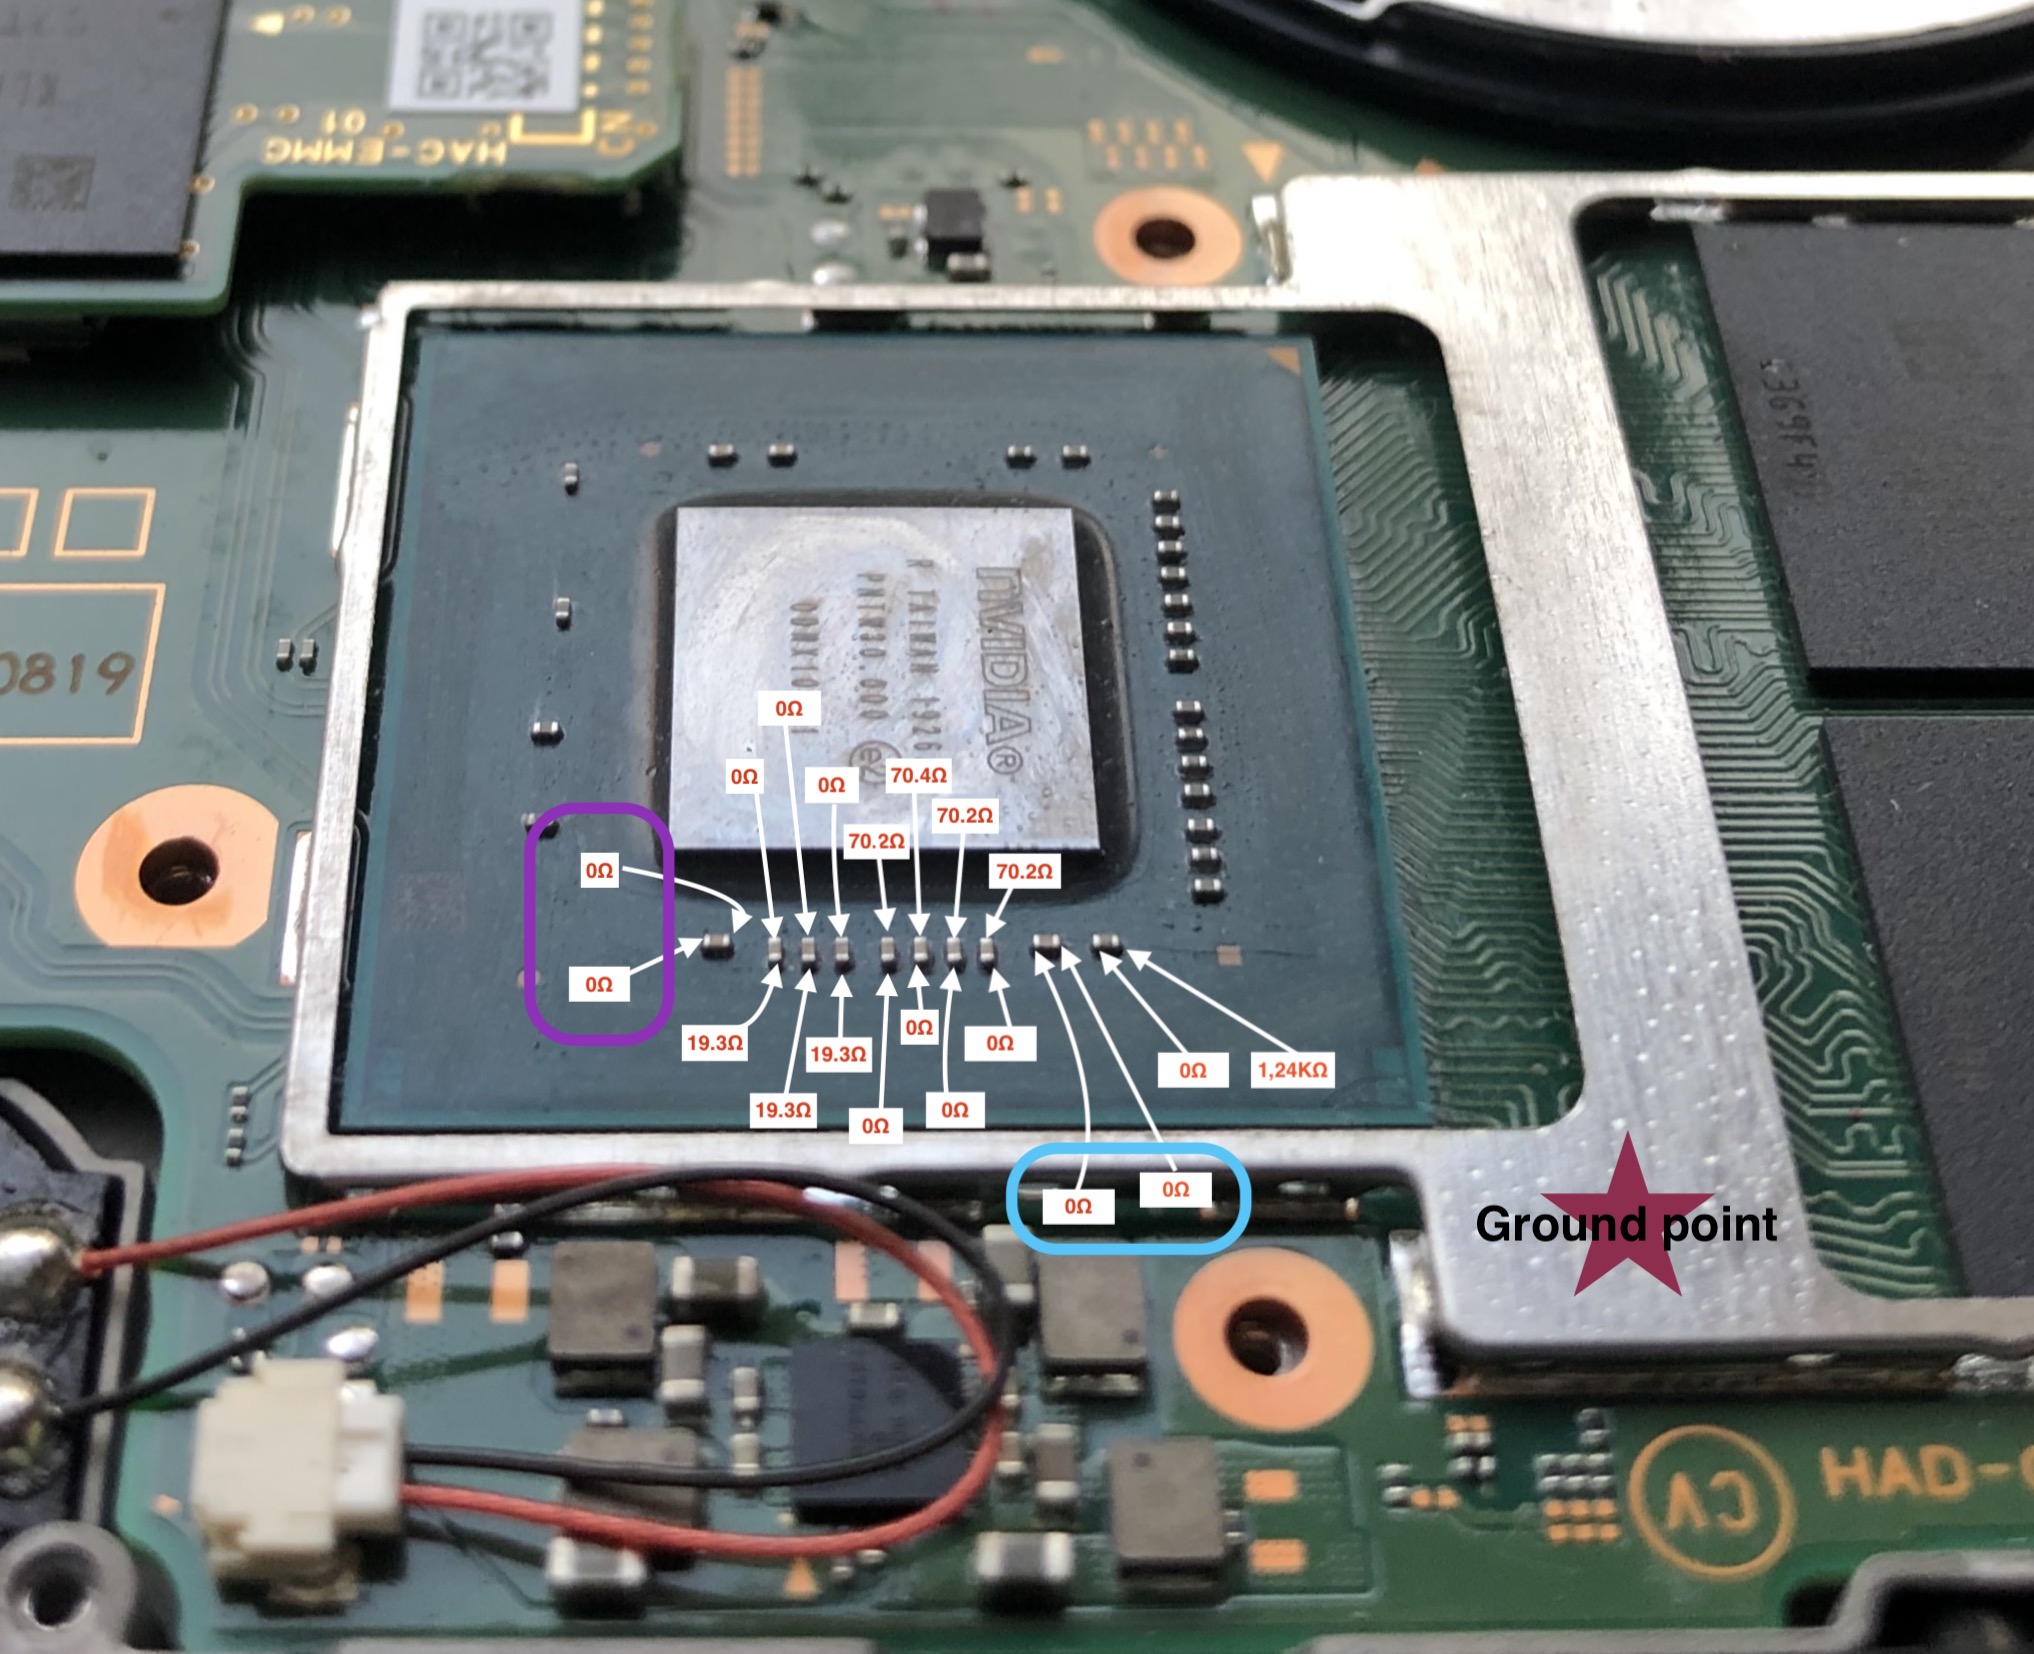
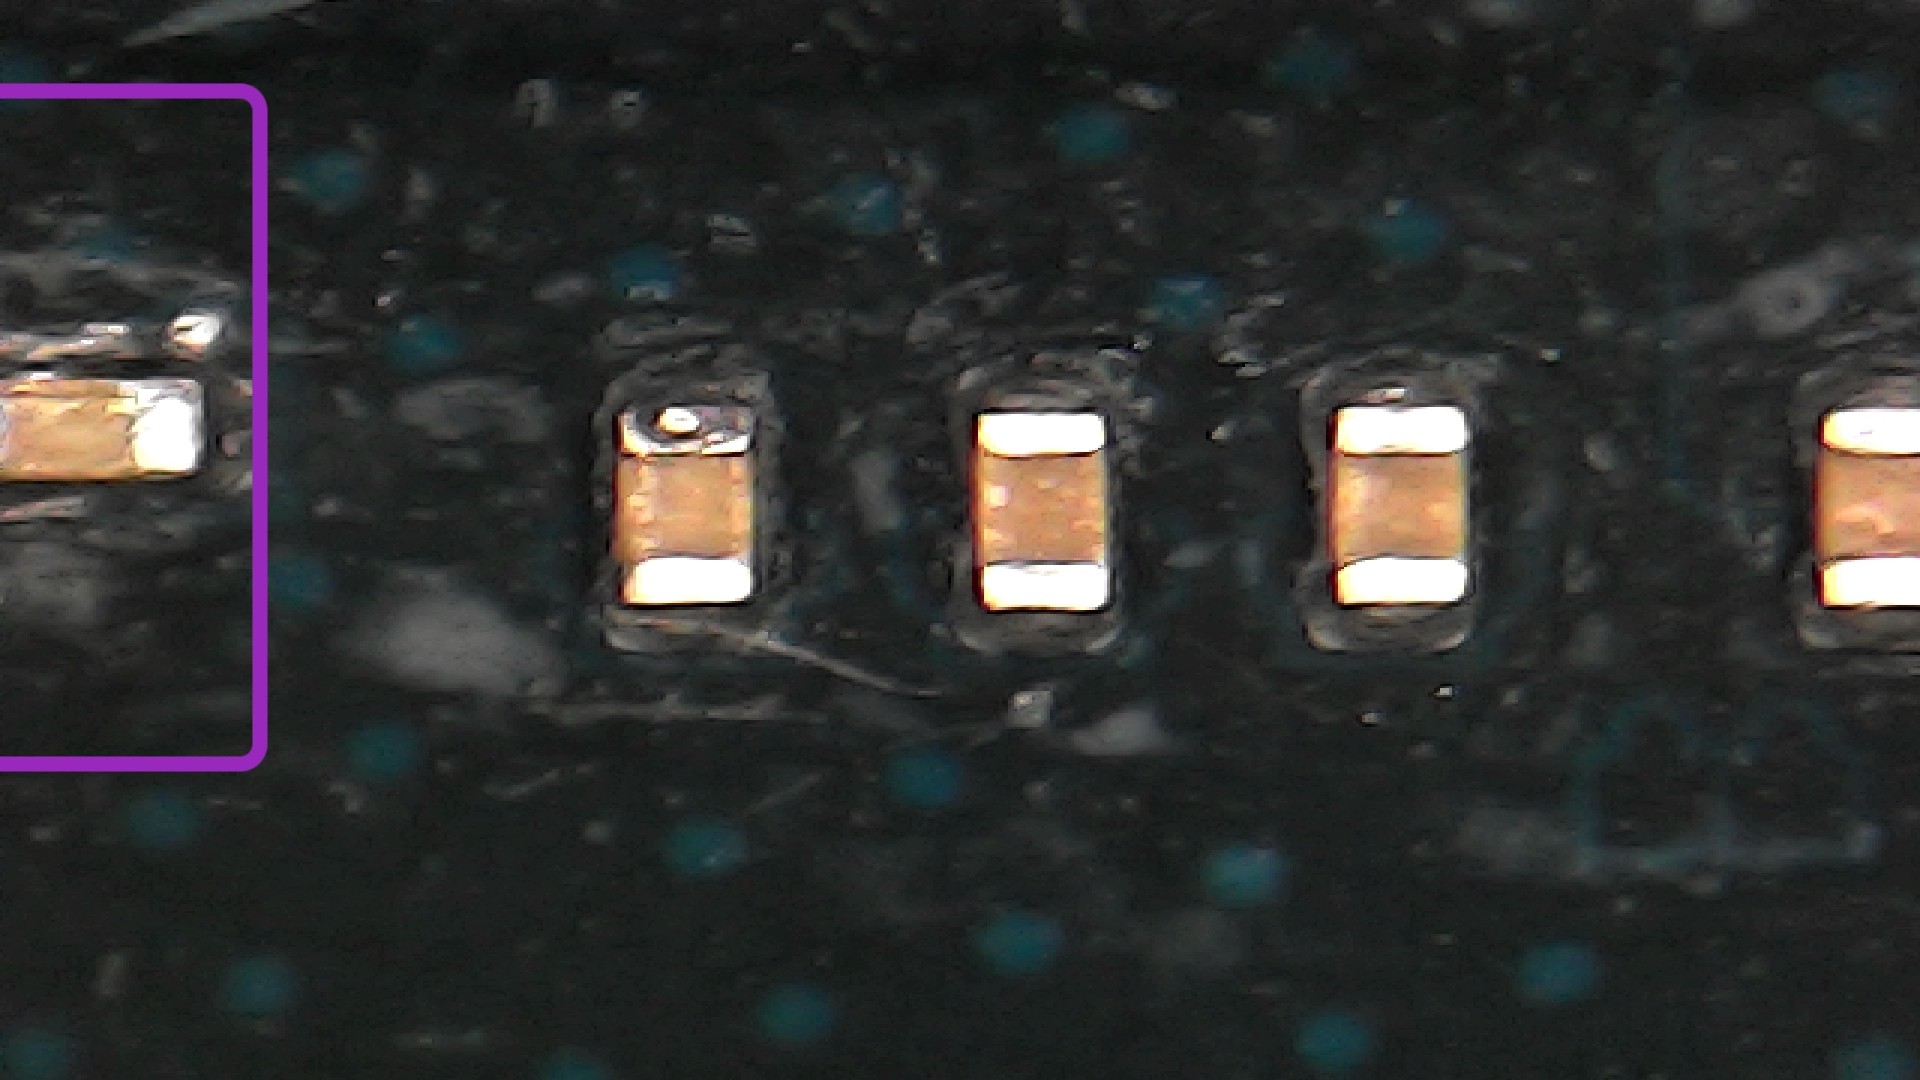
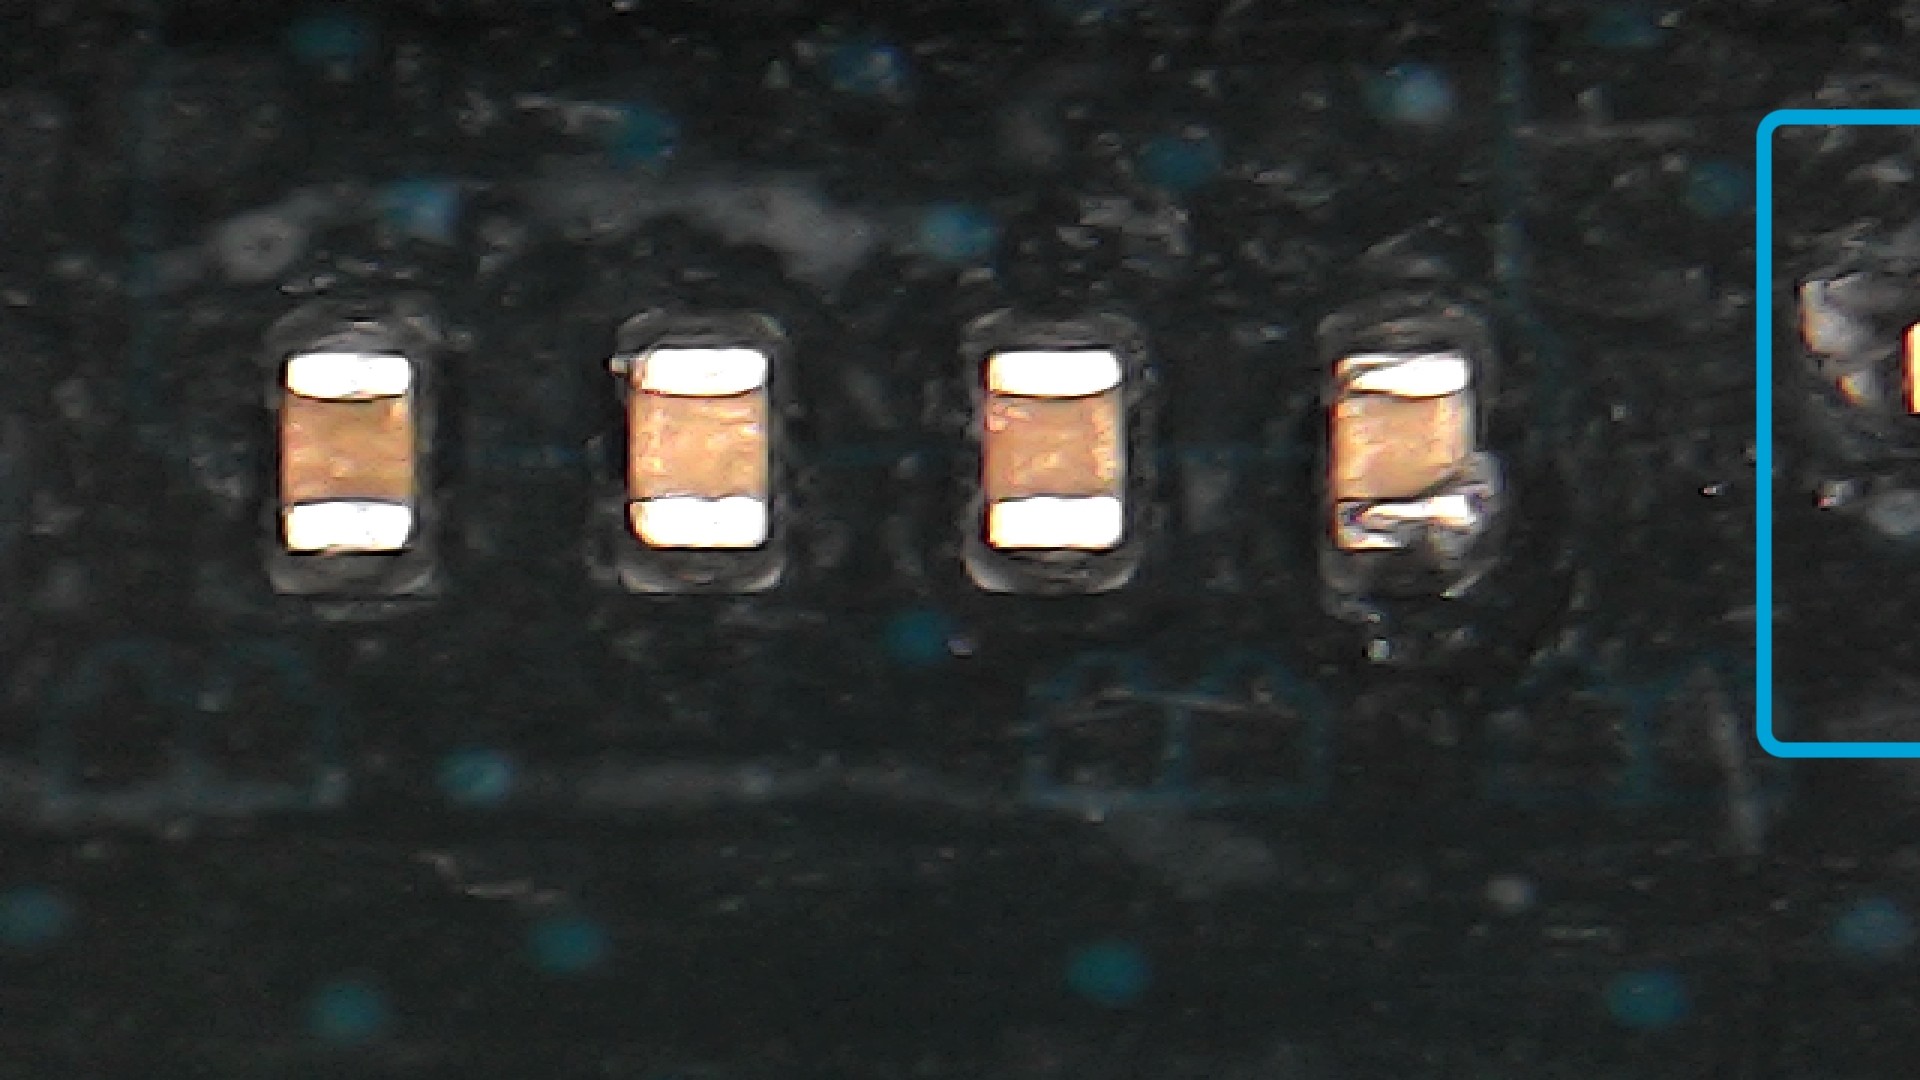
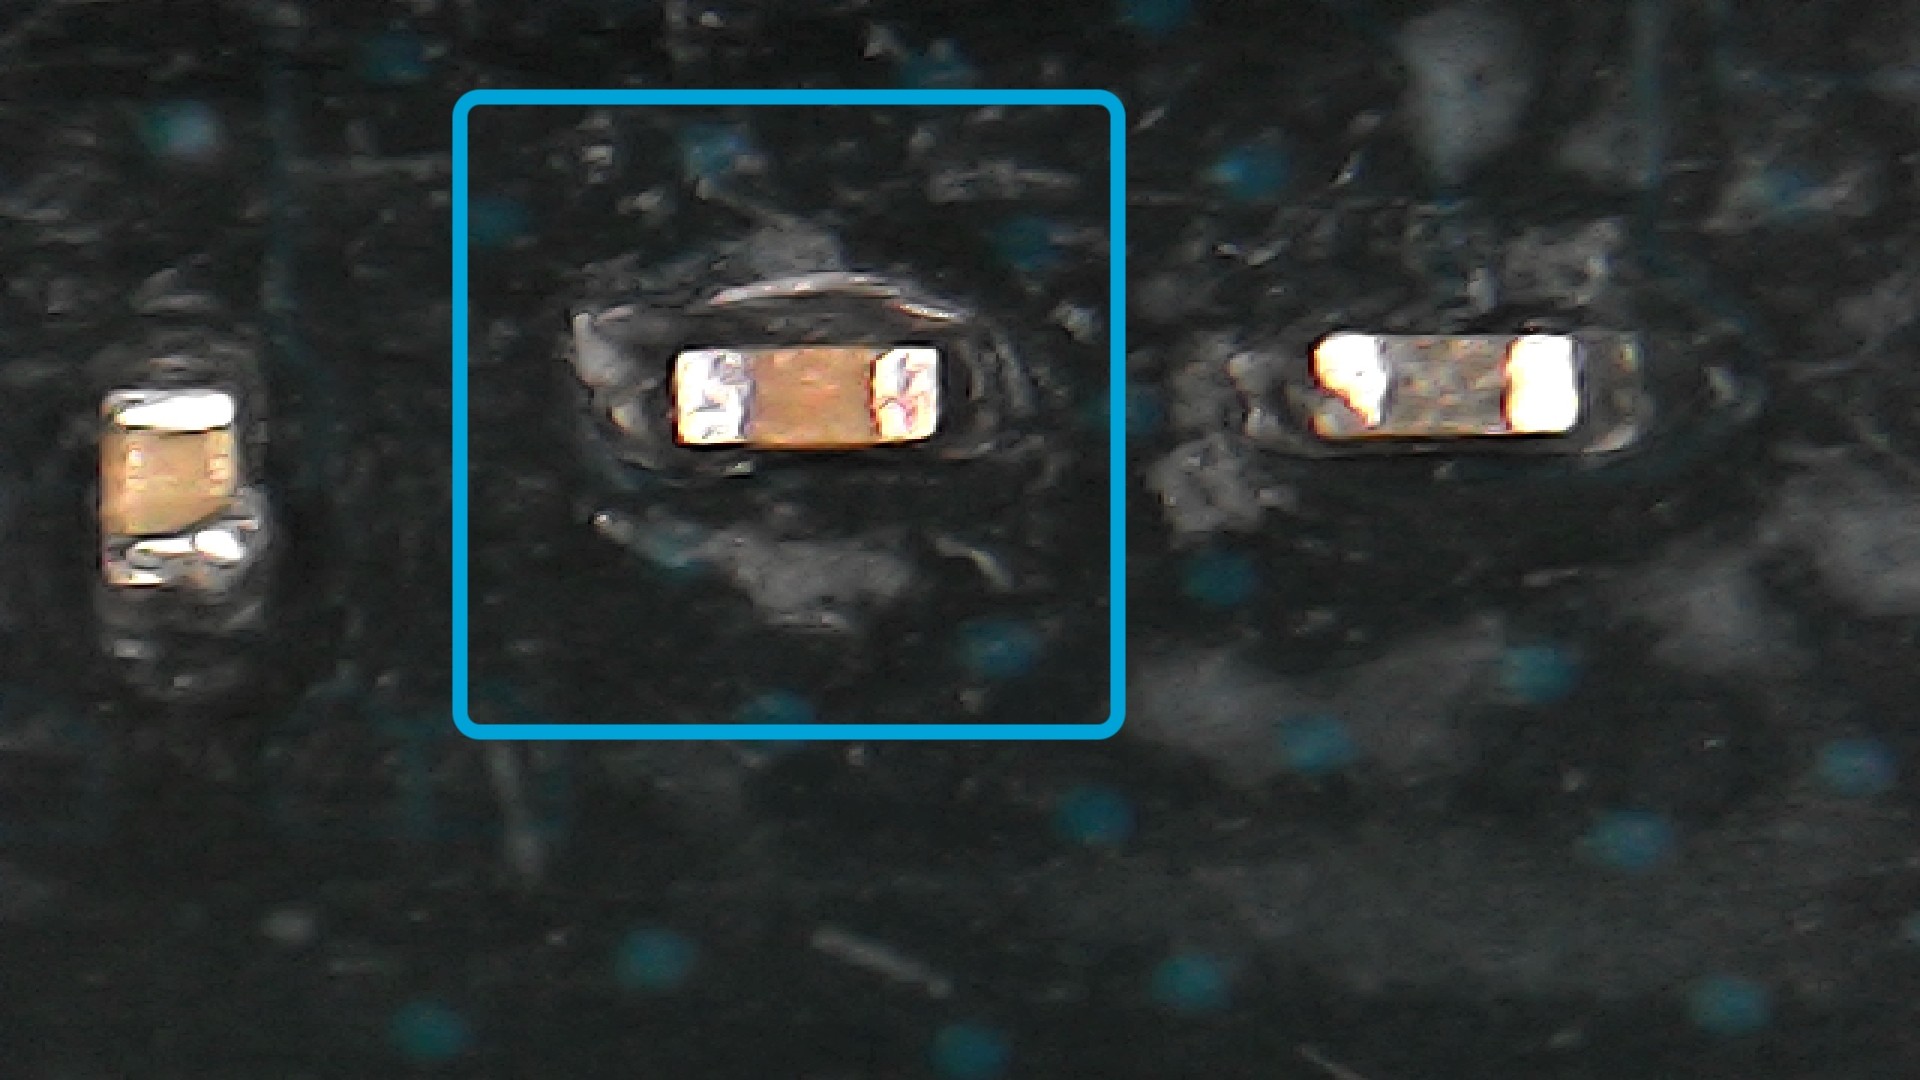
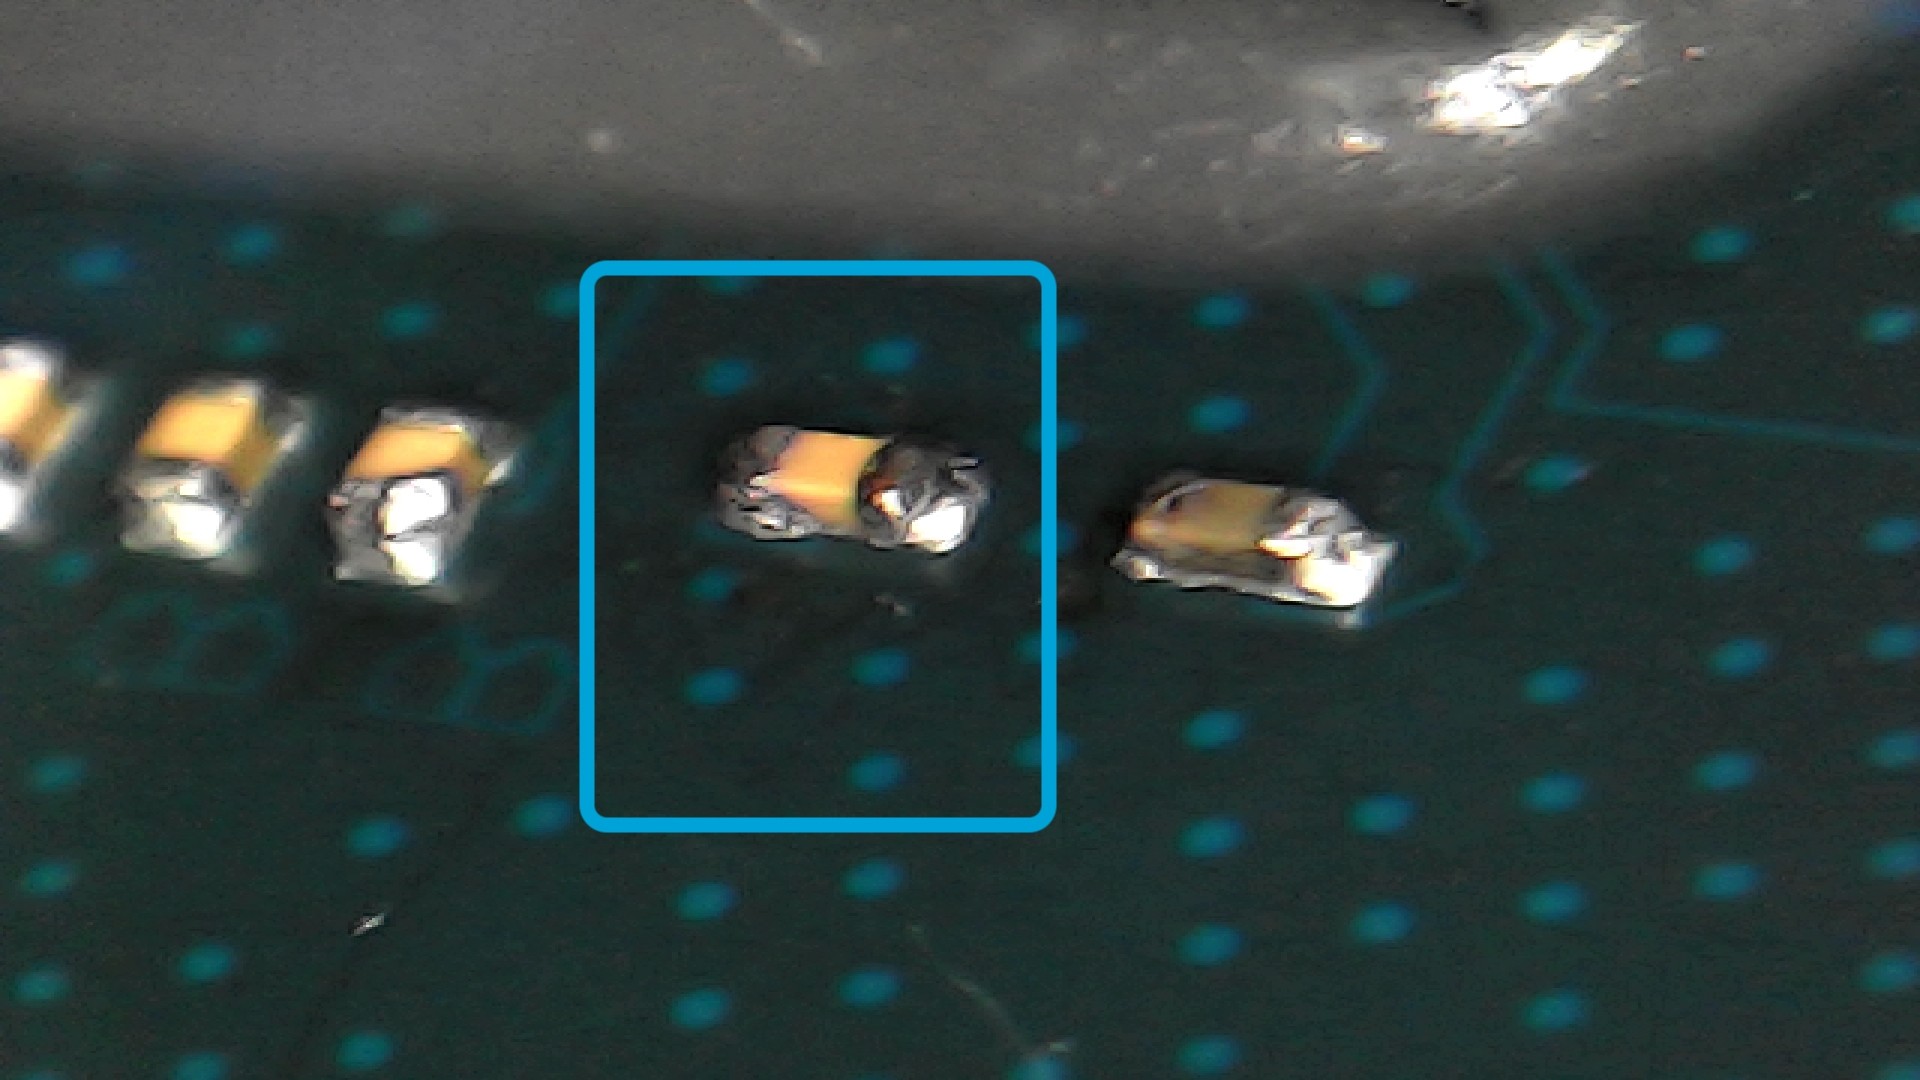
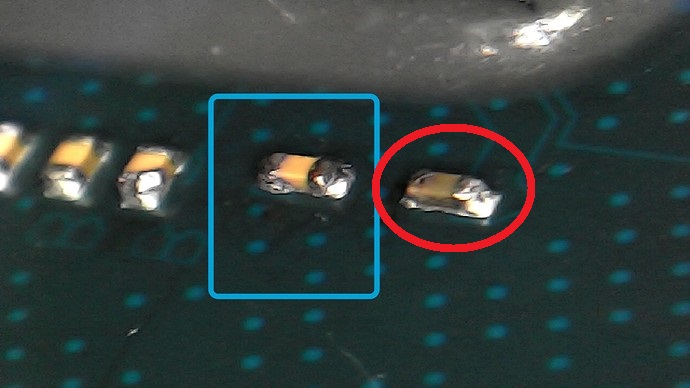
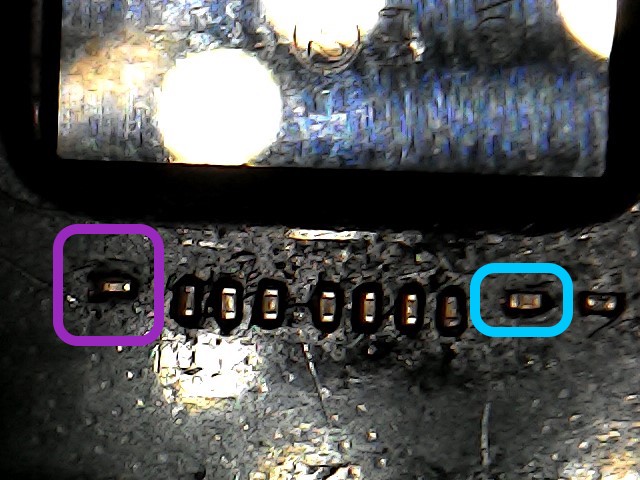
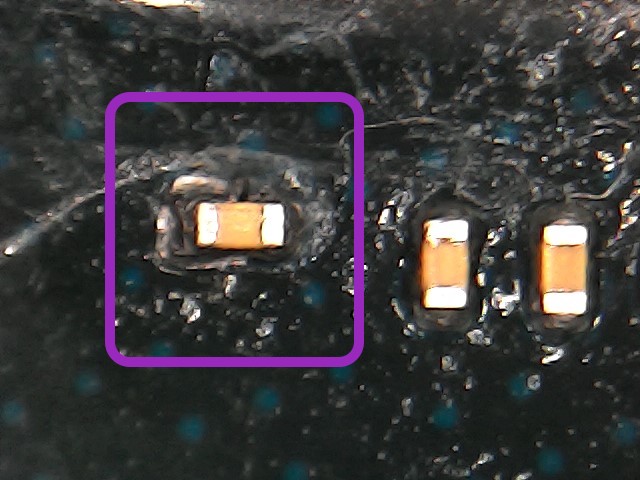
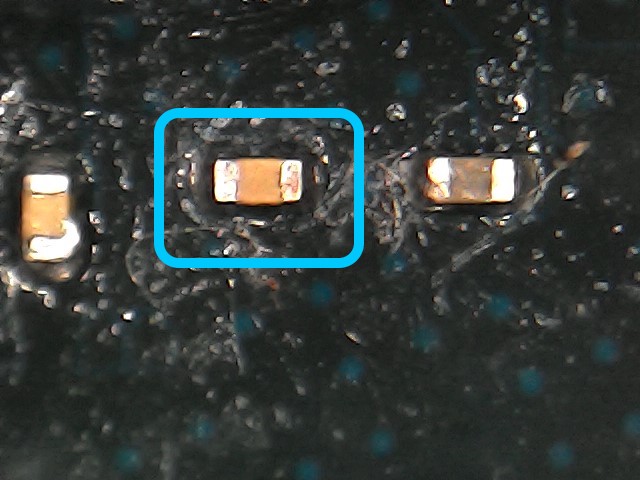
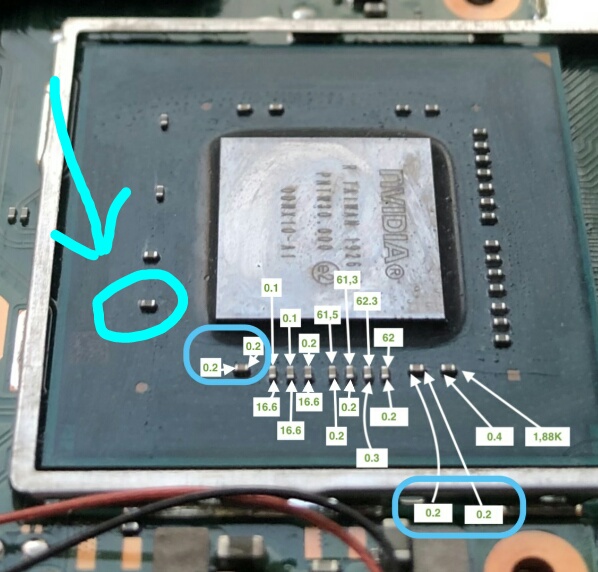
  • and of the row of SoC caps (I circled one that looked burned in red):

imgur .com/dTz9fnH
imgur .com/EstukfY
imgur .com/8Aiv8Qn

Note: it doesn’t smell like burned.

My thoughts

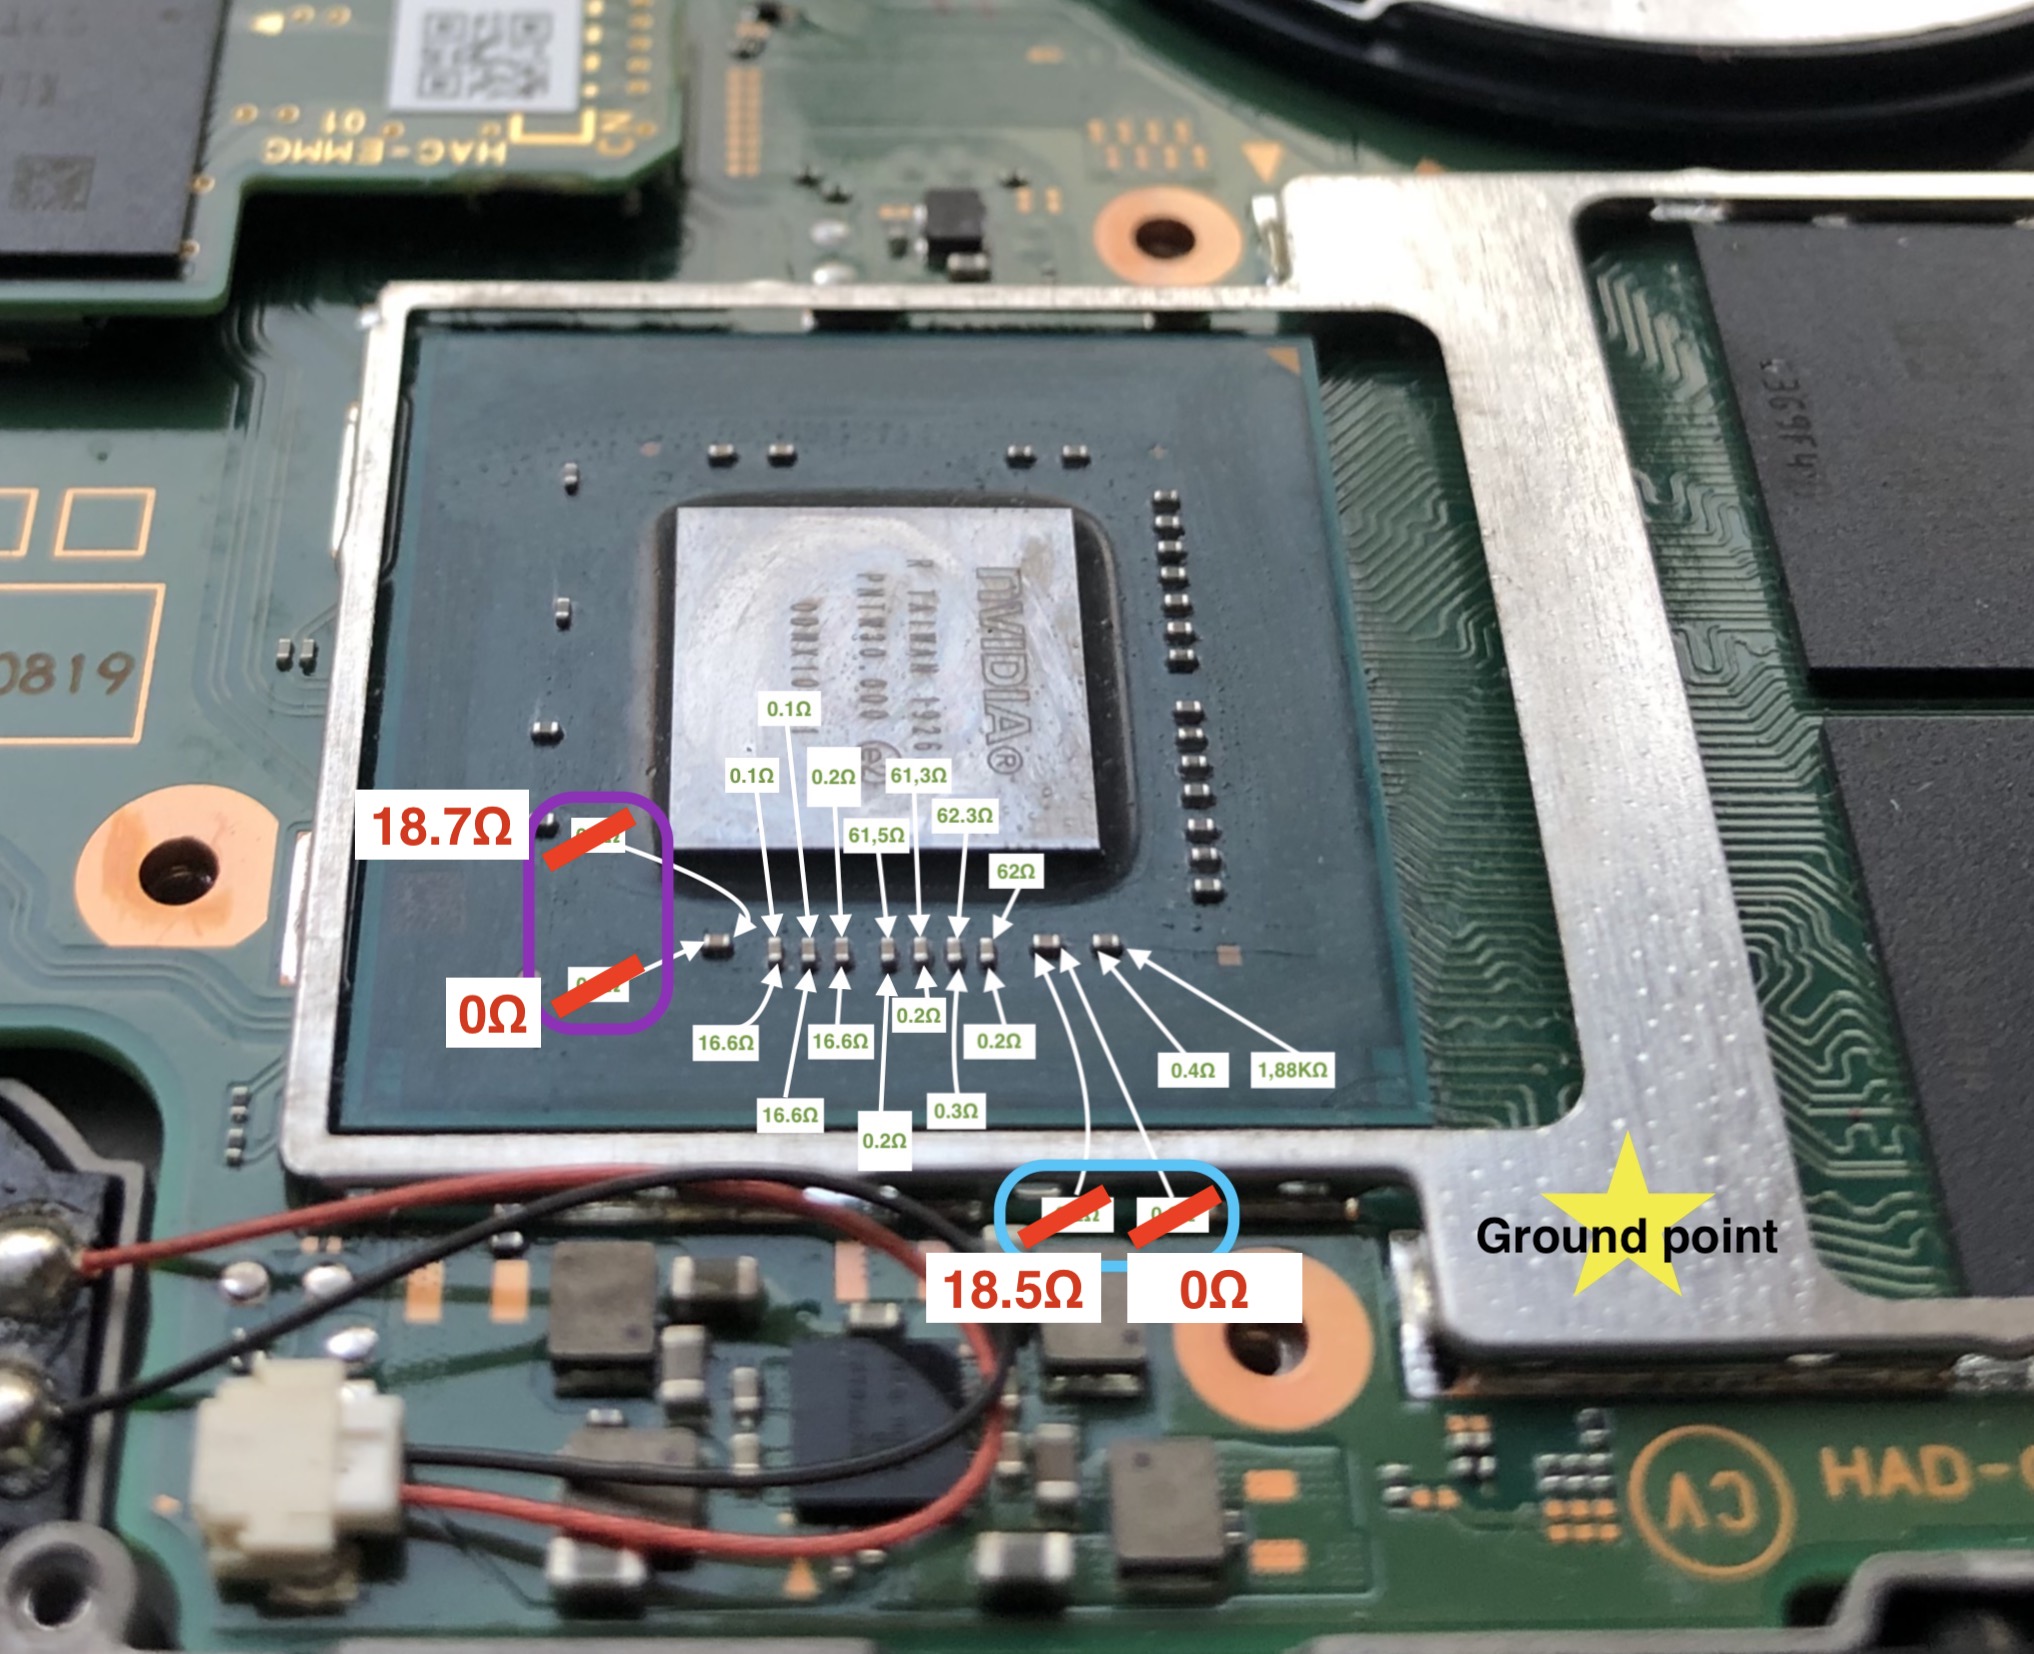
I think the SoC is burned and the caps are okay, I read here that they are pretty solid.

I guess to save the board, the solution would be to replace the SoC and the nand since they are linked. But I’m afraid it doesn’t make sense financially speaking.

I have a multimeter to play with if you can give me some hints. I’d like to get a confirmation that this motherboard is hopeless.

Hey all, I’ve used my multimeter to get some readings.

I find it weird that two caps have similar values on both sides.

I’ve highlighted them on the following image.

Any thought on those values ? (as reminder, this is a Mariko switch)

Thanks

Hi,

You don’t even say what the readings are… diode?, resistance?

If your meter is manual range then let me know what scale it’s set to.

Take a better pic of the caps now closer up.

It’s typical the relevant caps here get abused and sometimes crack resulting in a short, but i need actual resistance to ground readings on them… goes without saying i hope but disconnect the battery before taking measurements

It’s also typical that people leave the IC on the SX ribbon flex touching the SOC’s surrounding metal frame resulting in a short and red light

Hi Severence,

Here is the updated picture of my readings.
I got them using my multimeter set on resistance mode. It adjusts the range automatically but on this new picture, you can see when it’s ohm or kilohm.

The battery was disconnected, actually I removed the whole motherboard so nothing was connected when I measured the caps resistance. I used the bottom of the SoC shield as ground point (marked by a yellow star on this picture).


And here are some close-up pictures:

good stuff, thanks.

If you reverse your leads and put red on ground and black on caps positive and also post the readings too, i expect a change on the 1.88kohm cap in particular.

Following the results, and provided they meet my expectations i’ll ask you to briefly power the board on with the battery connected (prompt it to boot with the cable and the board outside of enclosure)

now drop a few drops of ipa on the two dead short caps in question and see which one starts the bubbles off, if at all, if you see it, then disconnect power unplug battery and knock the offending cap off with your soldering iron using a blob of solder, clean up pads with flux, then check the resistance to ground on the cleaned up pads, of course wait til you’ve gotten the measurments i asked for above first, i want to rule out pmic before we subject it to anything :smiley:

Also, it’s hard to make out but your first close up pic looks like it has solder blobs around the caps is this just a shadow? if not might be worth touching that/them up or taking a pic in better light for me to confirm

Thank you for your hints.

I’ve checked the resistance again after reversing leads and here are the results:

The 1.88kohm cap is now giving 1.24kohm.

I’ve checked again under the microscope those caps and it’s still not clear for me if they are shorted at their base or not. My observation is really altered by the light direction. Sometimes I might say yes there is a solder blob, but then I check the untouched caps and it seems like there is something at their base too.

bonus side view:

I don’t know if I have the right tools to remove the hypothetical solder blobs though. I have a brand new heat gun, some flux, and a basic soldering iron, all from aliexpress.

no worries, ok,

it’s likely just flux residie, you might try using a sheet of paper to get in there to clean them up and rule it out, gentle scrub with a brush and ipa won’t hurt either,

My concern isn’t that you shorted the caps/rail with your iron as i believe the max pmic has short circuit protection but more the potential voltage differential on your irons tip

Theoretically it should be fine, provided the short circuit protection doesn’f kick in and the rail is active for even just a few seconds then i’d proceed with earlier recommendations to power and add ipa to find the culprit.

If your concerned about your iron, practice on an old scrap pc/laptop board with cpu, attempt to solder a jumper to one of the caps then attempt to remove one with a solder blob, they should have a similar thermal mass.

Don’t use hot air here

daa286eb53a1cb3b7e5caf967ec2bc7299b40224_2_690x388

On closer inspection it would also appear that this capacitors end-cap is damaged, while it’s not likely to cause you issues in the short term it may do long term (if you can resolve your original issues that is) I would personally remove it together with the other capacitor/s that you determine to be bad… i will have a better sense of this after you clear the dead short and retake resistance measurements on these particular rails

Thanks again for your useful indications.

I have a broken GPU somewhere, I’ll do some training on it and I’ll update this thread when I’ll have something new to tell.

Good evening,

My mariko Switch is alive!

I did a lot of cleaning using some flux and a desoldering braid because something was shining all along one of the bad cap so I thought they might be shorted at their base.

After that, I tried to put some alcohol on the caps and then I powered on the motherboard. A very strange sound, like something burning / under pressure, could be heard but I’ve seen no bubble coming from the caps. The SoC started to get hot and after 7 seconds the strange sounds vanished. I’ve unplugged the battery, thinking that this test just killed the SoC a little bit more.

I could feel that the SoC was warm and so were the back of the motherboard and its nand.

After that a few minutes, I plugged again everything and something had changed, the SoC was no longer warm, even after 30 seconds plugged. I thought it was all dead but after checking with my multimeter the reading, I was hopeful again.

Here is the reading after this little experiment:

As you can see, both bad caps give now different reading on each side.

After that, I put the motherboard back in place and plugged in everything. I couldn’t believe it when I’ve seen the screen displaying the Nintendo logo just after pressing the power button.

I’ve tested the console and everything is working normally so far. I’m impressed.

Here are some pictures of the caps after my cleaning:

WIN_20201229_13_55_31_Pro
WIN_20201229_13_54_35_Pro
WIN_20201229_13_54_44_Pro

and here is the switch perfectly working:

What a day!

Thank you so much for your help Severence.

Hi again,

I’m really pleased you were able to resolve the problem and get your switch up and running again :smiley:

It sounds as though your initial cleanup with flux and wick removed the majority of solder and/or conductive debris around or under the caps and the subsequent power on with alcohol and the ultimate high current draw on the shorted rail and in turn the high heat cleared the rest on it’s own as indicated by the HF/squealing noise you might of heard.

You measurements on the caps afterwards now appear to be more inline with the values I’d expect on mariko hardware.

1 Like

Damn it!

Its new life was kind of short.

I’ve updated it yesterday and launched a download of Rocket League. The switch passed the night on its dock downloading the game in sleep mode.

This morning, when I came to check if the game was ready, I’ve seen that the light of the dock was green even though the console was asleep.

I took it and the screen was black. It was not responding to the buttons or the dock.

I successfully restarted it by maintaining the power button and volume buttons. There HOS was fully booted and I clicked on settings. After that, the screen displayed the following message:

Then I rebooted the switch again and the console was stuck on the Nintendo Switch logo.

I did a hard reset again and this time I got only the nintendo logo and then the screen was off.

This last step has been repeated 10 times and then it no longer worked.

Now the switch is always off and cold. The hard reset doesn’t work.

I’ve checked all the caps and I see nothing bad. Same for M92T36, lines 5 and 6 are OK. I didn’t check under the board though.

I also tried to put quickly the SX Core on the SoC and all I get is a flashing blue LED and then steady white.

Too bad it didn’t last long.

PS: yesterday I also got a blue screen when I reassembled the Switch the first time. Maybe the heat sink was touching something, I don’t know. But I didn’t panic since after checking everything again, the console worked properly.

Hi again,

Sorry to hear that.

At this point I’d say, if your able to PM me (i can’t) then just send it my way and i’ll fix it free of charge. Going forward, the diagnosis and repair gets somewhat complicated, though i am happy to help remotely as best i can here… it is somewhat difficult.

In the meantime though I’d suggest disconnecting battery/power.

I don’t recall what steady white indicates in terms of an error on SXCore as I’ve never seen it, SXCore modifies boot0 so perhaps it’s indicating an issue there which might also explain the BSOD you observed (can be caused by a corrupt boot0) which may point to a 1v8 problem.

I’m regretting not saying the otherday to remove caps, scrub and finally replace as a matter of course…I thought in your particularl case it’d be safer to leave well enough alone :frowning:

Had a bit more of a think on this and if you want to try to resolve the issue yourself you might try,

Removing the SX-Core and just for levity check the resistance on the “SP1/SP2” pads on the flex/ribbon and ensure the ribbon isn’t posing a problem and shorting out for some reason.

If all is good then next up, plug the debug USB into the modchip and then into a PC and check it’s detected, i believe it should show up as a COM device, so check device management in windows. If it’s detected then follow the manufacturers instructions and update the firmware on SX-Core, if all is good then disconnect from PC and put the modchip to one side for now, we’ll only use it again if the next few steps don’t bear fruit.

While the error you saw is sometimes synonymous with an “SD card issue”, i don’t believe that’s truly your problem, i think it’s more likely cause and effect… the SD has lines pulled high to the 1V8 rail that I mentioned earlier, even so, it doesn’t hurt to check, so I’d disconnect the SD flex connector and attempt to power up the board in recovery mode. If nothing is displayed on the screen then don’t re-attempt, just disconnect battery/power, i say don’t reattempt as if something is pulling a normally high signal/s low then it’s possible it could cause corruption of the data on the EMMC (or further corruption)

If the console didn’t boot in the previous step, then I’d remove the two caps that were previously shorted (1V rail) and also the third cap (1V8) that had the end-cap damage. These capacitors are purely bypass caps and their removal will not prevent the console from booting under normal circumstances and for the sake of testing purposes it’s safe to do so. Even so, don’t power up the board at this point but instead take resistance readings relative to ground on the now unpopulated capacitor pads the same way you did earlier on and post your measurements and i’ll check them.

Of course, make sure your comfortable performing the above steps first and practice if necessary on that GPU you mentioned earlier.

It might be you have to install SX-Core later in order to check partition validity or reinstall a fresh generated boot0 (and possibly other partitions) Of course assuming the SX Boot menu will even load without a valid boot0 currently (I’ve never tried)… as my suspicion is the caps were actually bad all along but intermittent, sometimes they only expose themself when they are warmed up (leaving it in the dock over night) I think this issue is plausible and likely unfortunately as you mentioned it was downloading/updating a game and in turn reading/writing to the EMMC while under a possible hardware fault condition

Thanks again for your help Severence.

I live in France so sending you the motherboard could represent a certain cost. I see that Mariko switch as a side project. I want to turn my failure into a learning (how to fix electronic products). I already bought a new nintendo switch (unpatched v1) so this saving operation is not done in a rush and I don’t want to spend too much on it.
Do you live in Europe ?

I feel confident in my ability to remove properly the caps. I’ll do what you suggested. But first I want to disconnect the motherboard and check the caps under the SoC. I’ll keep this post updated on that matter.

Regarding the possible corruption of the EMMC, I have a complete backup of the nand that I made back in November when I received the SX Core.
I don’t know wether it could be useful since I’ve updated this mariko switch this week to HOS 11.0.1, more efuses are burned so my backup may not be able to boot.

Yeah, UK.

And completely understand, this is truly the best way to learn, funnily enough this is pretty much how i started, i botched a modchip install (on a much older console) tried to resolve it…made it much worse, then left it, came back to it a year or so later having gained some much needed experience in both knowledge and practical skills and ultimately fixed what i though was unrepairable :slight_smile:

Thats good to hear, and one less potential issue. Yeah it’s useful, you can boot prior FW either through CFW or stock via hekate/SX boot menu regardless of fuse count so that’s good, though you may still have to generate another boot0 with EmmcHaccGen (or other) depending on if these were backed up without first doing a “clean up” in the SX boot menu, otherwise your boot0 backup will be the modified version and i am unsure if the modchip saves the original locally (which would likely be lost after modchip FW update) or if the modchip inteligently modifies the data on the fly, in which case it won’t matter. Regardless, you have all the important partition data backed up.

Hi, i have switch that doesn’t power on, short on the M92T36, after replacing the IC the short is gone, but still no power on, i tested the caps on the SoC, found one that is dead shorted, can someone confirm provid the correct reading it needs to be

On my Switch, I get 0Ω on the left and 454Ω on the right (based on this image orientation).

The resistance of this cap is 574Ω

i desoldered the Cap and still short on the SoC, thanks for your quick reply

Will say it’s extremely unlikely that the caps on SoC ever fail and if they do it’s almost always down to user intervention, for example modchip installs causing undue stress on them - thereby it’s only a common failure in these limited circumstances.

In your case, is it a mariko?

There is one cap on the SoC that normally tests as a closed short, so it’s likely not your issue…though i’ll double check later to verify which paricular cap it is