Those ones ? :
If yes, then it looks that also for tweezers i am bagging you to know what you are using 
Those ones ? :
If yes, then it looks that also for tweezers i am bagging you to know what you are using
Yeah that’s the ones… junk ![]()
That will teach me for falling for the NRF shill once again… I should have learned my lesson after the first few times ![]()
The brand/paint has wore off on my go to pair so no idea how to find them, but they’re great and have barely any side to side movement and close together perfect… sorry I’ll see if I can find them again at some point online.
The other pair for finer things which are semi-decent for extra fine work is “titanium tweezers” (should be able to find these on Aliexpress) they have knurling for grip… but they are not truly titanium…they’re alright but aren’t very hard and stock standard the very tips bend out of shape if you look at them wrong… I ground them down and manually hardened them with a blowtorch and quenched in oil and now theyr’e pretty decent.
btw popped T3A station company an email about incorporating tip profile functionality… lets see what they say or if they respond at all
Haha, sorry for that, i am more used to car mechanic tools or pure computers than electronics, and a question call another one, i am sorry, i am abusing a bit i will slow myself down with questions. You already gave me so much answers, thanks again.
Thank you so much, let’s see.
That’s also a way to go to harden them manually you are right. I will do that once and try to find these as well. Just in case you don’t find back the other one you have.
I hope they will get back to you, and that would really be a great news, just at least to have some choice with different product. ![]()
Yeah sometimes if they’re really, really cheap tweezers they are by nature not hard enough or not any more hardenable, in those cases you have to blowtorch then dunk in charcoal dust and repeat many, many times in order for the steel to become hard enough then finish with the quench
I doubt they will… but worth a shot ![]() , if it had this functionality then I think it would be a superior station as a whole… though I’m not including their T12 handle in that as I’m not overly keen on the tip stickout. The power headroom on te T3A PSU s welcome, the screen is larger and colour and the case seems to be higher quality… so yeah just that all important feature for me to jump ship
, if it had this functionality then I think it would be a superior station as a whole… though I’m not including their T12 handle in that as I’m not overly keen on the tip stickout. The power headroom on te T3A PSU s welcome, the screen is larger and colour and the case seems to be higher quality… so yeah just that all important feature for me to jump ship
I found out that the T3A has 3 tip profiles setup and not only one. With a bit of luck, you might group tips that have a similar calibration together and call the right preset, that’s also an idea, even if indeed it requires a bit of luck 
By the way, what tip would you recommend to get for T12 handle ? I know you said somewhere that you don’t really mind having that many tips because with the experience, you manage to do a lot with few of them, but for a beginner ? I am used to solder since a long time, but larger components, when it comes to microsoldering and rectify sometimes bridges around QFN components or so, i still sometimes struggle to define which tip to use.
Trouble with this is you’d have to remember which tip is over or under cal and manually compensate everytime the station s used which is a real pain and your far less likely to notice an over temperature situation. I’ve found none of these cartridge tips (including JBC 245) like operating at >430C for any extended period of time, doing so compromises the coating and leads to worse performance, this I think is the real benefit to true tip profiles and indpendent calibration ![]()
JL02 is great for when an area is cramped but it’s lacking in thermal mass due to it’s small and thin tip… but sometimes you’ve just got no other options as no other tip will fit (sometimes have to use hot air assist). J02, JS02 are slightly beefier version of that tip shape and have higher thermal mass and an easier time and you’d use them for less crowded areas. D12 and D24 are good all rounder chisel tips. Some people like the K style of tips - not really my cup of tea as I find them still to thick for certain areas and the bevel never seems to land where I want it, but of the bunch KU types seems alright (though I’d prefer finer version of it). Conical (sometimes “I” type tips) should be avoided for any handle type ![]()
Sure or take note, but overall i agree, it isn’t an ideal world, but overall it might be doable if the functionality never comes for those who want to go for it.
Thanks for the feedback, i was going for the JL02 and J02, but also the C08 which obviously you don’t advise. I was then thinking KU, D12, D24, BC1, BC2 and that’s it.
Might work fine as a minimal workaround for light users… unfortunately for me, I’m routinely switching between various tips in a session (beyond just x3) and as I have a viariety of tips - some of which are duplicates of the same tip type from different manufacturers this approach is unpractical. I’ll look into this further when the T3A arrives and see if I can do anything about this
Yeah all good choices, though maybe the BC1 isn’t all that useful due to it’s small size, BC2 and up is good though (I think the other larger one is C4 if I remember right which is handy too)
Conical is and always was pretty hopeless and must just be a remnant of an age where that’s the “best” they could machine at the time and for whatever reason it’s stuck around, because it’s brought to a point and because of the angle it’s incapable of any real/decent heat transfer… I mean unless you hold the handle and tip near horizontal (then it will behave more like a J type tip)
I see your point. Let’s see then, anyway i ordered the KSGER, hope it won’t take ages to get the device.
Thanks for the tips about the tips (literally ![]() )
)
Hi there,
received my unit, was so impressed about how tiny this thing is, just amaizing.
Soldering are nice on my side with the stainless steel version i have to say, however, i try to find information about how to remove the mercury sleep switch, i don’t find any information about that and how to add the sleep in handle support, do you have already saw something like that in a thread ?
What impressed me the most is how thin are the wire that goes to the iron, i don’t know what section it would require for 24V 100W, but i have the feeling that the wiring is to thin, it looks like 0.5 mm² or something. I am wondering if i shouldn’t change it for thicker one.
Edit : looks like at 24V, 0.75mm² cable handles 300W for 2 meters cable. We should be good then even with 0.5 mm² i guess.
Good to hear ![]()
Is that the all stainless version or the hybrid carbon fibre & steel version?
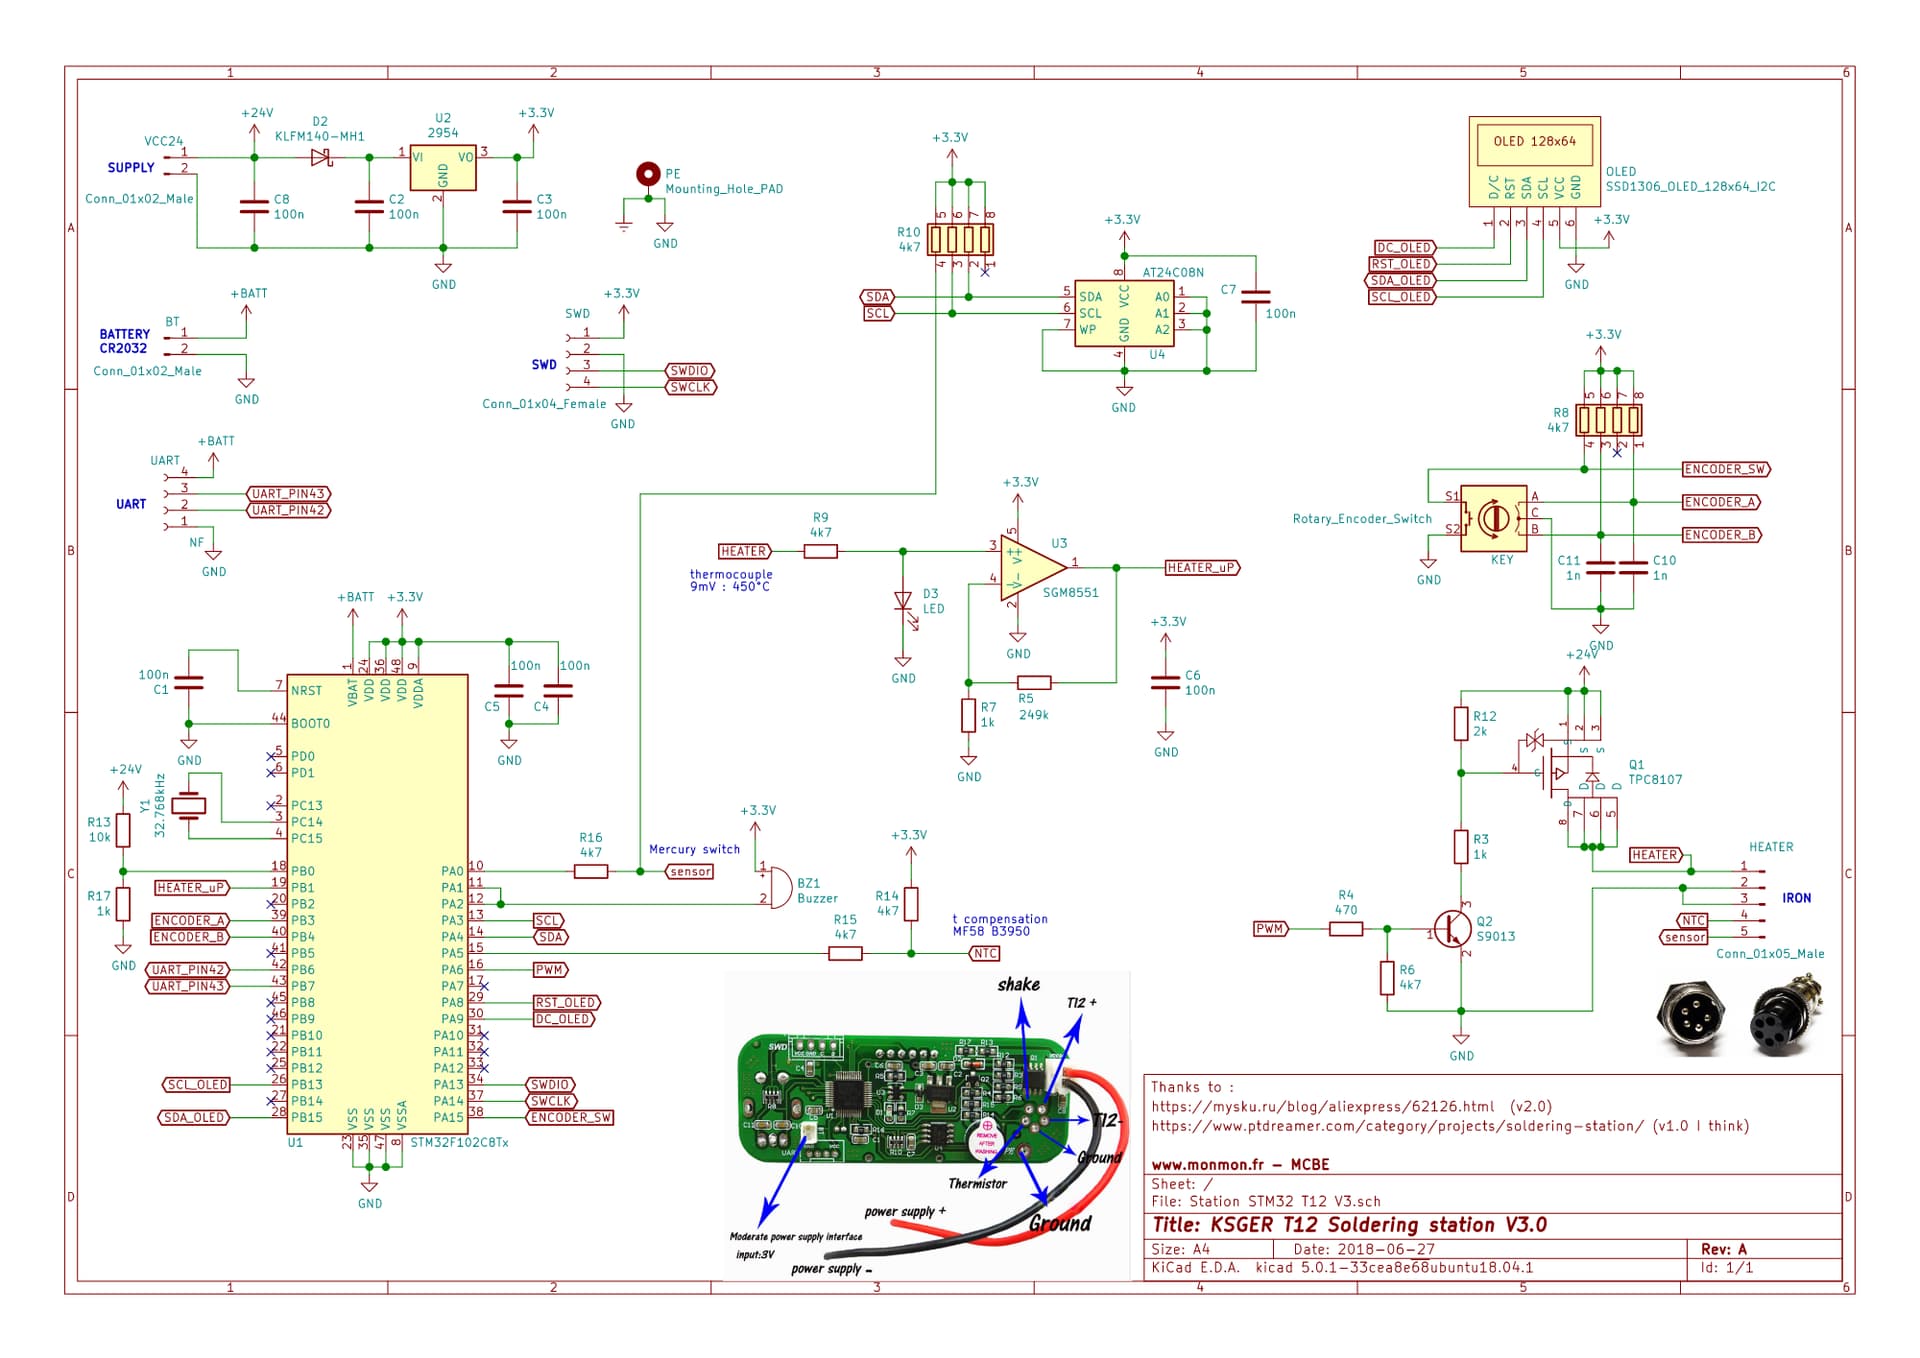
I’ve completely forgot it this is acting as an inline switch or is active low on it’s own conductor… I think if I remember right it’s the latter and you can just cut it out… if I remember right that’s all I did, then (again if I’m remembering right) I rewired the handle and connector and paired this “free” conductor up with the positive or negative - because why not sort of thing. There is full schematics for these KSGER stations which you can find on a GIT which cover the handles/tips so you can get confirmation there
I haven’t got round to doing it myself yet but the pinout for that is also covered in those schematics - though could be you require a specific stock FW for this otherwise you’ll need to install the CFW for this functionality Or maybe it’s mains earth being tied to DC ground which triggers this “switch” in which case it might work whatever the weather…
Yeah, if anything I think the biggest limiting factor - atleast in my aluminium handle (and the plastic variant) is the contact portion of it with only one contact per tip contact point with the earth one being the worst of the three… I’m currently in the process of resolving this by designing and 3D printing a superior contact portion with atleast twice the number of contacts on it but as you can imagine with this being such a small part with increibly fine features there are a few issues to work out… wish I had a resin printer
Hi there, the all stainless version.
Will look to this GIT and check the diagram if i am able to understand it, hopefully ![]()
That contact portion looked a bit weak to me as well, but at least in the stainless steel version, it is thicker than the wire itself.
So according to this Diagram i found, we need to ground the “shake” pin to get it to sleep
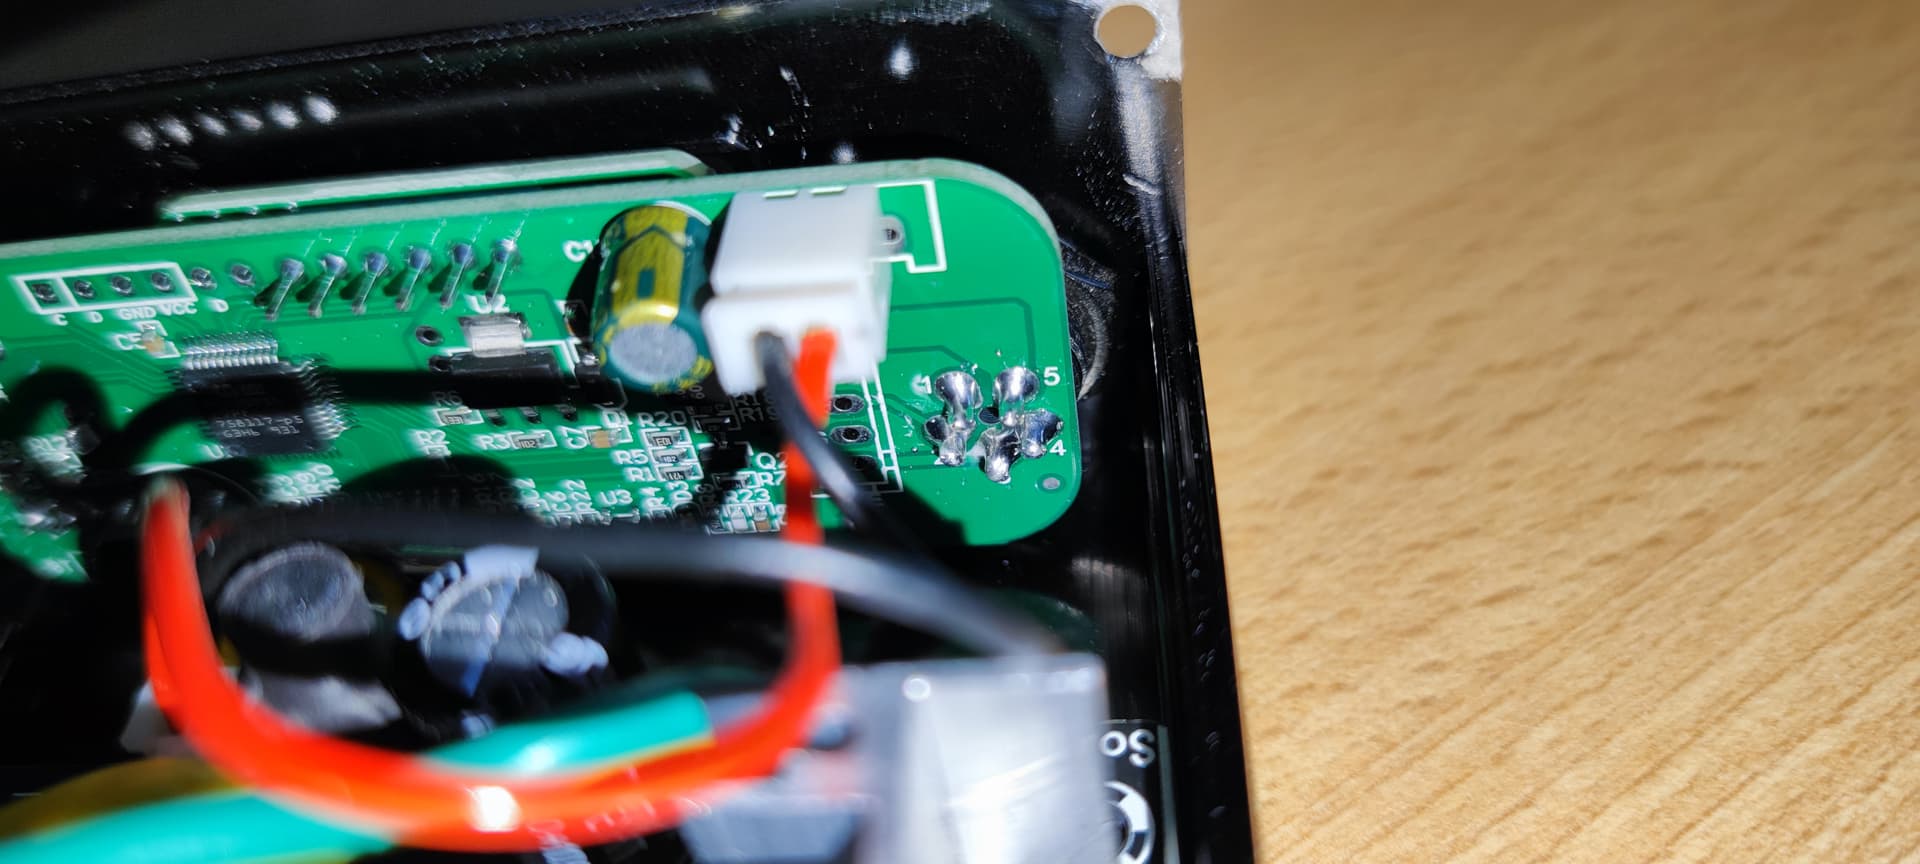
However, what i don’t get is that pin 3 is ground (PE potential earth i believe) and pin 4 is T12- , but they are bridge on my device as you can see here :
I am not sure what best practice is, but i have the impression if i don’t bridge PE and GND then i won’t be able to use the handle as metal to ground the tip and put the iron in sleep mode, right ?
Something like that, where i just interconnect PE and GND :

Not sure that that schematic is a match with your board (atleast if that photo you posted is of your station) and your board looks closer to the V3 variant… I would double check this. If you can take a photo of the board closer to the aviator connector area I expect you’ll have some through hole pads, these are the pads used (at least on the V3.x and more) for the JBC breakout lines.
afaict just glancing over the schematic for the V3 version, the shake line is spulled high to 3v3, when it’s grounded (pulled low) it enables sleep, so unless there is a more elegant way of doing this then your likely going to have to tie this shake line to the cradle and then earth/ground the handle and in by putting your iron in the cadle the outer earthed ring will pull the shake line low activating sleep… though take that all with a pinch of salt I haven’t fully looked into this
I could have swore the way JBC was doing it on their stations was tying DC negative to the cradle and tying earth to the handle ring and when the two close trigger sleep… though maybe I’m remembering wrong… might be worth going over the EEVBlog forum for the CFW as I think the manner in which people have wired up the JBC handle for the KSGER stations might offer you more clarification/confirmation on this.
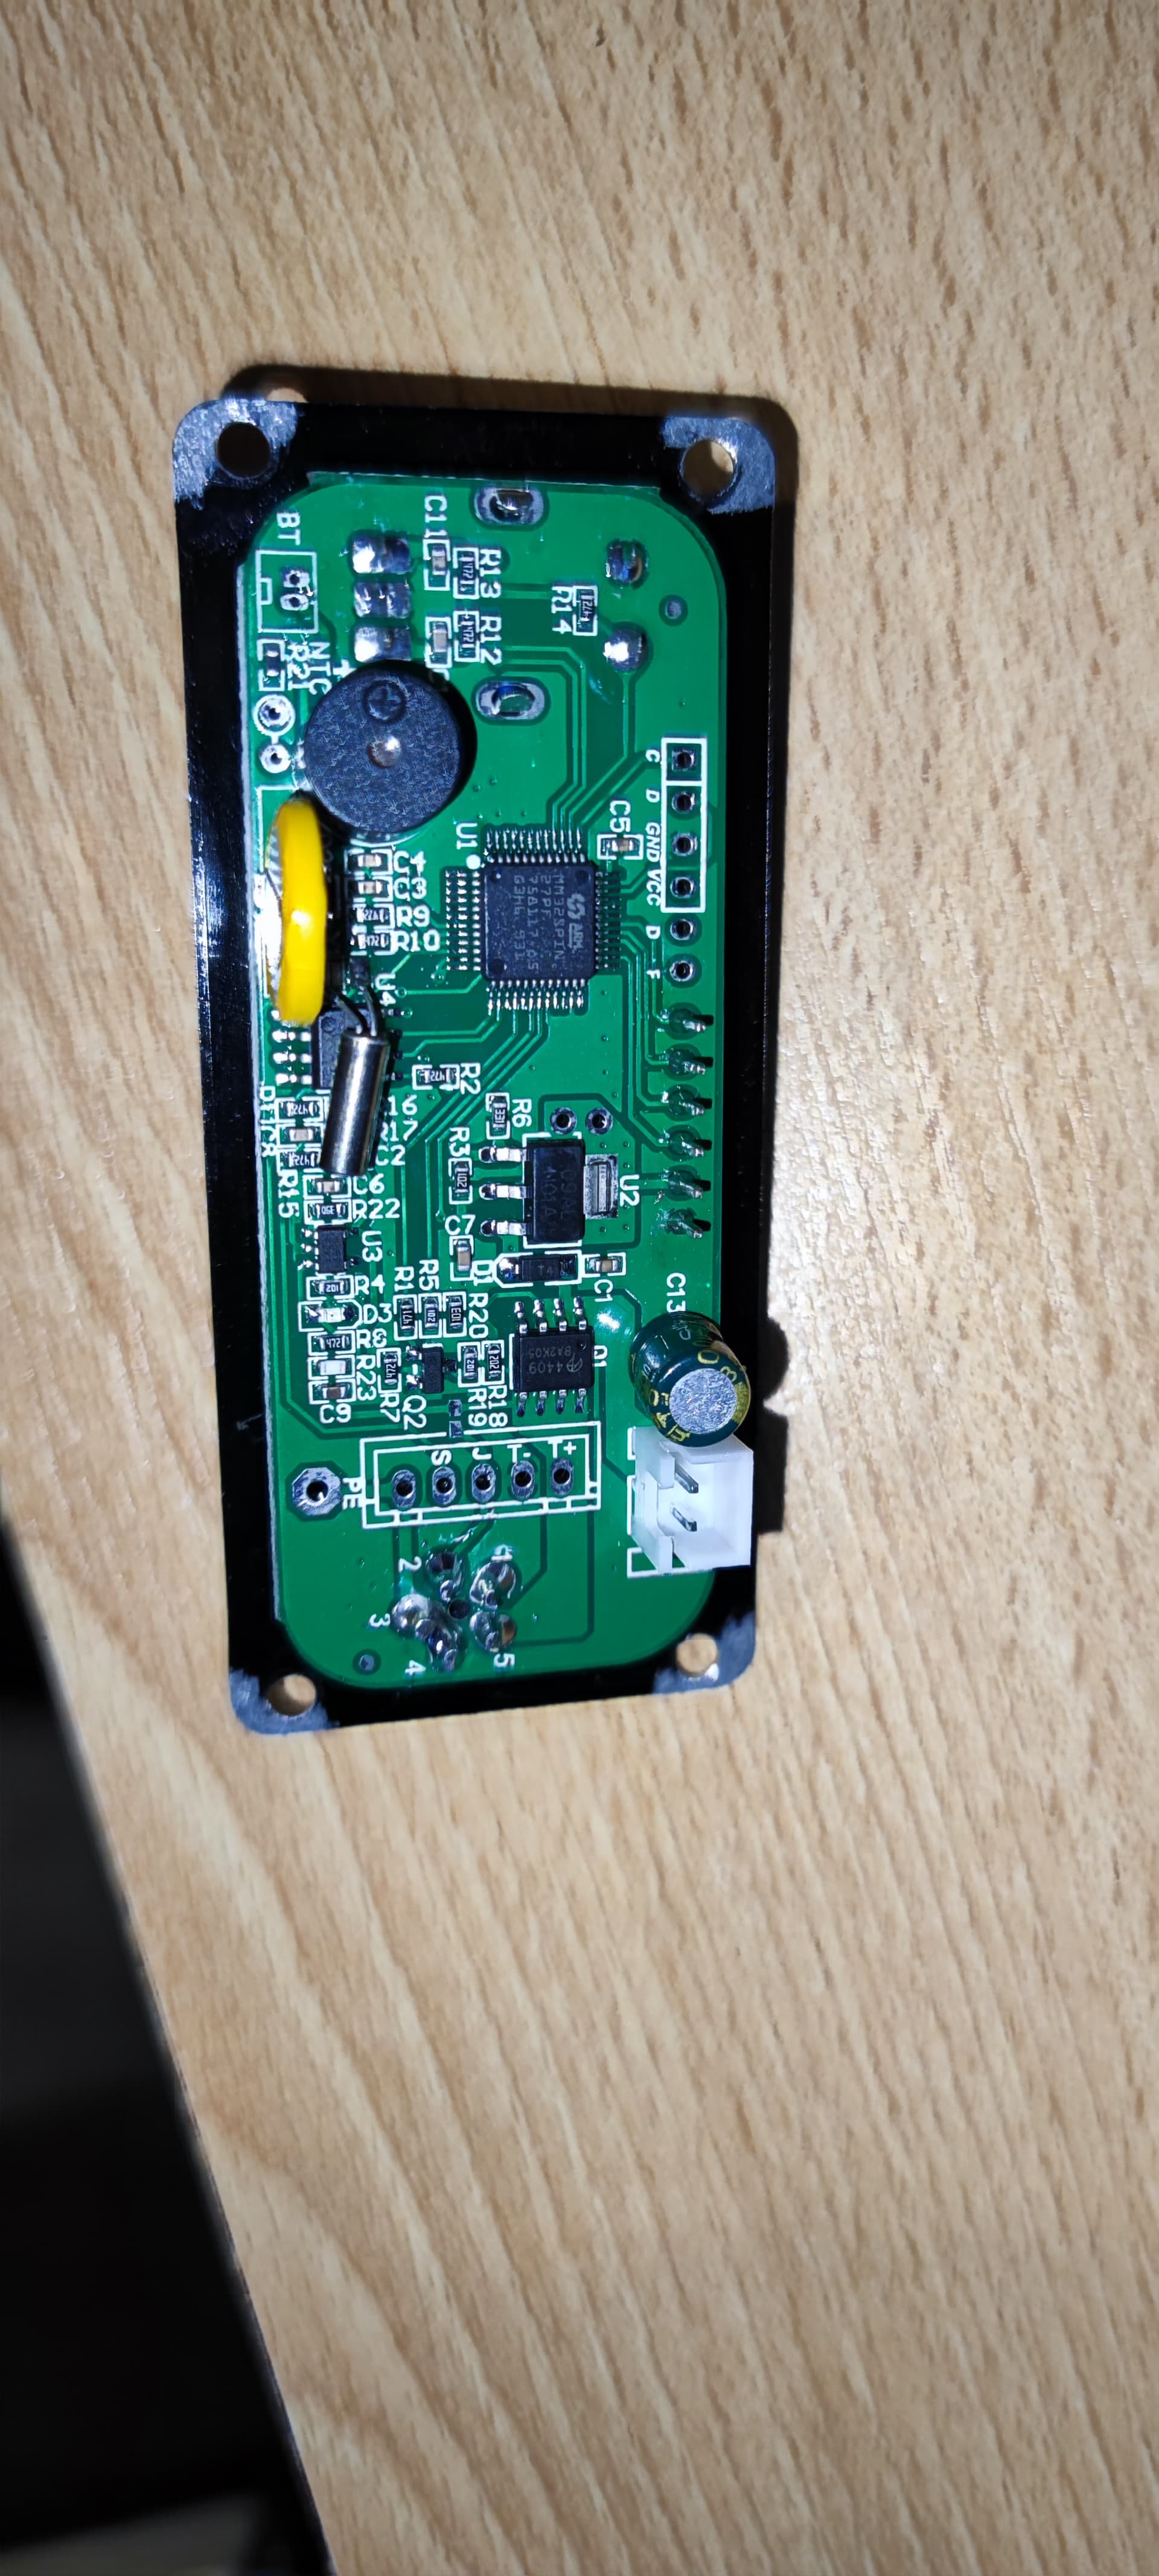
Well, the point is that my board doesn’t match any of the pictures from the github repo. Here is a better picture to point that out.
Yeah on quick glance your board looks to be either very similar or identical (in terms of parts or arrangement) to the V3 boards (mine is the black version) and seems to use what is probably a pin compatiable STM32 cotex M0 clone - so you might just want to buzz out a few of those through hole pads to their destitnations to verify while comparing to the schematic, afaict T+/T- would be the switchmode 24V supply driven by the fet (again I’d check this, this is just off the top of my head) “S” would likely be sleep/shake and “J” is likely JBC handle functionality with the unpopulatoed bridge resistor.
Waiting for my ST-link which should arrive today. I tried already to use the station with the original firmware, but run into a lot of error messages no matter which tip i was using. It warms up the tip, but i am running in the impression that it never arrives to the temperature i am asking for, or at least, it arrives when the tip isn’t pressed against something, because i can’t melt the solder on pads. I have to check what’s wrong, but when i insert the tip, i don’t feel that much resistance, i am wondering if the connection socket isn’t the issue. Or it is the same as a user from eevblog had, same symptoms, but his problem was a “grounding loop”, sorry for my ignorance, but i don’t know what that is ? And sadly, i can’t find this post anymore even in my history, damn.
By the way, what is the stand you are using ? The one i bought is really a disaster, the tip weights too much to stay correctly in (stainless not aluminum). I bought that one : KSGER DIY T12 Zinc alloy Holder Soldering Iron FX9501 Handle Frame OLED Station Stand For Stainless Steel Handle Silicone Pad|Electric Soldering Irons| - AliExpress
Could just be you got a dodgy stock FW on your station. The other possibility is you need to let the tips degass (this is more toublesome on extra cheap clone tips) you’d do this by just setting it to 300C and leaving the tip on for 20 mins or so, hopefully afterwards and following calibration the tip will get to temp and you won’t get those error messages anymore. Third option is the contact tab/s aren’t making decent connection with the tip contacts or one of the joints to the contacts are bad
.
Hmm I don’t know how a grounding loop issue could cause the symptoms your seeing ![]()
I’m just using one which came with an old CSI soldering station, seems to fit alright (but not perfect)
I haven’t checked but does the handles not fit in the Aoyue cradle? or can you modify it if it doesn’t fit? if I remember right the stand from that was pretty weighty