Talking about soldering tip

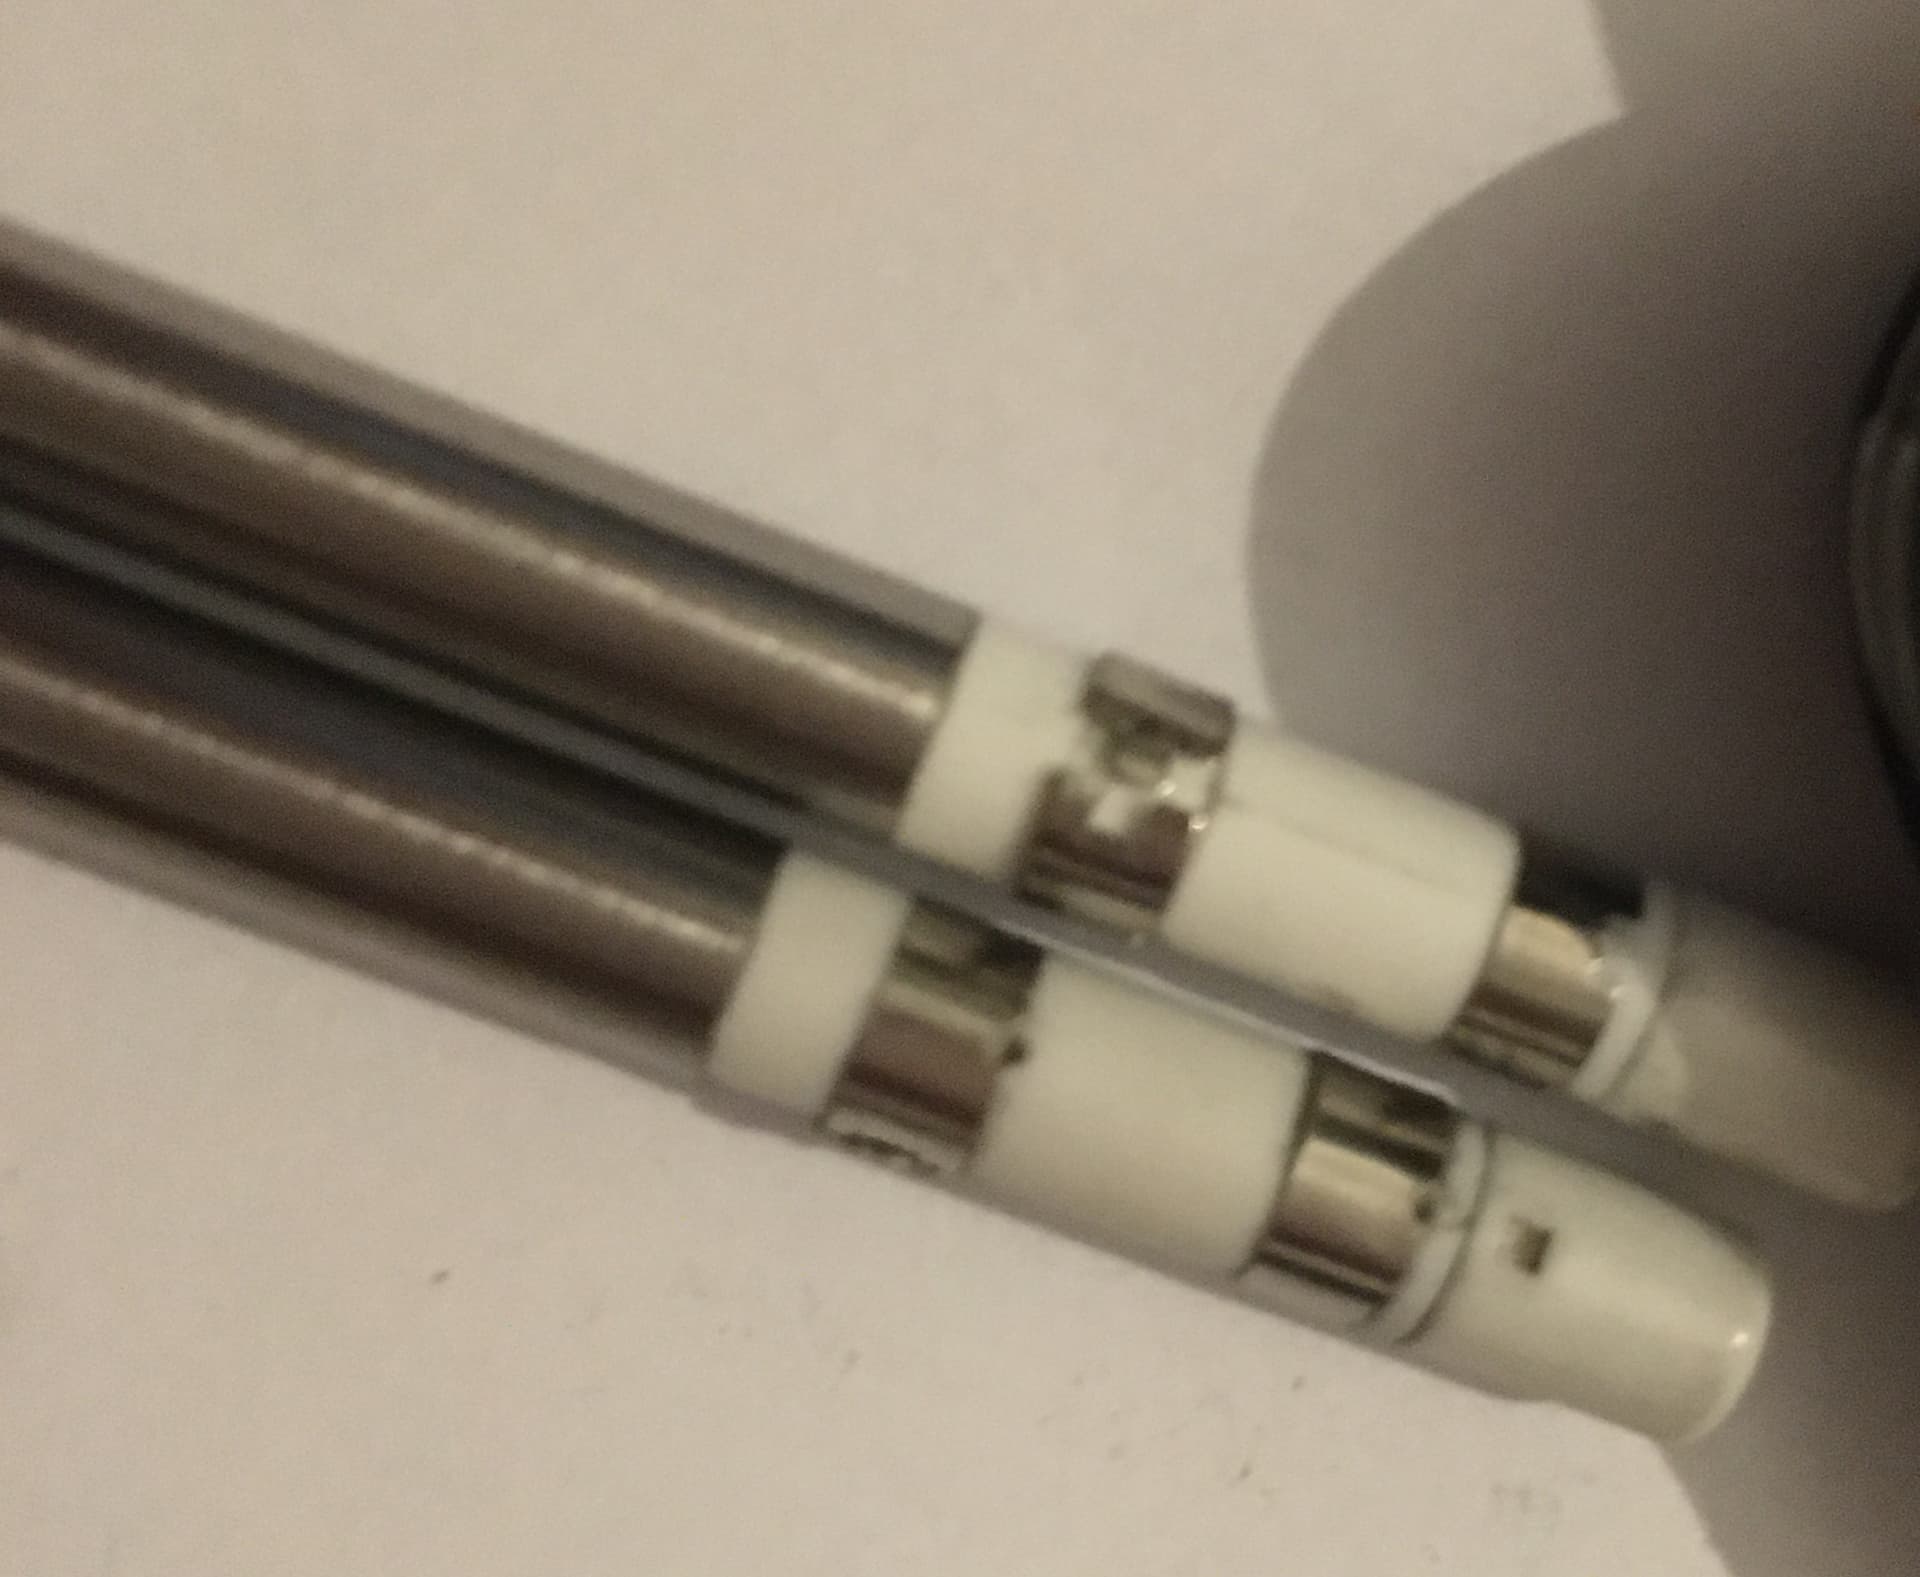
One thing I did completely forget to mention, on the aluminium handle the internal silicone sleeve closest to the grip end is a very tight fit for a few months until it wears out a little, this can make it pretty hard to gauge if the tips are fully inserted to begin with. When the tips all the way home the scond crimp ring on the tips shaft should be just about insider the silicone ID, if your stuggling just put a bit of IPA on the tips shaft which will act as a temporary lubricant

So if your steel handle uses this same silicone sleeve on the ID you might want to check this.

btw that T3A station showed up the otherday, quality of the station itself seems excellent, got the flimsy stand instead of the bulky one which seems to work alright and supports the handle fine if a tips inserted otherwise without a tip itā€™s off balance and the handle will fall out. I opted for the T12 handle variant for the reasons mentioned previously
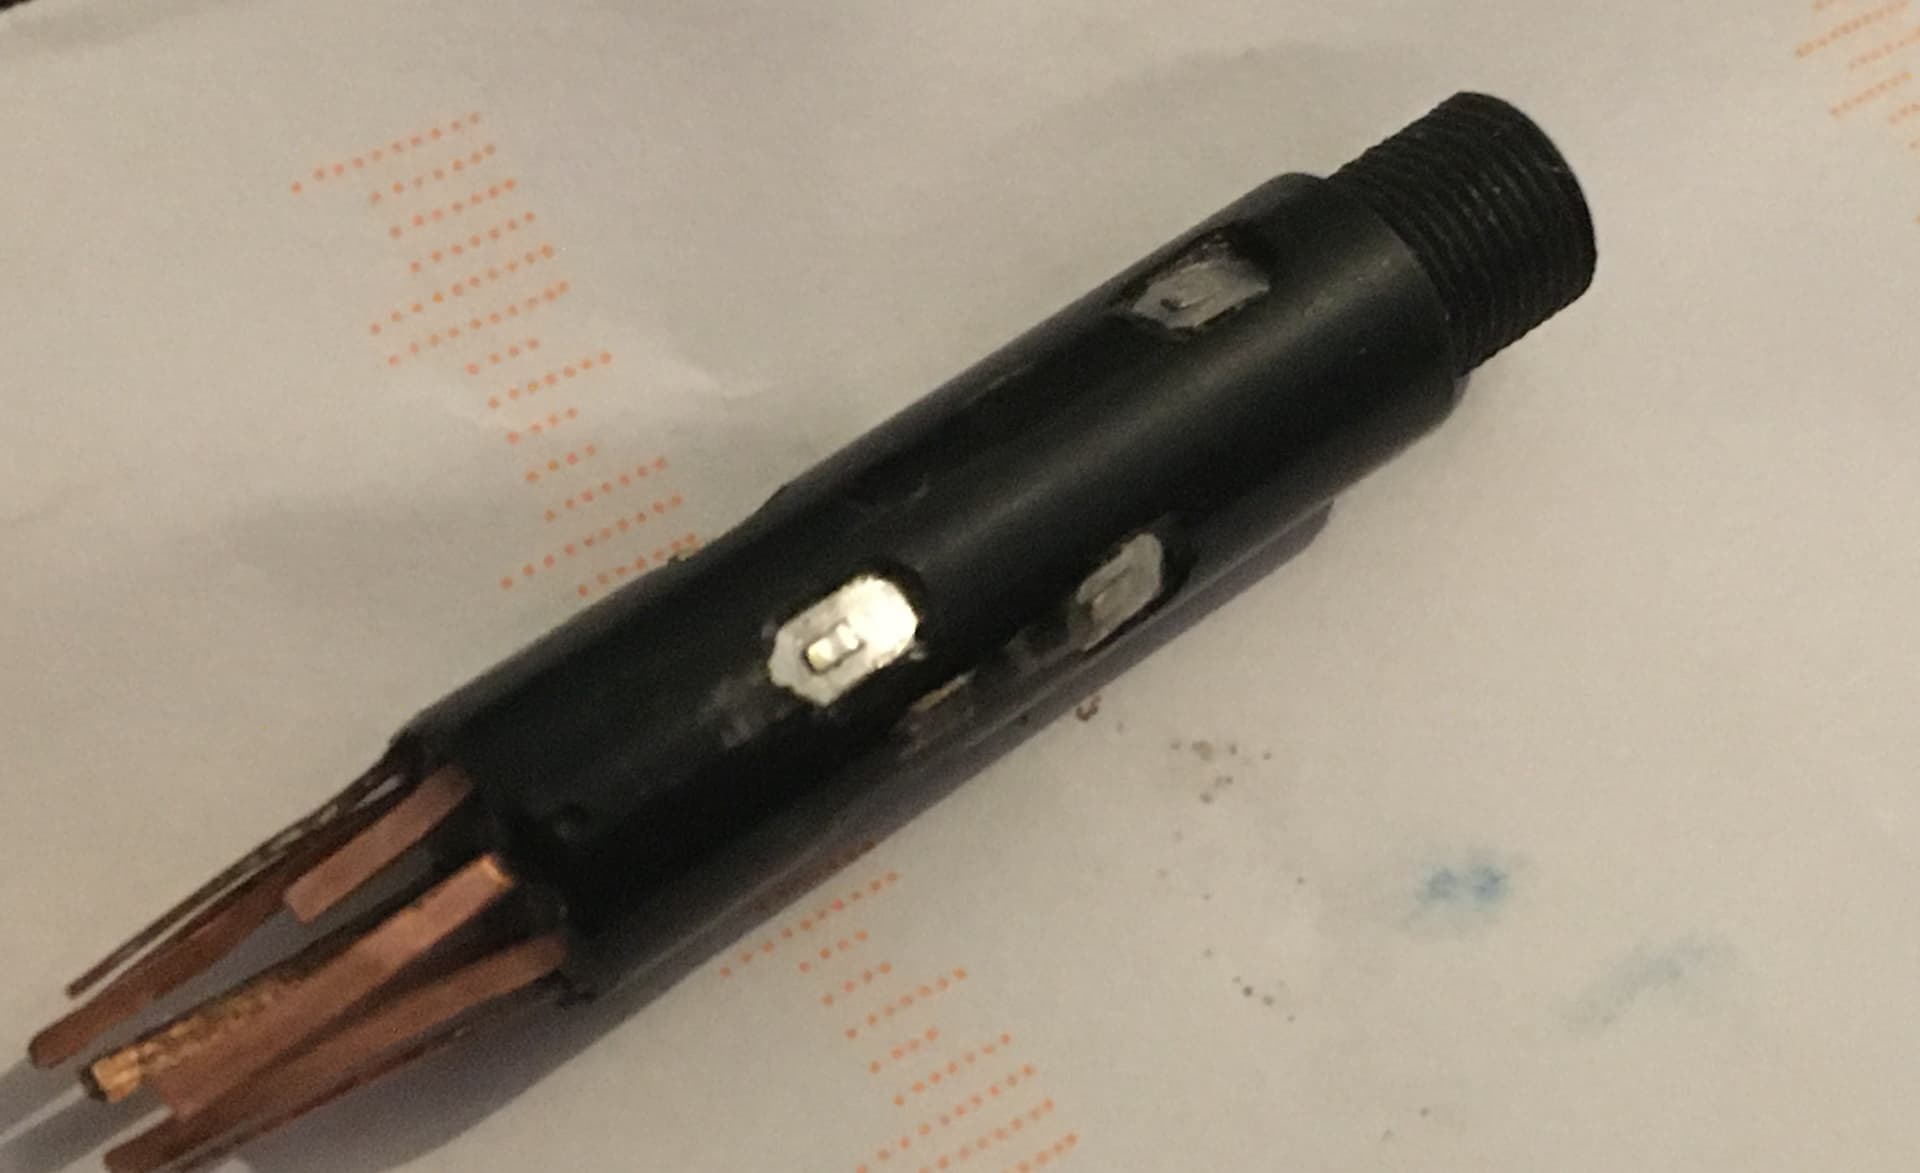
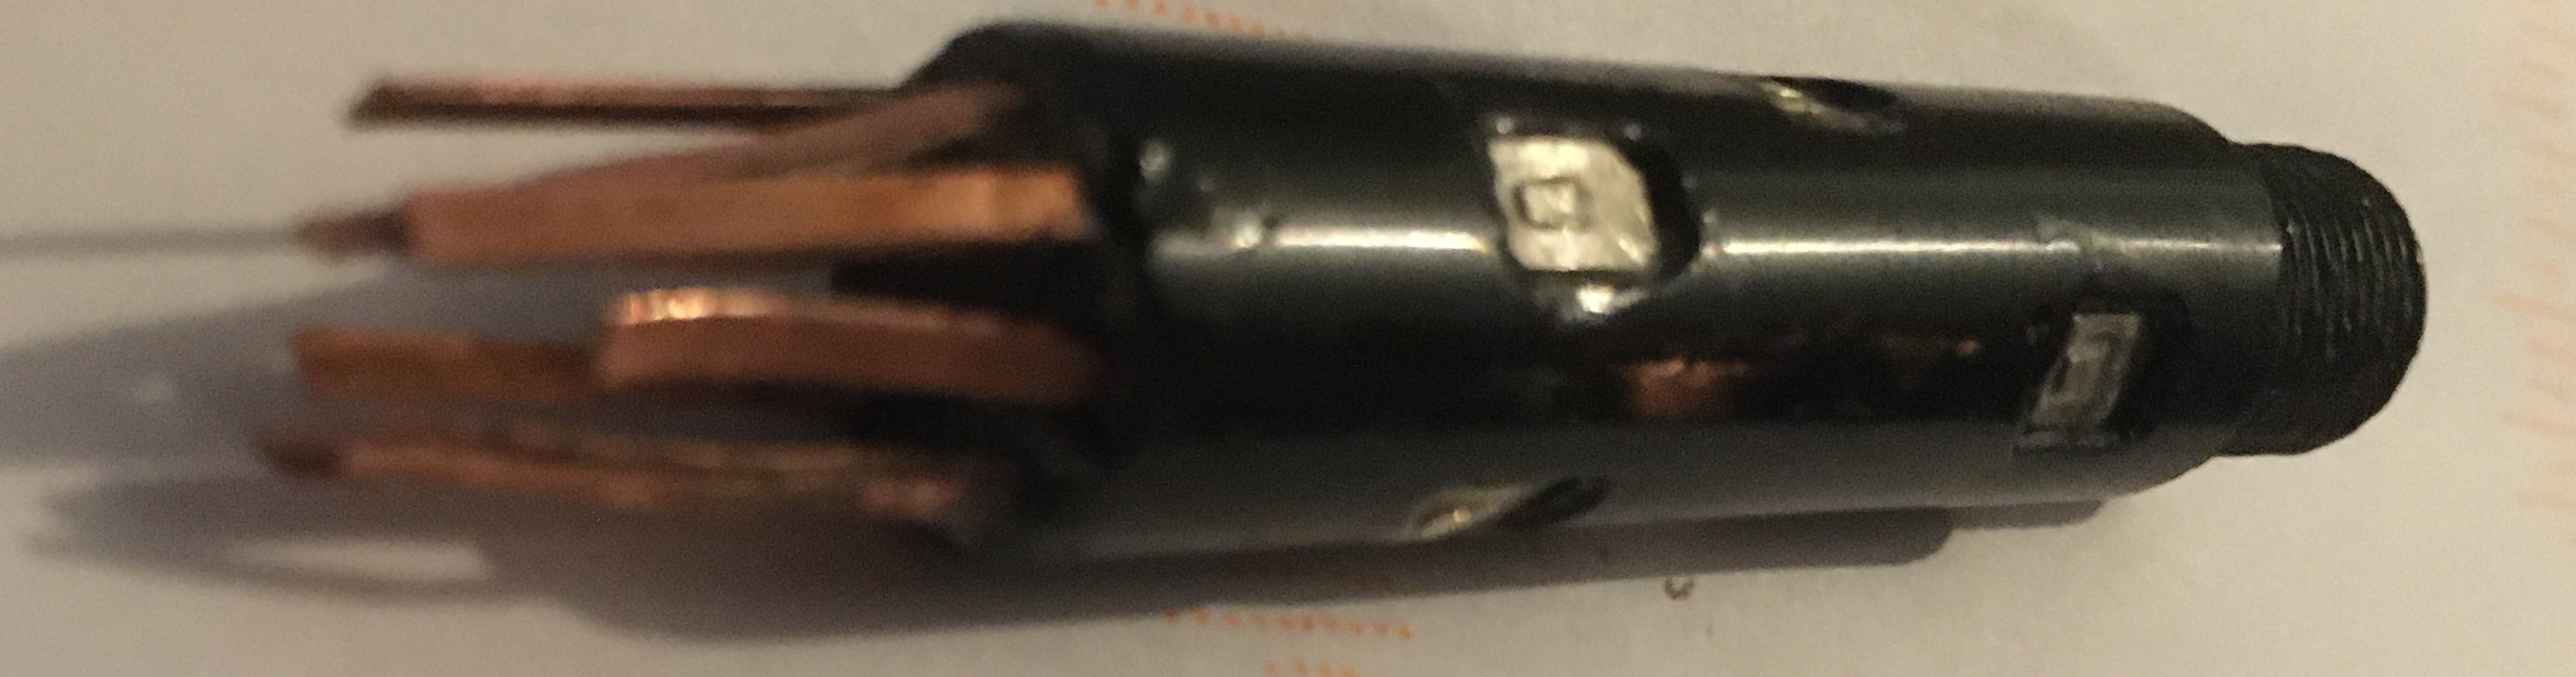
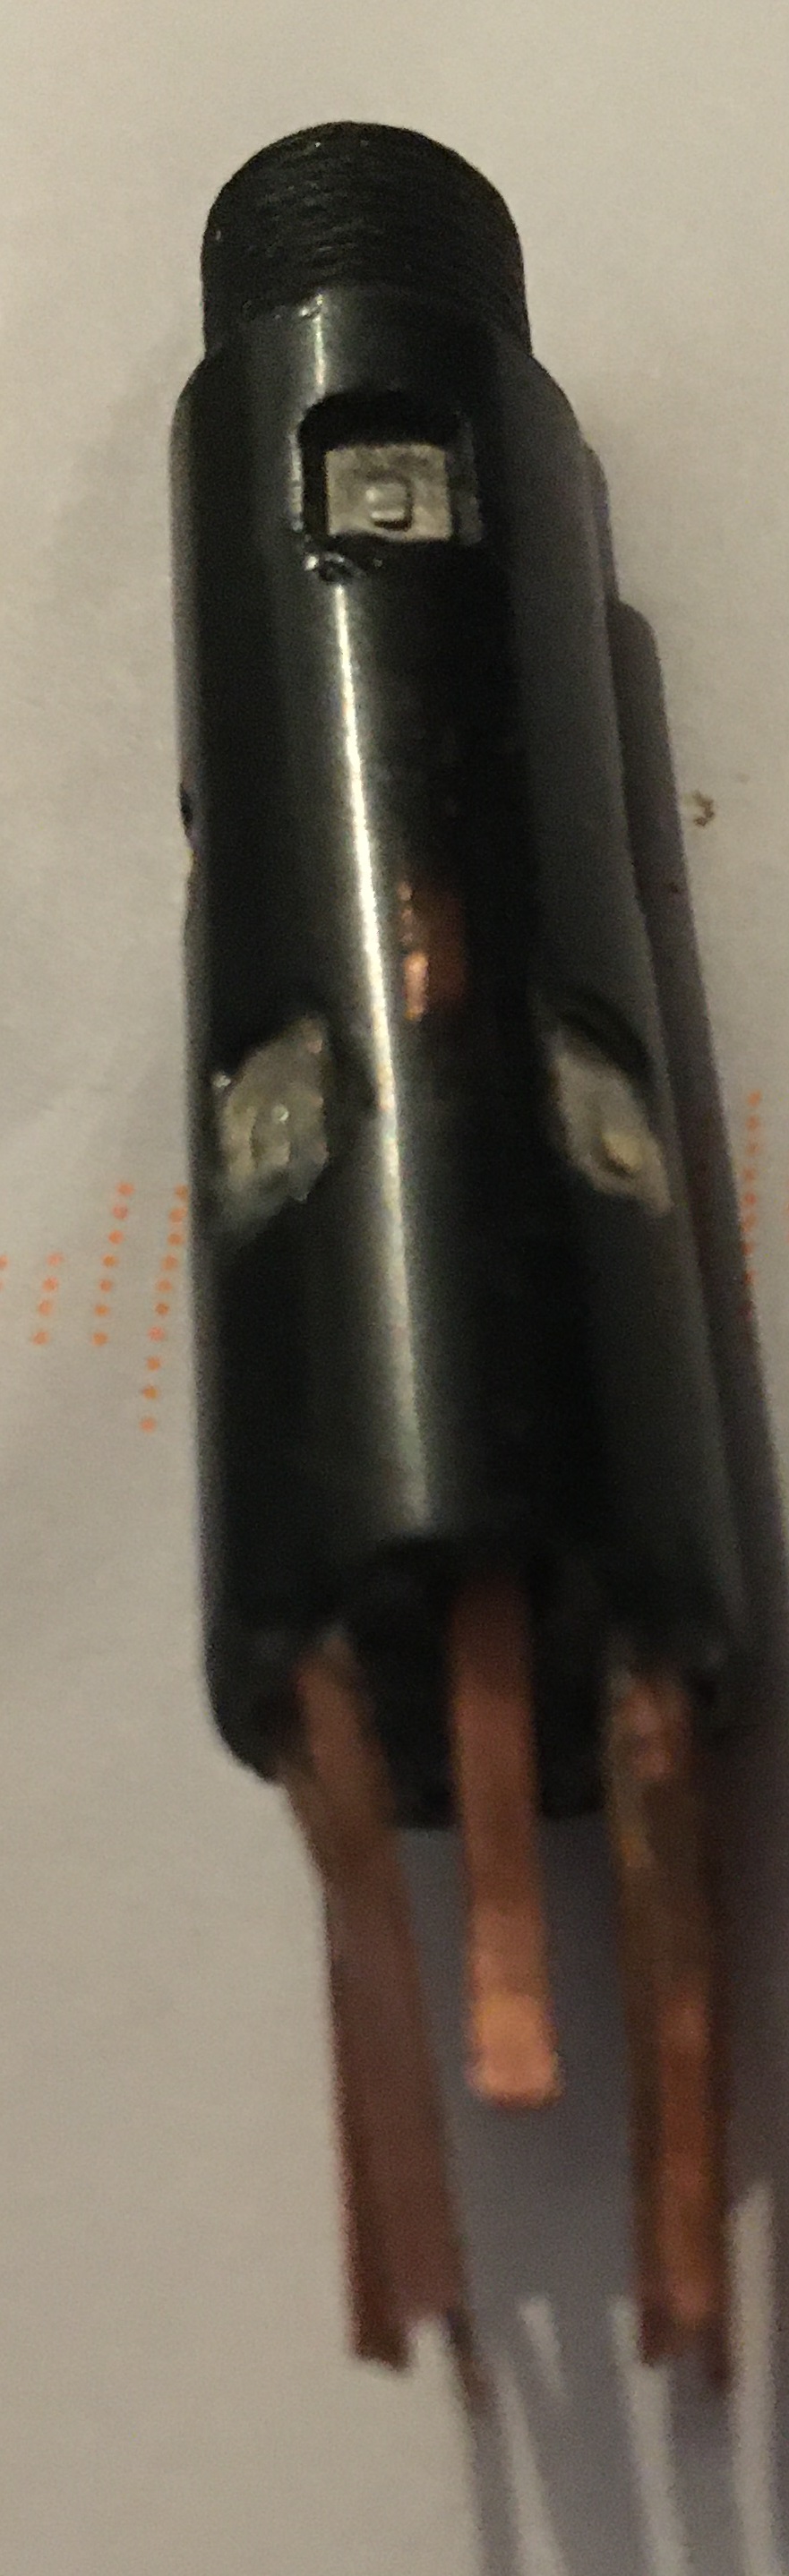
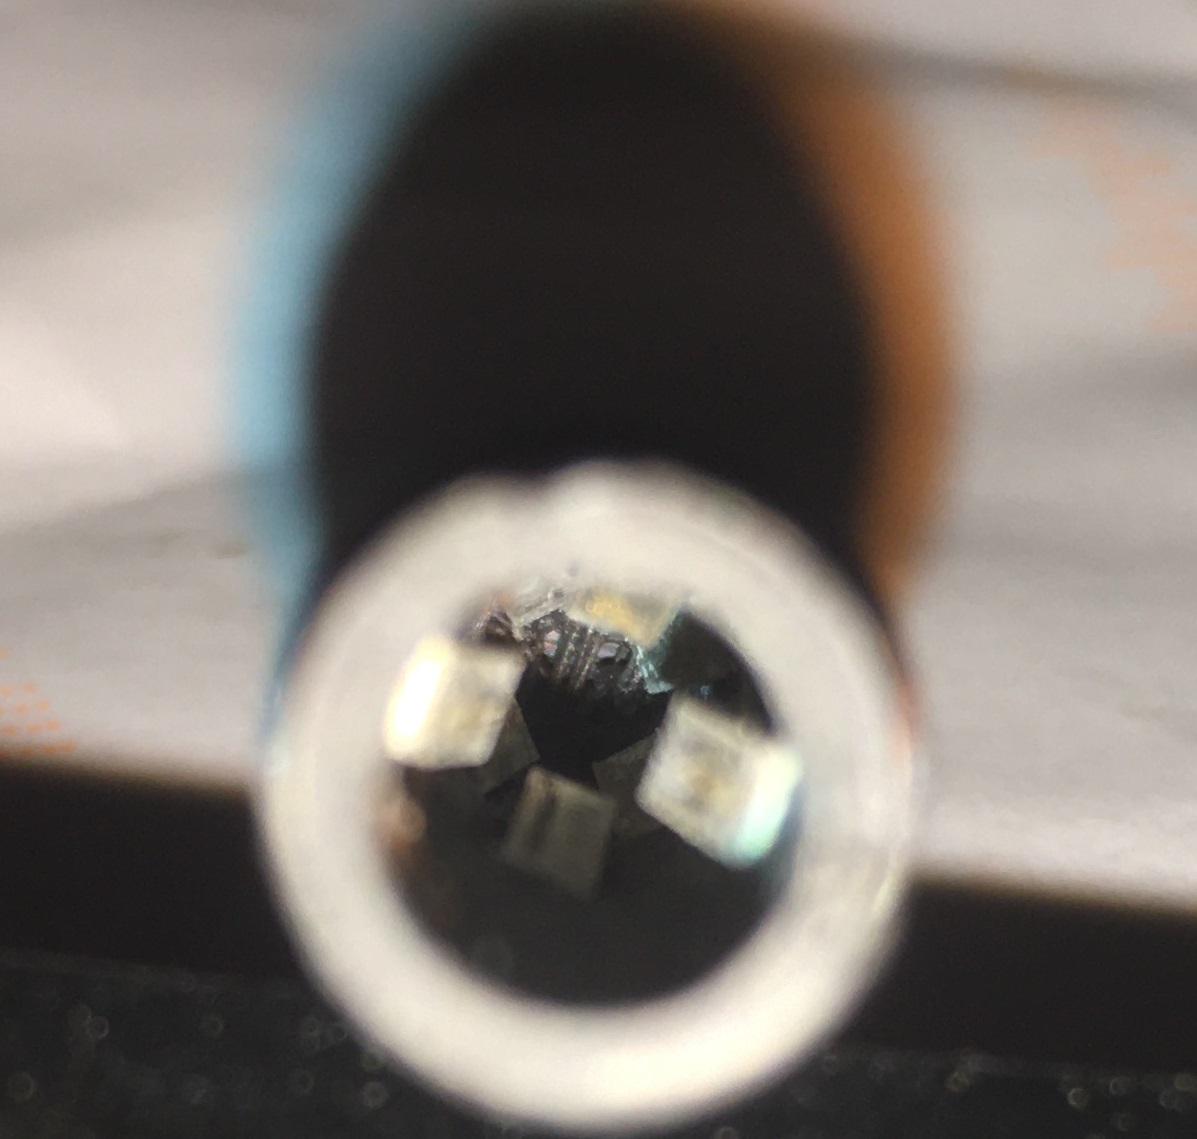
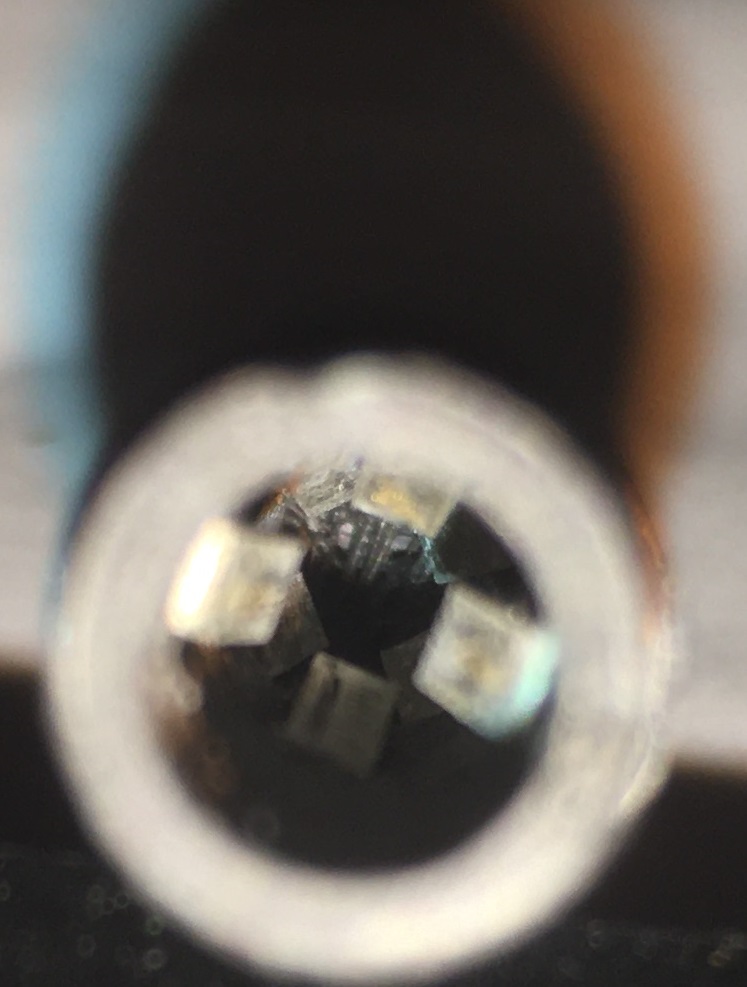
Handle quality seems nice, canā€™t tell if itā€™s steel or aluminium but the tip to grip ratio is really poor with almost twice the stickout compared to the KSGER handle/s (Iā€™ll modify this by fitting a 3D extension piece in the middle if I can) They seem to be using PTFE/Teflon tubing on the ID closest to the grip instead of silicone which makes tip insertion somewhat easier but thiere is more play on the tip vs the silicone used in the Ksger version, the contact portion inside is the same crappy design with single contacts corresponding to each of the T12 tip contacts the same as what Hakko, Ksger, Quicko etc use and the terrible earth contact. Even though they have the fly lead (which is nice silicone cable btw) to go to the cradle for sleep sensing, they have installed the mercury ā€œshakeā€ switch inside their handle tooā€¦ not really sure why theyā€™ve done that unless itā€™s optional in the menu or something.

Anyway, Iā€™ll plug it in at some point and give it a test but tbh I only bought it out of curiosity (and for a couple of other reasons) and canā€™t really see myself using it as my regular station without modifications of the installed FW

Yep, i checked that internal silicone sleeve, all good, the length was correct. Basically i adjusted the connections inside the socket, placed a little drop of solder on top at the ring, and now i donā€™t have error anymore. I let the BC01 tip run for 30mins as suggested, it is better, but still if i try to drag solder from a QFN chip, the solder is hard to melt even at 420Ā°C with leaded solder used on that chip.

I need to investigate that with the thermometer when i will receive it i guess.
Regarding the Aoyue stand, the hole is way too big, the handle falls in it, but you are right that it would be perfect if i modify it. I have to think about something, will keep you posted.

By the way, my unit is making creepy beep while turned off every 5-10mins. Since I am working in my sonā€™s bedroom (it is my old room where I have a desk) I have to unplug it and put it downstairs so that he can sleep lol

Thanks for your feedback about the T3A, looks nice alternative overall, if something can be made around firmware.

I guess your talking about the top contact on the threaded section? that would be the earth contact, if thatā€™s the case not really sure why that would prevent the tip from getting up to temp as these tips will work even without that connection (?)

My guess would be the same that the tip is not at the reported temps, you can get them pretty close with a standard welded end K-type thermocouple with a bit of effort, that being said a BC1 tip is pretty fine and has very little surface area to work with so that may be your problem too

Yeah maybe a washer at a closer size epoxied on will solve it

Think mine does that when I turn it off at the mains switch at the back, just caps holding a charge I think. As for noises when the unit is on you can actually here the switching noise, almost sounds like a clock ticking, in the CFW I think thereā€™s an option to change the switching frequency which might avoid this if it bothers you

may as well post this public, maybe someone has some suggestions or better part alternatives, this is my version of the contact section for the soldering iron handle, bear in mind this is a prototype and is really pushing the limits of what I can do on my FDM printer, this is ABS ad there are few issues Iā€™ll talke about, but the positives are, it has basically zero contact resistance, the fit feels nice with a positive sounding click when you insert a tip


Itā€™s just using standard JST style spring contacts, x8 in total, forget what they are specifically but theyā€™re the contacts which go to the JST connector for the Heatbed of my 3D printer and Iā€™ve just crimped in some copper strips.

The issue, Iā€™m limited by my printer and I need to make the lips which the contacts slip into thinner and idealy square, as is they follow the radius which means they are comressing a hair too much when the tips inserted which leads to this issue

breaking the tips contacts crimp/weld on the upper contacts after a lot of insertions, I either need a resin printer to increase the tolerances and allow for finer features or I need to move to the next size down of JST style contacts, Ideally contacts which have a longer stalks (if they exist) which will negate the need for having to crimp in the copper strips/tabs

Aside from the obvious issue these are superior in every way to the way Hakko and Ksger are doing itā€¦ just needs a bit of workd :smiley:

I am talking about that, yes, but i didnā€™t mean that the connection is solving the problem but more the fact that know the tip holds better in place in the socket, it is not loose anymore and for now, with the only tip i tried, it is working good. I will continue the test with other tips and let you know.

I have in mind to use some tubes of different diameter, i need to check with my father but i think i will go that way.

In this case it does it 5 to 10 time with some minutes between, doesnā€™t look like capacitor discharging .

[quote="Severence, post:45, topic:7120"]
may as well post this public, maybe someone has some suggestions or better part alternatives, this is my version of the contact section for the soldering iron handle, bear in mind this is a prototype and is really pushing the limits of what I can do on my FDM printer, this is ABS ad there are few issues Iā€™ll talke about, but the positives are, it has basically zero contact resistance, the fit feels nice with a positive sounding click when you insert a tip
[/quote]

Waow man, this looks amazing. I am not sure how to improve it, but donā€™t you think 2 contacts per stage opposite to each other with 120Ā° shift in between stage would make it ? That would hold the tip perfectly by having a perfect share of pressure around the tip and minimize this pressure effect you have on the very last stage ?

Maybe the reported temp is the issue, because but with the Aoyue soldering iron and the finest tip i had, i never had any trouble to melt solder of a QFN chip to rework them, especially when it was leaded one.

Hmm :thinking: sounds to me that doing this has atered the aignments slightly which has in tiurn changed the alignment slightly at the lower two contacts. Maybe try putting a bit of preload on the spring contacts by pushing them in slightly, careful not to push them in too far as the tip can catch them on the way in and permanently deform them.

You can also test the contact and wire resistance at the same time, first measure the resistance of the tips lower two contacts which will be around 8 ohms, note your reading, then insert the tip and put your probes into the aviator connector at the corresponding pins which go to these two lower contacts, you should hopefullly get a stable reading pretty close to the one you noted before, try giving the wire a wiggle if you see the value changing or increasing then might indicate a cable issue, then try spinning the tip, if the value isnā€™t stable or increases then that would indiicate bad contact netween the spring contact/s and tip

Is it a beeping noise? maybe this is relating to the contact issues above, if you can turn the buzzer off completely in the FW does it stop doing this?

My logic was as earth and ground are going to be tied together this end, it would ultimately be x4 contacts, so in order to keep things even I went for x4 contacts for the positive also, though your right two would be plenty electrically speaking. Funnily enough the issue isnā€™t where youā€™d think itā€™d be - where it in theory would have the most pressure but rather on the upper contact ring where there there would be less pressure and only two contacts. One of the reasons for this issue is, I have a wall thickness of <0.4mm which these crimped contacts sit on, the lower x4 slots during the print are closest to the heat bed and during print those four 0.4mm walls being so thin are inclined to shrink and lean inwards until the rest of the model can tie eveything back together further up, it will be a bit hard to tell from the images but itā€™s basically allowed the lower x4 contacts probably about 0.2mm at the most more clearance vs the others which is just enough it seems on each to not cause issues, as is on the upper contacts Iā€™m compressing the springs maybe <0.1mm beyond their full range of travel due to model issues.

Iā€™m already kind of pushing it with this size of contact, I reckon if I could have better print tolerances this size of JST contacts would be perfect but taking into account printing issues and errors I think realistcally on this printer Iā€™m going to have to move to the next size down of contacts for a more reliable result, Iā€™ll see if I can find them and update :slight_smile:

Thanks for your input though :+1:

Yeah, maybe check that the Aoyue isnā€™t doing the opposite too on the invers, ie: reporting 300C and actually being 420C

Done, and this is now perfect. I have a nice click when inserting the pin, resistance through the wire up until the aviator plug looks just mint now, exactly the same resistance value with direct measurement and the wire.

It is a brief beep, coming from the internal speaker. Turning it off doesnā€™t fix the issue, and believe it or not, i unplugged the device from 230V, no more beep, i plugged the cable back without powering on the device, beep restarted. I would say it happens every 5 to 10 minutes. Nothing shown on the screen, just this beep, by time to time. I tried then to remove the wire between PE and - GND, and only connect PE to the third contact pin that is for grounding the tip. It is a bit better now, it happens less often, but sitll happens. I guess something to do with the battery and maybe some leak from the primary capacitor through the transformer ? I donā€™t know.

My pleasure, i see your point, then probably the smaller version will fit, and as there will be 4 of them, you are good about connectivity efficiency i guess.

Sure, the thermometer is ordered, letā€™s see when it comes.

Good stuff, glad to hear it :+1:

I would wait until you can try the CFW as this might be a software related issue, if that doesnā€™t fix it weā€™ll delve into potential hardware related issues, though I would be surprised as it looks fundamentally the same hardware to all the other Ksger revisions.

So the current contacts Iā€™m using are a molex KK 3.96mm 0.156" ptch,. Hereā€™s the potential candidates for alternatives, just using RS as molex site has terrible search function and itā€™s impossible to find anything and RS has decent pics.

Molex seems to be the only manufacturer on RS (afaict) of this springy style of connector, there are a few other manufacturers making this KK ā€œcat earā€ style elsewhere, this mini series above seems like it might be really good as they also seem to employ an indent on the contact surface which may lead to yet more lower contact resistance on round surfaces, the contact seem smallerā€¦ though itā€™s very hard to tell based on the drawings what the hieght of the spring is in full compression which is the info I need really. Stll not perfect though, best would be if the shaft was longer straight out of the gate to avoud the need for crimping in copper terminals

I have seen such connectors in cars as well, for taillights. That might be interesting to look at. Check the brand ā€œLittlefuseā€, i am sure they are based in UK even, it was, when my father bought the kit of connectors from them, a super quality.

Thanks Iā€™ll check out littlefuses offerings and see if anything fits the bill

btw I checked the voltage on the line going to the cradle on the T3A, itā€™s 4.5V so theyā€™re likely doing it with some dedicated I/O to the MCU using a weak pullup to a 5V rail most likely, but funadamentally itā€™s the same as the shake line used on the Ksger, so youā€™d just make a jack on the station (away from the mains) and connect the shake line upto the jack and then from the jack to the cradle, then ensure your handle is earthed/grounded (you may have to solder or tap a fly lead onto it if it isnā€™t already and this should work fine.

One thing to consider, if the shake line is directly fed into the MCU (even via a resistor) your going to want to look over the schematics and the board for some sort of ESD protection, say for example you zapped the cradle somehow you could potentially fry the MCUā€¦ Iā€™d be interested to go over the T3A board also (given how similar it is to the Ksger) and see if theyā€™re using any such protection tooā€¦ I doubt they are

I will order some jack connector and check how to connect all that stuff. But first i need a better stand, the one i have makes me nervous, the handle doesnā€™t stay in place it is a pain in the neck. I tried another tip today, the J02, much much better to remove bridge on QFN chip than the JL02. I think i can work with that one, the solder stays almost at the edge of the tip, i was able to rework my joints around P13 easily enough, considering that i donā€™t have much experience with that soldering iron.
However, the station still beeps :rofl: even without the PE connected to the negative. Not sure, will see with the CFW but i have the feeling it is hardware related.